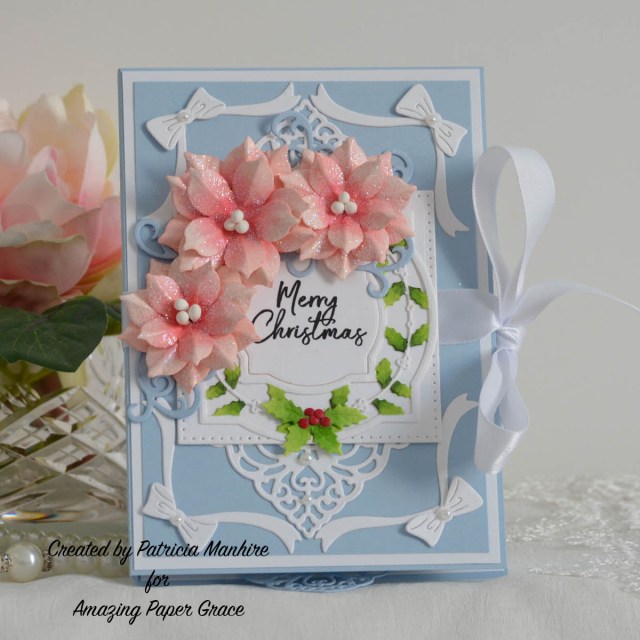
This holiday collection allows you to make a Cascading Card inside of a Shadowbox Frame, mounted on a card base or unmounted. Don’t worry, these motifs make great conventional cards as well.
We listened to you, and we heard loud and clear that our community loves dynamic and purposeful cards. In previous collections we gave you 3D Vignettes in a Christmas way. Now we’ve found a way to merge a Collection favorite, Shadowbox Vignettes, in a new format.
Becca Feeken with Amazing Paper Grace sent me these lovely dies to start my Christmas Card making!
What’s a Christmas Cascade? Amazing Paper Grace takes a spin on Christmas by building a new collection around something you already have in your stash – the Shadowbox Dies. Becca loves building upon what you already have and making it new again.
Christmas Cascade is made up of sets of 3″ motif dies where each set has 3 motifs. That’s enough for each leaf of your waterfall but again, you could make them the center of your A2 or your A7 card. These, paired with the Waterfall base will allow you to use any dies to make your next Waterfall Card.
The Inspiration behind Christmas Cascade
The inspiration for Christmas Cascade was to produce a motif to use from an enclosure card all the way up to full A7 card with background layers. This “cardlet” size has been a favorite in our stash because the elements can easily transition into all of the Amazing Paper Grace Collections and to all size cards. Hint: This is not the last time you will see “Cardlets”
Welcome back and today I thought I would share a card made during our lockdown. One of my favourite stamp sets from Altenew is the Beautiful Day set and it is perfect combined with the Beautiful Heart stamp set.
This card is sitting on my desk to keep me inspired on my papercrafting journey.
To make this card I have created a 4 1/4″ x 5 1/2″ card base from white cardstock. I have cut a piece of pearlescent vellum from Lawn Fawn 4 1/4″ x 5 1/2″ and embossed it with the Tufted embossing folder from Stampin Up and adhered it to the front of the card. I have then cut the edge using the Lawn Fawn Reversed Stitched Rectangle die and adhere to the card front.
I have stamped the images from the Beautiful Day and Beautiful Heart stamp sets with Ranger Archival Jet Black ink on Iris cardstock. I have then coloured the images with Zig Clean Colour Brush markers and die cut with the coordinating dies. I played around with the images until I found a pleasing arrangement and then adhere to the front of the card.
To finish the card I have stamped the image from the Altenew Best Sentiments stamp set in Jet Black ink on white cardstock using the Misti. I trimmed the sentiment leaving a small white edge and then adhered to the flowers as shown with some fun foam.
I love how I can mix and match the stamp sets and be so creative with them. And I love this sentiment and why not make a card to inspire you to challenge and inspire yourself!
Welcome back and today I have a Christmas card to share with you to get inspired to get started early on Christmas cards. I have used the gorgeous Candlelit Christmas collection for this card.
Due to shipping delays the new Tender Moments collection has been postponed and you can benefit by saving 15% on flower shaping bundles including the Christmas Poinsettia bundle.
Welcome back to inspiration for Heartfelt Creations. I have another card featuring the gorgeous Cascading Wisteria mixed with some French Cottage images and birds from the Cherry Blossom collection. As usual I have instructions below the photos.
Iris cardstock, foam tape, Versamagic ink – Pretty Petunia, heavy cardboard, Ranger Archival ink – Violet, hot glue gun
For more tips on creating with the French Cottage Collection watch the tutorial at https://youtu.be/cATv3wk2_sM.
For more tips on creating with the Cascading Petals Collection watch the tutorial at https://youtu.be/DqhvfrsTI00.
Instructions:
Cut a piece of white cardstock 10” x 7”, score at 5” along the long side and fold to create a base card of 5” x 7”. Cut a piece of gold cardstock 4 15/16” x 6 15/16” and adhere to the front of the card. Stamp the door image from the HCPC-3908 French Doorway Cling Stamp Set in Jet Black ink on Iris cardstock. Colour with Zig Clean Colour Brush markers and trim the image to 4 3/4″ x 6 3/4″ and adhere to the front of the card.
Stamp the lamp image from the HCPC-3908 French Doorway Cling Stamp Set in Jet Black ink on Iris cardstock. Colour with Zig Clean Colour Brush markers and die cut with the coordinating die. Adhere to the top right of the door frame as shown. Stamp the pot plant images from the HCPC-3909 French Cottage ‘scapes Cling Stamp Set in Jet Black ink on Iris cardstock. Colour with Zig Clean Colour Brush Markers and die cut with the coordinating die. Adhere to either side of the door frame. Cut a piece of light green patterned paper 4 7/8” x 6 7/8”. Die cut the opening using the outer large tag die from the HCD1-7202 Album Tags & Accents Die set. Die cut the large decorative die from the HCD1-7263 Swirly Accent Spray Die set out of white and gold cardstock. Adhere the white die over the gold die slightly offsetting the dies and then adhere behind the top of the opening. Cut a piece of clear cardstock 4 3/4″ x 6 3/4″ and adhere behind the green paper and decorative dies. Adhere this to the front of the card with a double layer of heavy cardboard.
Stamp the wisteria images from the HCPC-3912 Cascading Wisteria Cling Stamp Set in Jet Black ink on Iris cardstock. Colour with Zig Clean Colour Brush Markers and die cut with the coordinating dies. Shape lightly, add Crystal Clear with Dries Clear glue on a dry sponge and adhere to the top of the card with foam squares.
Stamp the pot plant images from the HCPC-3909 French Cottage ‘scapes Cling Stamp Set in Jet Black ink on Iris cardstock. Colour with Zig Clean Colour Brush Markers and die cut with the coordinating dies. Adhere to the front of the card as shown.
Stamp the long leaf branch image from the HCPC-3912 Cascading Wisteria Cling Stamp Set in Jet Black ink on Iris cardstock. Colour with Zig Clean Colour Brush Markers and die cut with the coordinating die. Shape lightly, add Crystal Clear glitter with Dries Clear glue on a dry sponge and then add to the right side of the door frame with foam squares. Stamp the small leaf and wisteria images from the HCPC-3912 Cascading Wisteria Cling Stamp Set in Jet Black ink on Iris cardstock. Colour with Zig Clean Colour Brush Markers and die cut with the coordinating die. Shape lightly, add Crystal Clear glitter with Dries Clear glue on a dry sponge and then add over the long leaf branch image with foam squares and over the pot plant on the right side of the door frame.
Stamp the small flower images from the HCPC-3908 French Doorway Cling Stamp Set in Magenta Hue and French Ultramarine inks. Colour the centres of the pink flowers with Tiger Lily ink and the blue flowers with Buttercup ink and die cut with the coordinating die. Colour the edges and backs of the pink flowers with Magenta Hue ink and the blue flowers with Pretty Petunia inks. Shape using the Groove Golf tools, add Crystal Clear glitter using Dries Clear glue on a damp sponge and adhere over the pot plants as shown. Add Heart of Gold Prills to the pink flower centres and Lemon Chiffon Prills to the blue flower centres.
Stamp the wisteria images from the HCPC-3911 Wisteria Petals Cling Stamp Set in Magenta Hue and Violet inks. Colour the images with Magenta Hue inks and then the centres of the pink flowers with Cactus Flower ink and the purple flowers with Majestic Violet ink and die cut with the coordinating die. Colour the backs of the flowers with Magenta Hue inks and then shape using the groove golf tools. Pierce the centres of the flowers and then thread the flowers onto a deep purple bead stamen and adhere using a hot glue gun. Make different lengths of the wisteria flowers. Add Leaf Green ink to the stamen wires and then trim and adhere to the cascading wisteria images with a hot glue gun.
Stamp the bird images from the HCPC3866 Tweet Cherry Blossom Cling Stamp Set in Jet Black ink on Iris cardstock. Colour with Zig Clean Colour Brush Markers and die cut with the coordinating die. Shape using the coordinating mold and add Crystal Clear glitter using Dries Clear glue on a dry sponge. Add three birds over the door frame and the wisterias using foam squares doubled up. Add one bird over the flowers on the bottom left.
Trim the sentiment from the patterned paper and adhere to the. To finish add Crystal Clear glitter to the card front with Dries Clear glue on a dry sponge.
Inside – cut a piece of gold cardstock 4 7/8” x 6 7/8” and adhere to the inside right of the card. Cut a piece of light green patterned paper 4 3/4” x 6 3/4″ and adhere over the gold cardstock.
Welcome back and I am finally getting myself sorted at home with my little craft area and I am now getting getting my crafting mojo back. I have even done a video on how I have made this pretty card complete with flowers and dressing the card!
I love how using the Dress My Craft Soft Floral Oriental paper makes soft beautiful flowers and I couldn’t resist making some Wild Roses and Wild Asters from Heartfelt Creations sitting on the gorgeous Annabelle’s Trousseau Layering Frame dies.
For a video on how to make the flowers and card please visit my YouTube Channel here: https://youtu.be/wqOyk9c568I
Materials Used:
Heartfelt Creations – Wild Rose – Small, Wild Aster, Oakberry Lane Blossoms, Medium Bead Stamens – Pastel,
Dress My Craft – Soft Floral Oriental Paper, 6 mm Styrofoam Pointed Buds, 8 mm Styrofoam Pointed Buds, Micro Stamens – Green, Sparkling Dust, Grooved Golf Tools, Foam Shaping Mat
Spellbinders – Amazing Paper Grace Annabelle’s Trousseau Layering Frame Medium
Ranger Archival inks – Vivid Chartreuse, Library Green
Ranger Distress inks – Spun Sugar
Ranger Distress Oxide inks – Mowed Lawn
Memento inks – Lilac Posies
Reeves – Gloss Gel Medium
Art Glitter Dries Clear glue
White cardstock, pearls
I hope that I have inspired you to create something today to brighten your day.