Sparkle and Shine Double Page Layout

Welcome back

I hope you all had a good Christmas and are now rested for the new year.  I would like to thank you so much for all the lovely get well wishes.  I am on the improve and am looking at getting back into crafting again which is always a good sign.

For my last post for this year I am finally using a scrapbook layout.  While I a primarily a cardmaker I do enjoy scrapbooking as well.  Close to My Heart has really made it a lot easier for me as well.  It is so much easier coordinating colours and papers to create fabulous layouts.

I am really enjoying using the WOTGs from Close to My Heart and also have found the “Make It From Your Heart” Volumes 1 and 2 books by Jeanette Lynton really useful to use for creating well balanced and interesting layouts for my scrapbooks.

I have loved using the Holidays from the Heart WOTG – Sparkle and Shine as the colours and papers are gorgeous.  I have completed the two double layouts that are suggested but as they have family members in them that are not happy about having their photos posted, I have used this layout with my cat, Sox, in it.  The photos are from last year’s Christmas and we had record high temperatures of 32 degrees.  Needless to say we were struggling in the heat and our poor Sox just did not know what to do with himself.  Plus, he had to be in the action and not miss out on the fun of opening presents!

For this layout I have used the recipe from page 32 “Make It From Your Heart” Volume 2 book by Jeanette Lynton.  I have found this particular recipe really useful as I can use landscape photos much more easily.  I have also used my Cricut to cut out the titles using Cricut Craft Room to make the letters weld together.

CTMH Sparkle and Shine double page layoutThese books that are available from Close to My Heart are great when you are struggling for inspiration.  There are layouts for all number of photos and the instructions are easy to follow.  Here I have added some extra embellishments and titles to help make it my own and kept it very simple to make the photos the focus of the pages.

The materials I have used are:

WOTG – Sparkle and Shine

Stamp set – Stitch Wonder Everyday Life

Cardstock – Slate, Ruby, Juniper, White Daisy

Inks – Slate, Ruby, Juniper, White Daisy

Sparkle Clear Flourishes – small

Cricut Cartridge – Art Philosophy

Make It From Your Heart Volume 2 by Jeanette Lynton

These products in the Holidays with Heart Gift Guide are still available through until December 31st while stocks last.   Orders totaling over $150 during the promotion can choose one starred item from The Holidays with Heart Gift Guide for free so it is an ideal time to purchase one of our Cricut Collections or our ink and marker organiser.

So be in quick as there are only a few days left before these products are no longer available.

I am hoping to get my creative mojo up and running in time to do the Australasian Blog Hop for the SOTM on 1st January which will be good.  There are some very talented ladies downunder and it is a real privilege working with them.

Enjoy the rest of the year and look forward to more creative gorgeousness next year.

Happy Crafting

Patricia

Merry Christmas

Merry Christmas and Happy Holidays

download


I apologise for not having an original design today but I have been battling a nasty upper respiratory tract infection that has resulted in my probably fracturing a rib.  So I have not been able to do a lot of crafting, but rest assured I will be back in full force next year.

I would like to take the time to wish everyone a happy, healthy and safe Christmas and New Year.

Happy Crafting

Patricia


CTMH Gift Card Holders

Hello everyone

Gosh Christmas is just around the corner and I still have not completed my Christmas shopping.  Life has just got in the way over the last couple of weeks.  However, I will get it all done by the big day.

For those who do not know what to get for people a gift voucher is a great option and then the recipients are able to take advantage of the sales post Christmas.  Close to My Heart Cricut cartridges have the answer for how to present these vouchers with a cool gift card holder.  My inspiration for these cards came from Pinterest and in particular from this blog Busy with the Cricky where Susan has done some lovely cards and given instructions on how to make them.

For my cards I have used the Artiste cartridge and I have cut the the card from page 59 in the booklet and cut them at 5″ which gave me two cards per 12 x 12 sheet of cardstock.  Then using patterned paper I cut another card at 4.75″.  To finish off I cut a piece of white daisy cardstock at 4.5″ to place in the middle of the card for a sentiment and for people to write on.  The two smaller pieces had the centre cut out and I was able to mat the patterned paper onto the cardstock easily.

Here are my versions:

CTMH Christmas gift card holdersHere are some close ups of the cards.  One or two photos may be a bit blurry so I apologise for that.

CTMH Gift Card Holder CTMH Gift card holder CTMH Gift Card Holder CTMH Gift card holder CTMH Gift card holder CTMH Gift card holder CTMH Gift card holder CTMH Gift card holderAnd I have kept the inside of the cards fairly simple to enable people to write on them.  Sorry I have just realised that I missed taking a photo of the little section to put the voucher in but you can just see a little part of it in the photo below.  I will try and rectify this in the next week to really show you how neat this little card is.

CTMH Gift Card Holder insideI have mainly used the stamp set from the Seasons Tweeting Gift Bag kit from the Holidays from the Heart Gift Guide.  This little owl is so cute and I love the different sentiments that go with them.

Here is a list of the materials I have used:

Cardstock – Ruby, Juniper, Daisy White

Patterned paper – Sparkle and Shine paper packet

Stamps -Seasons Tweeting Gift Bag kit, Scandinavian Wishes, Sparkle and Shine Workshop on the Go Stamp set

Inks – Slate, Ruby, Juniper

White Bakers Twine

Clear Sparkles

Artiste Cricut Cartridge – rosette from page 55 cut at 1″, bows from page 55 and cut at 1/2″ and 1″.

Art Philosophy Cricut Cartridge – Holly leaf  from page 46 cut at 1″ and the rose from page 69 and cut at 3″

As you can see I am loving my Cricut and there is so much more to do yet.  I have  just barely scratched the surface with all the cool things to do on it and I still have to get the Art Booking cartridge.  I think I am going to be very busy and it  will keep me out of mischief I am sure lol.

The products from the Holiday from the Heart Gift Guide are still available until the end of December and if you spend over $150 you can choose one starred item for free.  Just by buying a Cricut Cartridge you would qualify for this special offer so visit my shop now and have a browse.

I hope you all have a great week and I will now have to see what I can come up with for my last blog post before Christmas.

Happy Crafting

Patricia

Australasian Close to My Heart Stamp of the Month Blog Hop

Hello and welcome aboard the Australasian Close to My Heart Stamp of the Month Blog Hop. If you have arrived here from Marianne’s Blog, Your Creative Journey with Marianne, then you are in the right place. If you landed here by accident, no problem, please join in by following the link at the end of this post.

I am really excited to finally show you what I have been doing for this month’s blog hop.  This has been a work in progress and I originally wanted to make a box for a thank you gift and it wasn’t quite what I had expected so my creative mind went into overdrive and thought it would be great to do an exploding box and use the December SOTM set and then I was all sorted for this hop.  I had done an exploding box as part of a group a few years ago for a friend who was undergoing surgery and she has still got it now as it was such a special gift.

I ended up doing two boxes – one for Christmas and one made out of Chantilly for more general purposes.

Side view of the exploding box

The inside of the box showing the three layers and the decorations that I have p

Exploding hexagonal box All  assembled

To cut out the hexagon box shapes I have used the Artiste Cricut cartridge page 48 3 D object.  For the Chantilly box I have cut out 3 different sizes – 3.25, 3.00 and 2.75 inches.  The Christmas box is slightly smaller and the sizes are 3.00, 2.75 and 2.5 inches.

Using my Cricut machine has made this so much easier and I could spend more time on decorating the box.  Here is the base and as you can see I have cut up the cardstock and paper ready to put on the base front and back.

????????????????????????????????????????????????????????????????????????????????The dimensions I have used for the Chantilly panels are:

Bottom layer:

Outside panel – 2 1/2″  x 3″

Inside – plain cardstock panel 2 1/2″ x 3 ”

Patterned paper panel 2 3/4″ x 2 7/8″

White cardstock – 2 1/4″ x 2 6/8″

Middle Layer

Outside panel – 2 3/8″ x 2 7/8″

inside – plain cardstock 2 3/8″ x 2 7/8″

Patterned paper 2 1/4″ x 2 6/8″

White cardstock 2 1/8″ x 2 5/8″

Inner Layer

Outside panel – 2 1/2″ x 2 1/4

Inside – plain cardstock 2 1/2″ x 2 1/4″

Patterned paper – 2 3/8″ x 2 1/8″

White cardstock – 2 1/4″ x 2″

Unfortunately, the sides were not even so you may have to do a little adjusting to get an even matting.  If you are sharp eyed you will have seen I have made a mistake with the middle layer with the inside layers being smaller than what I have written here but I have given you the above dimensions to make it easier for you.

Here is the middle layer with the layers all cut out and I have distressed the edges with Desert Sand ink.

????????????????????????????????????????????????????

I then adhered all the layers to the sides outside and inside.

?????????????????????????????????????????????????????????????? ?????????????????????????????????????????????????????

I then used  the You are My Happy stamp set to stamp images using Outdoor Denim ink on the White Daisy cardstock and distressed the edges with Desert Sand ink.  These were then adhered onto the patterned papers.

For the middle of the top layer I had to cut out another  hexagonal shape (2 1/2″) out of patterned paper using the base of the box.  If I had the Artbooking cartridge I would have been able to cut the hexagon from there.  However, this was a simple way to get the nice patterned paper and I just cut the sides off and it fitted very nicely.  The edges were also distressed with Desert Sand ink.

All stamped and ready to assemble

Once I had completed each layer the box was adhered together to create the exploding box.

All  assembled

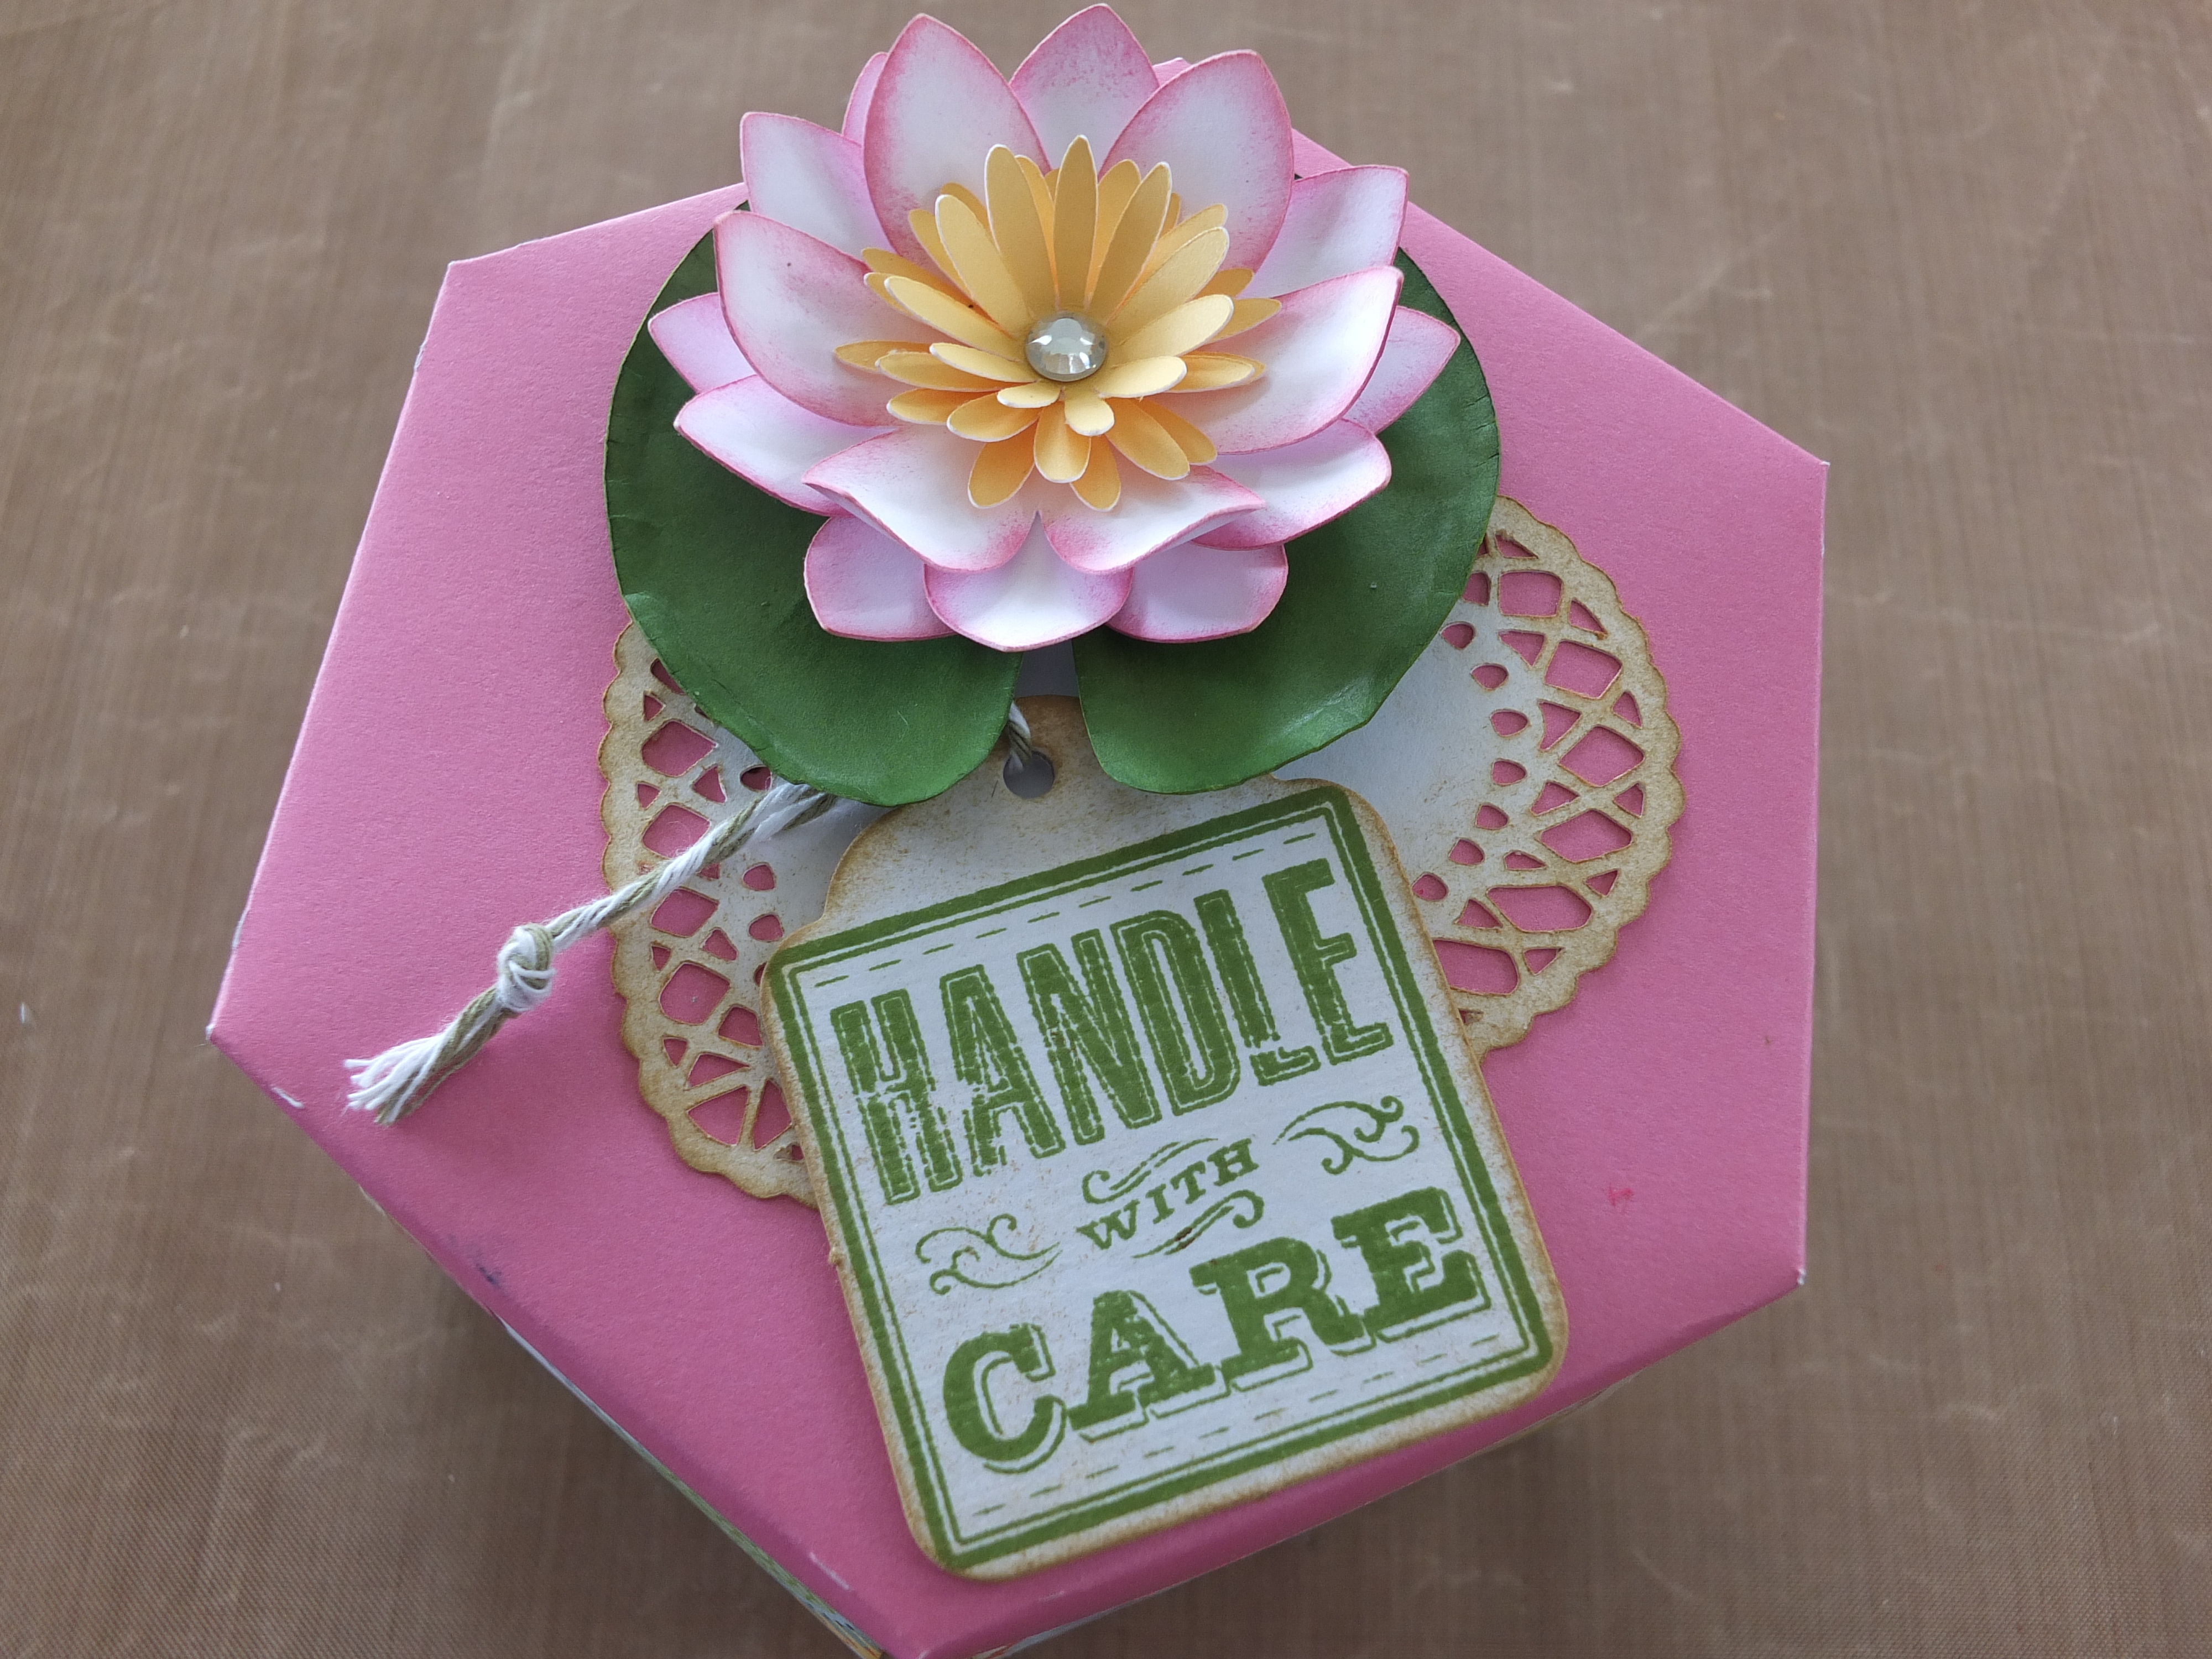
I cut out the top of the box out of Cotton Candy cardstock and decorated it with a lily on a lily pad and a heart shaped doily and topped it off with a dimensional tag stamped using the SOTM set Special Care.   I have got the idea for the lily from Angela Mansfield a fellow CTMH consultant.  She was very generous and gave very good detailed instructions.

Here are the instructions for the decoration on the top.

The flower has been cut from White Daisy cardstock using the  Artiste Cricut Cartridge (pg 73 accent 1)at 2 1/2 ”   – 3 layers.  I have sponged the edges of the layers and then shaped the petals using my fingers.  The 3 layers were adhered together to form the base of the lily.

For the centre I have cut 3 flowers again from the Artiste Cartridge (pg 54 Accent 3) from  Buttercup cardstock and layered them on top of each other and once again using my fingers to gently add some shape and dimension.  To complete the lily I added a clear sparkle in the centre.

For the lily pad I have cut a plain circle from the Art Philosophy cartridge (pg 21 circle1) at 3″ out of  New England Ivy cardstock.  I then cut a small wedge out of the circle and using an embossing tool I went around the edge of the circle to  create a small lip for a ruffled edge.  I also embossed some vein lines to add some more realism.  to finish off I have sponged the edges with Topiary ink.

I have cut the lovely heart shaped doily from the Art Philosophy cartridge (Pg. 70 Font layer) out of White Daisy cardstock and distressed it with Desert Sand ink.

Finally I have distressed  a dimensional element tag with Desert Sand ink and stamped the Handle With Care stamp using Topiary ink onto it.  I am really pleased with the distressed look this came out with.

Here are some close up views of the top.

Close up of the lily Close up of the tag

Materials used for this box are:

Cardstock – Cotton Candy, Desert Sand, New England Ivy, White Daisy, Buttercup

Dimensional elements – tags

Inks – Cotton Candy, Topiary, Desert Sand, Outdoor Denim

Stamp sets – CTMH SOTM set – Special Delivery, You are My Happy

Sparkles

Chantilly papers

Memory Bond adhesive

CTMH Artiste and Art Philosophy Cricut cartridges

For the Christmas box I have followed the same procedure as above but I have reduced the size of the box.

The papers used are from the Holidays from the Heart gift guide and I have teamed them with Slate and Ruby cardstocks.  I love the look of the candy cane papers.

Christmas exploding box

The rosette has been cut using the Artiste Cartridge (pg 50, accent 4).  I can’t remember exactly the sizing but I think I cut it at 2″.

The rose has been cut out of Ruby cardstock from the Art Philosophy cartridge (pg 69, Font) and the holly leaves have been cut using New England Ivy cardstock from the Art Philosophy cartridge (pg 46, Leaf3).  The holly leaves have had lines embossed and the edges sponged with Topiary ink to add some dimension. The holly berries have been cut from the Art Philosophy cartridge again (pg 64, Layer) and I have added some liquid glass to add some shininess and dimension to the berries.

I have not distressed the dimensional tag and chosen instead just to stamp the Handle with Care image using Ruby ink onto the white tag.

Inside I have decorated in a similar fashion but this time I have used the Art Philosophy cartridge to cut out postage stamp shapes (pg 24, Square6) at 1″ and stamped all the images from the Magical Days Holiday stamp set from the Holidays from the Heart gift guide in a mix of Slate, Juniper and Ruby inks.

another view all laid out Close up view of the panels using the Holidays from the Heart  Magical Days Holi

Materials used:

Cardstock – Ruby, Slate, White Daisy, White Daisy

Sparkle and Shine B&T Duos from the Holidays from the Heart gift guide.

Inks – Ruby, Slate, Juniper

Dimensional elements – tags

Grey Bakers twine

Stamp sets – SOTM Special Delivery, Magical Days Holiday

Memory Bond adhesive

Liquid Glass

The Special Delivery stamp set  is a very versatile set and I would have loved to have done a baby layout with this, but as I already have scrapped my children’s baby photos I thought I would do something completely different.

This exclusive stamp of the month is only available during December. It can be yours for just $5 with a qualifying order of $75 or for $29 if ordered separately from your CTMH consultant. If you do not have a consultant please contact me or place an order in my online store.  I’d love you to leave a comment and some liking before heading off to the next stop, Jenny’s  blog, Jen’s Creative Classroom.

Happy Crafting Patricia

A Girly Card

Welcome back.

I am sorry to be a day late for this post but I was called away to a family emergency and then I have ended up with a cold and chest infection.  Just great having a fever when the weather is starting to get very warm!  Enough about me, I hope that you have all had a good week and not getting too stressed with Christmas just around the corner.  I know that I said that this week there would be a blog hop but, unfortunately, that has been delayed until next weekend.  I can’t wait to show you what I have created.

Today, as a break from Christmas, I thought I w0uld post a card that I have made for my niece’s 18th birthday using my Cricut machine.  I was late sending it but she has received it now and I can finally publish it.

?????????????????????????????????

For this card I have used the Artiste and Art Philosophy cartridges and Chantilly papers.  The dress and stand were made using the Artiste cartridge  while the numbers were cut using the Art Philosophy cartridges.  I have used my Cuttlebug Swiss Dots embossing folder to create the textured white card which is matted on Cotton Candy cardstock.  To make the pink sparkles I have used my Cotton Candy alcohol markers on clear sparkles to make the sparkles pink and match my card.

Materials used are all Close to My Heart or otherwise stated:

Cotton Candy cardstock

White Daisy cardstock

Chocolate cardstock

Cuttlebug embossing folder – Swiss Dots

Artiste Cricut cartridge

Art Philosophy cartridge

Clear sparkles

Cotton Candy alcohol markers

Stamp Set – Card Chatter Birthday D1475

I hope you like my humble offering today and I promise you that I will have the blog hop next weekend.

Have a great week

Happy Crafting

Patricia