The Art of Hidden Journalling from CTMH

Welcome back

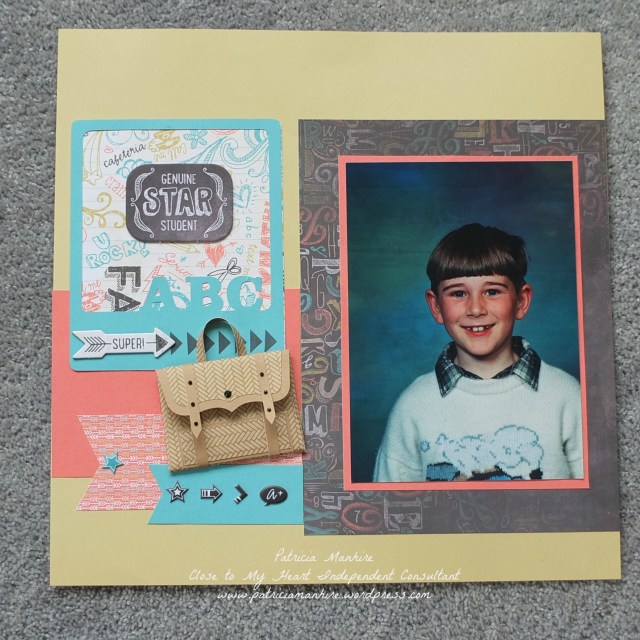
Keeping with the scapbooking theme here is a layout that I have done with some hidden journalling.  I prefer to hide my journalling, as for me it seems to take away from my artwork.  I have taken my inspiration from the layout in the Make It From Your Heart Volume 1 pattern 08.

Here is my layout using the Chalk It Up B&T papers, Complements and Assortments as well as the Artfully Sent Cartridge and Artbooking Cartridge.

CTMH Chalk it Up layout

I love the envelope that looks like a satchel and used my Artfully Sent cartridge to make the envelope.  I cut three different images – two the same size using Desert Sand cardstock and the herringbone paper and another one in the herringbone pattern that I used CCR to make a little smaller.   Unfortunately, I did not take any photos of the work in progress but I had to have the front in the herringbone pattern so I trimmed the top of it off the paper just before it folded over then adhered the herringbone paper image onto the Desert Sand image. I then put the smaller herringbone image on the top of the Desert Sand image and turned it over to create the satchel.  I then used Desert Sand trims to create the straps and finished off with the black sparkles from the Sparkles Black and Grey Assortments.

CTMH small bag

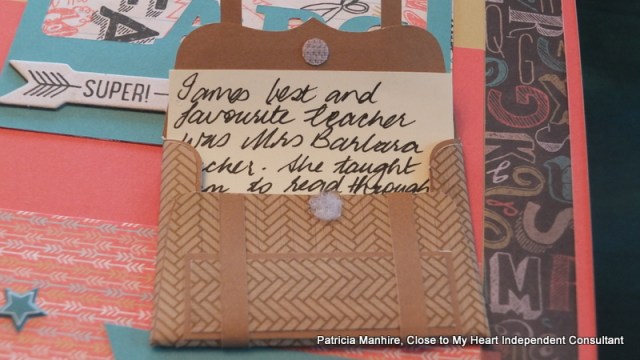
Here is the journalling inside the bag.  The little hook and loop dots are so useful for closing this little envelope/satchel.

CTMH Hidden Journalling

Materials used:

Cardstock – Lagoon, Sorbet, Desert Sand, Flaxen

Papers – Chalk It Up

Complements – Chalk It Up

Assortments – Chalk It Up

Cricut Cartridges – Artbooking, Artfully Sent

Hook & Loop Dots

Sparkles Black and Grey Assortment

Thank you for looking and I hope that you understand my instructions.

Watch out for the Australasian CTMH SOTM blog hop coming on the 1st April.

Have a good week and Happy Crafting

Patricia

CTMH Hopscotch Layouts with a Touch of Artfully Sent.

Welcome back.

Today I have another couple of layouts using the Hopscotch papers that are due to be retired at the end of the month.  I am going to miss this papers as the colours are gorgeous and the papers are really fun.

Last Easter my daughter had a craft making session with her friends, where they decorated up some Easter eggs and made them look like dinosaurs.  I took some photos, as you do, and when CTMH had a special a while back on Studio J I got these photos printed in different sizes.  The colours in the photos matched perfectly with the Hopscotch papers – particularly the Sorbet and Flaxen colours.

I have used the Hopscotch complements and assortments to finish of the embellishments as well as using the negative of the Sweet cut from Artbooking along with You’re the Bomb stamp set which is also retiring at the end of this month.

CTMH Hopscotch LayoutThe Artfully Sent Cricut cartridge is so versatile and here I have used the sleeve function to cut out the envelope to hold my journalling card for my daughter to complete when she can.  I have used the journalling card from the Artbooking Cartridge stamp set Take Note.  This stamp set is only available as part of the Artbooking Cricut cartridge and I use this a lot for my journalling.  Here is a close up of the sleeve and I have used strips of the Hopscotch papers to create the patterns.
CTMH Hopscotch Layout with an Artfully Sent Touch

Here is another layout using small strips of paper to embellish the layouts.  I have taken my inspiration from the Magic book but added my own twist.  I have also used Artfully Sent for the letters FUN and Artbooking cartridge for the embellishment and the Artiste cartridge for the Easter title.

CTMH Hopscotch Layout

Materials used:

Cardstock – Flaxen, Colonial White, Sorbet, Cotton Candy, Glacier

Papers – Hopscotch

Complements – Hopscotch

Assortments – Hopscotch

Stamps – You’re the Bomb, Take Note

Inks – Black,

Cricut Cartridges – Artbooking, Artiste, Artfully Sent

Gold Sequins

Glacier Extra Thick Twine

As I said these Hopscotch papers and the You’re the Bomb are only available until the end of the month so be in quick so you are not disappointed.  You can click here to go straight to my website to order.

There is another Seasonals Expressions coming out next month and I have had a sneak peak and there are some gorgeous new products coming so watch this space…

Have a good week and Happy Crafting

Patricia

CTMH Brushed Layout

Welcome

I have done a lot of cards recently, but I did find some time to do some scrapbook layouts a couple of weeks ago.  I am more of a cardmaker, but I do enjoy scrapbooking and I am so thankful that CTMH has a great range of how to books to inspire me.

For this layout I have used the Performance pattern on page 48 – 49 of the Magic book.  This is the first time that I have used hand stitching on a layout and I am happy with the outcome.  I am going to look at getting my sewing machine out and have a go with that as well.     I have used the stitch guide to punch the holes and some embroidery floss and stitched it by hand.

I don’t normally mix up Colonial White and White Daisy but sometimes rules are meant to be broken and I am happy with how the Colonial White cardstock highlights the photos above the pink of the background papers and the White Daisy base.

CTMH Brushed layout

Here are close ups of the flowers and butterflies.  The flourish has been cut using the Art Philosophy Cricut cartridge (page 59 Font Layer) and I played around in Cricut Craftroom to get the size right.  The flowers are from the Artiste cartridge (page 55 Accent 1>Shift) and I have cut several different sizes to create some depth with the flowers.  The butterflies are from Artbooking (page 62 Icon)and I have stamped them with using the rock and rock technique with Canary and Pixie inks with the butterfly stamp from the Brushed WOTG set.   CTMH Brushed LayoutI have used the script stamp from the Armour stamp set and lightly and randomly stamped onto the Colonial White cardstock in Bamboo ink and then distressed the edges with Desert Sand ink.  I love how this has turned out.

CTMH Brushed layout.

I have hidden the journalling in this pocket.   Sometimes I struggle to put journalling on a layout as it seems to detract from the artwork so putting them into pockets makes it easy to create layouts.

CTMH Brushed Layout

I originally stamped this sentiment with Black ink but it didn’t look right so I then stamped the sentiment with Cotton Candy ink onto some scrap Colonial White cardstock.  I fussy cut out the letters and then adhered them slightly to the left of the black letters to create a shadow and actually it looks so much better for it and I will be doing this again.

Materials used:

Cardstock – Colonial White, White Daisy, Pear, Cotton Candy, Pixie

Papers – Brushed B&T Duos

Stamps – Brushed WOTG, Your Own Kind of Wonderful, Artiste Stamp set

Inks – Bamboo, Black, Cotton Candy, Desert Sand

Cricut Cartridges – Artiste, Art Philosophy, Artbooking

Clear Sparkles

Gold Glitter gems

Stitch Guide

I am doing this late at night so hopefully I haven’t missed anything.

Happy Crafting

Patricia

Easter is coming

Welcome

I am a day late for my blog but I lost the battle with the light last night to take photos.  It is heading into Autumn here and Easter is just around the corner so the days are getting shorter and the dark came up quicker that I had wanted.  I went out with my aunt yesterday and found some very cheap foam crosses and thought I would have fun dressing up the cross to put on the wall in my shop.  It is also fitting as my new landlord is a church.  Here is the finished product hanging on the wall at Gift Hutt.  I am going to look at doing another cross up for ANZAC Day with red poppies.

20150309_174523

20150309_174501


To cover the cross I have used the lovely B&T papers from the Yuletide Carol Reflections paper range.  This particular paper is really versatile for lots of different projects apart from Christmas.  I wasn’t sure about it at first but now I love it for doing backgrounds.  I used liquid glass to adhere the paper onto the foam – the edges are not perfect as this is not a perfect cross but I did what I could.  I had to have a join in the paper and hid this with the Black Striped Twill.

I really like using different techniques for making flowers and for these flowers I have got my inspiration from another company on how to do these flowers.  They used dies and stamps but I used my Cricut cartridges – Artiste and Art Philosophy and kept to a very neutral palate – Colonial White and Flaxen.  I love how you can make all different sizes instead of being limited to the size of the die.

For the flowers I cut the flowers from the Artiste cartridge page 54 Accent 3>Shift at sizes ranging from 2″ down to 1/2″ in increments of 1/2″ as this made a good contrast in sizes.  However, I used flowers that I had cut out earlier and I think the sizes were only 1/4″ difference and I think the centre petals are a little big.

After cutting the flowers I used the small spray bottles to slightly dampen the flowers.

20150308_144955


Once they were pliable to use I then used the shaping tool to create some texture and pattern on the petals.

20150308_145349


I then pleated all the petals by hand and twisted them slightly.  Using the large ball embossing tool I then made the flowers cup up.  Each flower had two of these layers.  These were then left to dry.

20150308_145048


For the centre of the flowers I used the next size down flower and using the same technique I created the cups for the centre.  However, I did not pleat the petals this time.20150308_150533

Here are the completed flowers ready to put on the cross.  As you can see I have done three different sizes to create some depth and interest to the flowers.

20150308_171108Before putting the flowers on the cross I cut out several leaves from the Art Philosophy cartridge page 35 <Branch2> size 2″ from Flaxen cardstock.  I then played around with the placement of the leaves and glued them down with the small glue stick.

20150308_163400

I placed a bow on the cross first and then had some fun with placing all the flowers in a pleasing way.  I finished off with a pearl flourish (NLA) and then some clear sparkles in the middle of the flowers.  For the final touch I embossed three butterflies from the Armour stamp set with gold embossing powder and fussy cut them out and used liquid glue to adhere them to the flowers.  I would have preferred to use pearls but unfortunately, CTMH do not stock them.

Here is a close up of the pearls, flowers and butterfly.

20150308_200431I then went on to create some cards using the same papers, flowers and colours and the His Love stamp set that is only available until the end of the month.

Here I have used my own design and used a spare flower and leaves to embellish the card.  I have used the black sequins from the Mini Medley Accents – Black to finish it off.

DSCF2504

For this card I have paper pierced the lily and finished off with the Black Strip Twill.  The pattern for this and the following card is from the Make it From Your Heart Volume 1 pattern no. 25.  I have first stamped the lily image on the Colonial White cardstock and then again on some scrap White Daisy and Flaxen cardstock and then fussy cut out the images and pieced them together to make the lily stand out.

DSCF2503

Finally, I have turned the card around and put the Bible verse on the card and finished with the smallest flowers – 1/2″ on the leaves in Flaxen cardstock.
DSCF2499Materials used:

Cardstock – Colonial White, Flaxen, White Daisy

Paper – Yuletide Carol B&T

Stamps – Armour, His Love

Inks – Black, Versamark

Liquid Glass

Ranger Gold embossing powder

Clear Sparkles

Black Striped twill

Bakers Twine Neutral Metallic Assortment

Mini Medley Accents – Black

I hope that you enjoy my latest creations.

Have a good week and Happy Crafting

Patricia


Some More Artfully Sent Cards

Welcome

I have been too busy to participate in the Australasian blog hop for the SOTM stamp set but here are a couple of cards that I made some time ago when I had a card making frenzy using the Artfully Sent cartridge.  I am still getting my head around all the different features so I just made some cards using the sleeve feature.  These turned to be very quick and easy cards to do.

I used some of the cards that I had made with the mat ink method and using the pearl paint to line the cut cards.  For details of how I have done this please click here.

For the first one I have cut the rose shaped sleeve on page 37 Sleeve>Shift at 7″ and used the pixie coloured background paper to line the cut front.  The sentiment has been cut using the Artiste cartridge in the Brushed diamond patterned paper and then I have used the Cricut Craftroom to cut another shape in White Daisy cardstock slightly smaller.  The sentiment is from the Artfully Sent Just to Say stamp set that comes with the cartridge and I have embossed that with the Ranger silver embossing powder.   I have placed a trim of the pink shimmer trim over White Daisy cardstock trim that I have trimmed with the Scallop border punch.  To finish off this easy card I have stamped and embossed with silver embossing powder the butterfly from the beautiful Armour stamp set from the Seasonals Expression catalogue and then I have used some gems from the now retired Pewter gems

DSCF2462


Here are two versions of the same pattern from the Artfully Sent cartridge.  I have used another piece of Pixie coloured base card to line the card and then I  have sponged the larger accents such as the leaves, ribbon and yellow flowers from the negative pieces that have been cut from the card and then glued them onto the card.  This was quite quick and easy to do and I have finished off with some Extra Thick Pixie twine and a small banner with the Get Well sentiment from the Just to Say stamp set.

DSCF2461


For this next card I have used the cutout as a stencil and sponged the the small blue spots as the background  onto a pre-cut piece of White Daisy Cardstock.  On a separate card using the card as a template I have then sponged all the negative cutouts using  Pixie, Olive, Flaxen Canary inks.  I then used the stencil again to place the pieces onto the base cardstock..  Then using the stencil again I have adhered all the pieces onto the base card to create my card.  This piece was then matted on some Pixie cardstock.

2015-01-18 15.21.41

Here is the finished card with a butterfly cut out from the Artiste cartridge and some bling from the clear sparkles and some flourishes.  I thought this made a lovely Mother’s Day card and again used the sentiment from the Artfully Sent Just to Say stamp set.


2015-01-18 16.02.11Materials used:

Cardstock – Pixie, White Daisy, Cotton Candy

Inks – Pixie, Canary Olive, Flaxen, Sky, Versamark

Paper – Brushed

Stamps  – Just a Note (Artfully Sent), Armour

Cricut Cartridges – Artfully Sent, Art Philosophy, Artiste

Extra Thick Twine – Pixie

Clear Sparkles

Shimmer Trim – Pink

Ranger Silver Embossing Powder

Border Punch – Scallop

Epoxy Bubbles – Pewter (NLA)

All these products are available on my website here for you to purchase.

These cards are available for sale at Gift Hutt.

I have now moved Gift Hutt into a larger shop and will soon be offering scrapbooking and cardmaking classes so please watch this space.

Have a good week and Happy Crafting.

Patricia