Cream and Pearl Elegant Card No. 2

Welcome Back

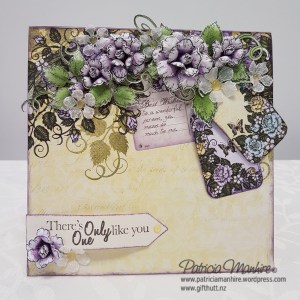
When I make new designs I often make several cards using the same theme and flowers and this one is another card I made using the lovely lace edge die from Spellbinders, and I have teamed it with a beautiful embossing folder from Anna Griffin.  The lovely sparkle on the roses comes from Rajni Chawla’s Frosting Powder.  It is an amazing product that totally transforms your flowers and is currently being released worldwide.

Materials Used:

Cardstock – Shimmer cardstock, White cardstock, Purchased base card 7” x 5”

Dies – Spellbinders A2 Devine Eloquence, Graceful Floral Lace, Heartfelt Creations Classic Rose, Classic Rose Vines

Stamps – Heartfelt Creations Classic Rose, Classic Rose Vine, Classic Rose Leaf

Inks – Colorbox Coral Rose, Memento Bamboo Leaves, Versamark

Embossing Powder – Stampendous Aged Ivory

Heartfelt Creations Deluxe Shaping Kit

Art Glitter Dries Clear Adhesive

Art Glitter Ultrafine Glitter – Crystal

Embossing Folder – Crafters Companion Lattice Edge

Pearl strips

Gemini Machine

Spray Adhesive

Peelcraft sticker

Foam squares

Instructions:

I have used a pre-cut 7” x 5” card base but you can cut your own using a piece of white 10” x 7” cardstock and scoring at 5” along the long side and fold in half for your card.

Die cut the lace edge out from the shimmer cardstock and then emboss using the instructions for your die cut machine.  Adhere to the bottom edge of the card.  Cut a piece of shimmer cardstock at 7” x 2 ½” and adhere to the top of the card.  Cut a strip of shimmer card 7” x ¾” and emboss using the lattice embossing folder.  Adhere to the card as shown and line each edge with a pearl strip.

To make the sentiment frame die cut the small frame from the Devine Eloquence set and then emboss the die for a textured finish.  Adhere to the centre of the card using a double layer of foam squares to give height to go over the pearls.  Add the peelcraft sentiment.

To make the flowers stamp with Coral Rose ink, sponge the colour over the stamped images and then die cut.  Shape the roses using the Deluxe Shaping kit.  Once flowers are completed spray with spray adhesive and sprinkle Crystal glitter over them for a sparkly finish.

To make the leaves stamp using versamark and emboss with the Aged Ivory embossing powder.  Sponge with Bamboo Leaves and then die cut out.  Shape the leaves with the Deluxe Shaping kit.

Trim the leaves and add to the top right corner and bottom left corner using a combination of Dries Clear adhesive and foam squares.  Add the flowers as shown.

Happy Crafting

Ka Kite Anu

Patricia

Heartfelt Creations Design Team Announcement

Welcome Back

I am so excited and humbled to announce that I have made the Heartfelt Creations Design Team.  I am looking forward to working with some amazing artists and designers, and of course working with the some of the best paper crafting products I have come across in over 25 years of paper crafting.  I would like to thank all those who took the time to vote for me and of course the Heartfelt Creations family who selected me to be part of their team.

Ka kite anu (God Bless and thank you)

Patricia

Cream and Pearl Elegance

Welcome Back

Today I am featuring a card using lovely cream shimmer cardstock and sparkling roses.  I love cream shimmer card and it goes so well with pearls.  Add some sparkly pink roses and you have a very pretty and romantic card.  I have just got a Gemini die cutting machine and I was playing around with some die cutting and embossing with Spellbinders dies and I was very happy with the result.

Materials Used:

Cardstock – Shimmer cardstock, White cardstock, Purchased base card 7” x 5”

Dies – Spellbinders A2 Devine Eloquence, Graceful Floral Lace, Heartfelt Creations Classic Rose, Classic Rose Vines

Stamps – Heartfelt Creations Classic Rose, Classic Rose Vine, Classic Rose Leaf

Inks – Colorbox Coral Rose, Memento Bamboo Leaves, Versamark

Embossing Powder – Stampendous Aged Ivory

Heartfelt Creations Deluxe Shaping Kit

Art Glitter Dries Clear Adhesive

Art Glitter Ultrafine Glitter – Crystal

Embossing Folder – Crafters Companion Lattice Edge

Pearl strips

Gemini Machine

Spray Adhesive

Peelcraft sticker

Foam squares


Instructions:

I have used a pre-cut 7” x 5” card base but you can cut your own using a piece of white 10” x 7” cardstock and scoring at 5” along the long side and fold in half for your card.

Die cut the lace edge out from the shimmer cardstock and then emboss using the instructions for your die cut machine.  Adhere to the bottom edge of the card.  Cut a piece of shimmer cardstock at 7” x 2 ½” and adhere to the top of the card.  Cut a strip of shimmer card 7” x ¾” and emboss using the lattice embossing folder.  Adhere to the card as shown and line each edge with a pearl strip.

To make the sentiment frame die cut the small frame from the Devine Eloquence set and then emboss the die for a textured finish.  Adhere to the centre of the card using a double layer of foam squares to give height to go over the pearls.  Add the peelcraft sentiment.

To make the flowers stamp with Coral Rose ink, sponge the colour over the stamped images and then die cut.  Shape the roses using the Deluxe Shaping kit.  Once flowers are completed spray with spray adhesive and sprinkle Crystal glitter over them for a sparkly finish.

To make the leaves stamp using versamark and emboss with the Aged Ivory embossing powder.  Sponge with Bamboo Leaves and then die cut out.  Shape the leaves with the Deluxe Shaping kit.

Trim the leaves and add to the top right corner and bottom left corner using a combination of Dries Clear adhesive and foam squares.  Add the flowers as shown.

Happy Crafting

Patricia


Thinking of You Classic Roses from Heartfelt Creations

Welcome back

Today I thought I would try and do something different with the Classic Rose stamp and die set from Heartfelt Creations.  Roses come in all shapes and sizes and this stamp and die set is just so great at making a wide range of flowers.

Materials Used:

Cardstock – Bazzill White Smooth, Timbrels White cardstock

Paper – Heartfelt Creations Wildwood Cottage

Stamps – Heartfelt Creations Classic Rose, Classic Rose Vine, Elegant Sentiments,

Dies Heartfelt Creations Classic Rose, Classic Rose Vine, Elegant Sentiments, Eyelet Oval, Decorative Oval, Classic Border Basics

Inks – Memento Tuxedo Black, Northern Pine, Bamboo Leaves, Rhubarb Stalk, Canteloupe, Brilliance Orchid

Heartfelt Creations Deluxe Shaping Kit

Art Glitter Dries Clear Adhesive

Foam tape

Sponge daubers

Instructions:

Cut a piece of white cardstock 6” x 12” and score along the long side at 6” to make a 6” x 6” card base.

Cut a piece of pink patterned paper 6” x 2 ½” and adhere to the bottom of the card base.  Cut a piece of white cardstock 6” x 5 ½” and using the lace edge of the border basics die cut the edge and adhere to the top of the card base over the pink patterned paper.

Die cut the outer eyelet oval in white cardstock.  Die cut the Decorative Oval and adhere to the eyelet oval.  Using foam tape adhere to the base card as shown.

To make the leaves stamp the images with Northern Pine.  Sponge the leaves with Bamboo Leaves and touch the ends of the leaves with Rhubarb Stalk.  Die cut the leaves and shape using the Deluxe Shaping Kit.  Adhere to the base of the oval with Art Glitter Dries Clear adhesive and foam strips.

To make the flowers stamp with Brilliance Orchid ink and sponge the centres with Canteloupe ink before die cutting out.  Sponge the edges with the Orchid ink both front and back of the flowers and sponge Canteloupe on the centres of the smallest flowers.  Shape the flowers using the Deluxe Shaping kit and put together using Art Glitter Dries Clear adhesive making different size flowers.  Adhere to the front of the card as shown.

Stamp the Thinking of You Sentiment in Tuxedo Black on white cardstock and die cut with the coordinating die.  Adhere to the top of the card with Art Glitter Dries Clear Adhesive.

Happy Crafting

Patricia

Blushing Roses for Mother

Welcome back

Mother’s Day is just around the corner in New Zealand and today I am featuring a card that I have made from the Blushing Rose collection from Heartfelt Creations.  I love the combination of purple and yellow and the Classic Rose flowers compliment the papers beautifully.

Materials used:

Cardstock – CTMH Colonial White, Timbrels White cardstock

Paper – Heartfelt Creations Blushing Rose, Vellum

Stamps – Heartfelt Creations Classic Rose, Classic Rose Vine, Everyday Hero

Dies – Heartfelt Creations Classic Rose, Classic Rose Vine, Everyday Hero, Luggage and Tags

Inks – Memento Tuxedo Black, Bamboo Leaves, Northern Pine,  Colorbox Wisteria, Frost White, Distress Ink – Dusky Concord

Ranger Embossing ink – White

Nuvo Crystal Drops – Lemincello

Heartfelt Creations Deluxe Shaping kit

Art Glitter Dries Clear Glue

Instructions:

Cut a piece of cream cardstock at 12” x 6”, score and crease at 6” along the long side to create a card base 6” x 6”.  Cut the 6” x 6” panel from the patterned papers, sponge around the edges with the Concord ink and adhere to the base card.

Die cut the two tags with the Luggage and Tags die, sponge the edges with Dusty Concord ink.  Place over the side of the postcard image on the paper using foam tape for some dimension.

To make the leaves stamp the images from the Classic Roses and Classic Rose Vine sets in Northern Pine.  Sponge with Bamboo Leaves before die cutting the images.  Shape the leaves for dimension and trim to place on the card across the front.

To make the roses stamp the images with Tuxedo ink and sponge in the centres with the Wisteria ink before die cutting the images.  Mist lightly on the back of the petals and shape using the Deluxe shaping kit.  Make up the roses in various sizes as shown and place on the leaves.  For further information on how to shape the flowers see Emma Lou’s video here:https://www.heartfeltcreations.us/video/129/how-to-create-dimensional-roses

Stamp the small images of the rose with Frost White ink on vellum and emboss with white embossing powder.  Die cut and shape lightly with the Deluxe Shaping kit.  Place around the roses as shown.  Add the Nuvo drops to the centre of the flowers

Stamp the sentiment from the Everyday Hero stamp in Tuxedo Black on the cream cardstock.  Using the arrow die from the Everyday Hero die cut the sentiment out.  Sponge on the edge with Dusty Concord ink and place on the card as shown with a small fold to the back of the card.

To finish, add a purple rose and vellum flower to the base of the sentiment as shown.

Until next time Happy Crafting

Patricia