Blooming Birthday Wishes

Kia Ora Koutou

Welcome to Inspiration Wednesday at Heartfelt Creations and today I have another card featuring the Delightful Daffodil collection. The daffodils and hyacinths make a wonderful combination and of course the butterfly in the collection makes a gorgeous addition. Scroll down past the photos for step by step instructions on how I have made this card.

Products Used:

Delightful Daffodil & Butterfly Die, HCD1-7341
Delightful Daffodil & Hyacinth Die, HCD1-7342
Delightful Daffodil Spray Die, HCD1-7343
Delightful Daffodil & Butterfly Cling Stamp Set, HCPC-3943
Delightful Daffodil & Hyacinth Cling Stamp Set, HCPC-3944
Delightful Daffodil Spray Cling Stamp Set, HCPC-3945
Delightful Daffodil Paper Collection, HCDP1-2124
Lattice Flourish Gateway Die, HCD2-7338
Deluxe Flower Shaping Paper Pack of 50 – White, HCPP1-475
Zig Clean Color Real Brush Markers – 48 Pack, 478594
Rajni Chawla’s Crystal Clear, PGM15015
Designer Dries Clear Adhesive, 159723
Ranger Archival Ink Pad – Jet Black, RACP468
Darice Adhesive Foam Strips, D120601

Other Products:

White cardstock, Iris cardstock, foam squares, pearls

Instructions:

Cut a piece of Deluxe Flower Shaping Paper 10” x 7 1/2″, score at 5” along the long side and fold to create a base card of 5” x 7 1/2″. Cut a piece of blue pattern paper 4 7/8” x 7 3/4” and adhere to the front of the card.

Die cut two outer frames out of Deluxe Flower Shaping Paper using the #1 die from the HCD2-7338 Lattice Flourish Gateway Die set and adhere together. Die cut an outer frame out of patterned paper using the #1 die from the HCD2-7338 Lattice Flourish Gateway Die set and adhere to the front of the previously cut frame and then adhere to the front of the card.

Die cut two decorative frames using the #2, #3 and #4 dies from the HCD2-7338 Lattice Flourish Gateway Die set out of white cardstock. Adhere the outer frames together and then adhere to the front of the card. Add the lattice gate to card front using foam strips for more dimension.

Die cut three Happy Birthday sentiments – two from Deluxe Flower Shaping Paper and one from blue pattern paper from the HCD2-7338 Lattice Flourish Gateway Die set. Adhere together with the blue paper on the top and then adhere to the inside of the lattice gateway frame.

Stamp the hyacinth images from the HCPC-3944 Delightful Daffodil & Hyacinth Cling Stamp set in Jet Black ink on Iris cardstock. Colour in with Zig Clean Colour Brush Markers and die cut with the coordinating dies. Add Crystal Clear glitter with Dries Clear glitter on a dry sponge. Adhere to the base of the card as shown with foam squares on a few of them to create some dimension.

Stamp the daffodil and hyacinth spray images from the HCPC-3945 Delightful Daffodil Spray Cling Stamp set in Jet Black ink on Iris cardstock. Colour with Zig Clean Colour Brush Markers and die cut with the coordinating dies. Add Crystal Clear glitter with Dries Clear glue on a dry sponge. Adhere to the top and bottom with foam squares.

Stamp the butterfly images from the HCPC-3943 Delightful Daffodil & Butterfly Cling Stamp set in Jet Black ink on Iris cardstock.Colour with Zig Clean Colour Brush Markers and die cut with the coordinating die. Add Crystal Clear glitter using Dries Clear glue on a dry sponge and adhere to the card as shown with foam squares.

To finish, add pearls to the top of the gate as shown.

Thank you for visiting and I would love for you to leave a comment about what you like in this card.

Follow me on Facebook!

Follow me on Instagram!

Follow me on YouTube!

Happy Crafting

Ka Kite Anu

Patricia

Introducing the Amazing Paper Grace | Make A Scene Collection

Hi crafty friends!  It seems like we have been waiting for months for February to roll around.  We have been working in the background, holding our breath, tapping our feet and waiting on tippie toes to show you a new collection!  Ta-dah!!!  Today we are introducing a new Amazing Paper Grace Collection called Make A Scene!!!  It was designed by Becca Feeken and is available at Spellbinders.  Stay tuned for a video link at the bottom of the post. NOW, TO EXPLAIN THIS TO YOU . . . In the past, Becca has created several interactive collections . . remember 3D Vignettes and remember Shadowbox Vignettes?  One of the things Becca does, is she tries to create a new twist on interactive that you can also use with flat cards and with past collections. That means new material for your old material. 

WHAT IS MAKE A SCENE? Make A Scene is an interactive card collection and a flat card collection, all in one – you choose based on your style.  The interactive portion is made with a card base that folds in six different layered scenery options.  The 3D card base folds flat but slides open to reveal a dimensional scene.  Since it has a 3D profile, the opened card makes quite a splash and can be set out on a desk for showing off.  The card base is huge and it offers you the chance to snag one of six scenes that cover many occasions.  If the six scenes are not your occasion du jour, then by all means dive into your huge stash of dies and insert your own contents.  The flat card portion is made with the individual scenes.  Each of the components for the scenes can be cut onto the top of a panel and used on a flat card or as part of a 3D Vignette or as part of a shadowbox scene. Today we are prepared to show you – each Creative Team Member has created both a 3D Card and a Flat Card so that you can see the best of both worlds! 

My Projects for Today

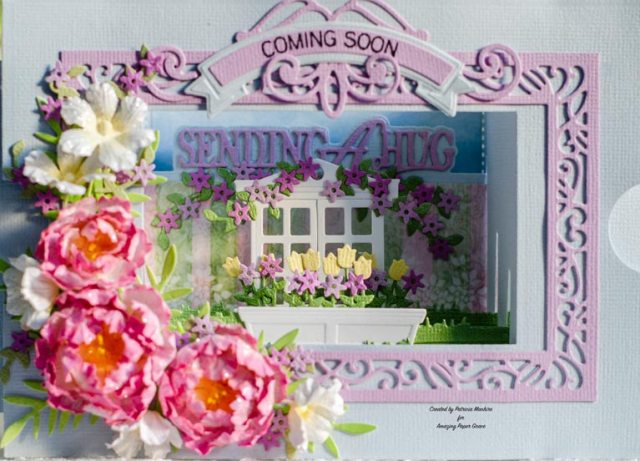
I’m using S6-165 Make a Scene Card Base and S5-444 Perfect Picture Window Scene

For my 3D Get Well card I wanted to create a sense of spring with all the flowers around the window and window box. The daffodils are blooming in the window box and there are blossoms over the window and in the background and on the window box. Sending a hug is coming soon as well as some get well wishes.

I have created this Special Day card using the window and window box with a raised frame to create some depth for a shadow box effect. The cascading flowers and tulips are so cheerful for any special occasion.

Designers Tip:

I found you cannot have a lot of bulk out wide in the front two layers as the layers will not slide through the side slots easily.

How to Assemble:

When you see the card base it will make total sense how this goes together.  Here is a quick start video to lay it all out for you.

Make A Scene Availability:

These dies and plates are available from Spellbinders right now! Click here:  Make A Scene

Make A Scene Collection Blog Hop!

Click on the links to each member, they’re waiting to inspire you to create something beautiful:

Visit Nida Tanweer
Visit Tara Brown
Visit Anita Kejriwal
Visit Linda Parker
Visit Kate Skonieczna
Visit Joanna Wisniewska
Visit Beatriz Jennings
Visit Patricia Manhire
Visit Agnieszka Posluszny
Visit Elena Olinevich
Visit Beth Pingry
Visit Margie Higuchi
Visit Becca Feeken at Amazing Paper Grace

Giveaway!  

You could win an Amazing Paper Grace Die of the Month! Enter to win on our new Instagram Account https://www.instagram.com/amazingpapergrace_creates/. All  of the entry details are there, look for this image below:

I love your comments!  Tell me, which scene is calling your name?

Follow me on Facebook!

Follow me on Instagram!

Follow me on YouTube!

Happy Crafting

Ka Kite Anu

Patricia

Sending Love with Amazing Paper Grace Picot Petite

Amazing Paper Grace has gone back to her roots with classic sewing inspired motifs! Introducing the Picot Petite Collection!

Becca Feeken sent over these lovely dies for me to try.

Over time we’ve had lace-inspired designs and have loved the feel of Hemstitching and Candlewicking. Reminiscent of needlework and treasured handwork proudly displayed, Becca Feeken has developed another classic line of layering shapes that feel so much like tatting or picot crochet.  As you might imagine, these shapes are crisp, clean, and timeless. Whether you are simply adding a classic layer to a card or cutting an aperture to highlight a lovely sentiment – these shapes mix and match with other sewing inspired motifs as well as intricate backdrops.

Classic Shapes are Timeless

With each Classic Collection, Amazing Paper Grace creates the most popular die-cutting shapes in oval, round, square, and rectangles. Moreover, these classic shapes mix and match with Hemstitch Classics, Candlewick Classics, Elegant Twist Classics, and now Picot Petit.

The Inspiration behind Picot Petite

If you’ve ever seen tatting, the little loop produced along the edge is called a “picot”.  It’s this little loop that is the basis for the border on all of the Petite Picot shapes.  They are lovely as a backdrop for any other layerings as the little picot peeks out.  It’s just a subtle way to bring in the ways of classic needlework to give texture and dimension to the backdrop of our cards.

For this card I have layered up dies from this beautiful collecttion. The gorgeous Amazing Paper Grace Filigree Quartet Etched Dies from Picot Petite by Becca Feeken makes a stunning lacy background edged with the Amazing Paper Grace Picot Petite Squares Etched Dies Picot Petite Collection from Amazing Paper Grace by Becca Feeken.

I have just done a small tutorial on using different medium on the Amazing Paper Grace – Creative Encouragement Group on Facebook and one of the medium I used was 160 GSM vellum. Here I have used the Amazing Paper Grace Sweet Cottage Flowers Etched Dies 3D Vignette Mini Album Collection by Becca Feeken to create these flowers and used two layers of each size. For the leaves I have used the Amazing Paper Grace Cinch and Go IV set. The leaves were easy to made as the dies created all the texture and all I had to do was colour the leaves with Ranger Archival ink Vivid Chartreuse ink and shape lightly before adding around the flowers.

These are the dies that I have used to create this card:

The sentiment is from a retired set from Stampin Up – Rambling Rose

Happy Crafting

Ka Kite Anu

Patricia

Let’s Celebrate Spring

Kia Ora Koutou

Welcome back to more inspiration from Heartfelt Creations. This week I have another gorgeous card featuring the Delightful Daffodil collection which is just stunning and is a promise for those in the northern hemisphere that spring will come. The colours are so soft and pretty and here I have coloured some daffodils in a range of different colours to add to the pretty background papers.

Products Used:

Delightful Daffodil & Butterfly Die, HCD1-7341
Delightful Daffodil & Hyacinth Die, HCD1-7342
Delightful Daffodil & Butterfly Cling Stamp Set, HCPC-3943
Delightful Daffodil & Hyacinth Cling Stamp Set, HCPC-3944
Delightful Daffodil Paper Collection, HCDP1-2124
Eyelet Oval & Basics Small Die, HCD1-7156
Ornate Ovals Die, HCD1-7305
Petite Pocket Accents Die, HCD1-7212
Celebrate Love Sentiments Cling Stamp Set, HCPC-3847
Deluxe Flower Shaping Paper Pack of 50 – White, HCPP1-475
Zig Clean Color Real Brush Markers – 48 Pack, 478594
Rajni Chawla’s Crystal Clear, PGM15015
Rajni Chawla’s Frosting Powder, PGM15016
Designer Dries Clear Adhesive, 159723
Ranger Archival Ink Pad – Jet Black, RACP468

Other Products:

Foam squares, Iris cardstock, heavy cardboard, white cardstock, spray adhesive, Stampin Up Tufted embossing folder (retired)

Instructions:

Cut a piece of Deluxe Flower Shaping Paper 12” x 6”, score at 6” along the long side and fold to create a base card of 6” x 6”. Cut a 6” x 6” panel from the paper collection. Stamp the image from the HCPC-3847 Celebrate Love Sentiments Cling Stamp set in Jet Black ink on the bottom left of the paper and then adhere to the front of the card. Cut the same 6” x 6” panel from the paper collection and die cut the top and bottom using the edge die from the HCD1-7212 Petite Pocket Accents Die set. Adhere to the front of the card using heavy cardboard. Die cut two decorative edges from the HCD1-7212 Petite Pocket Accents Die out of white cardstock. Add Frosting Powder to the dies using spray adhesive and adhere to the edges of the previously cut paper.

Die cut the decorative oval using the #1 die from the HCD1-7305 Ornate Ovals Die set out of white cardstock. Add Frosting Powder to the edge with Dries Clear glue on a dry sponge. Adhere to the front of the card using a piece of heavy cardboard. Die cut the eyelet oval out of white cardstock using the eyelet edge die from the HCD1-7156 Eyelet Ovals & Basics Small Die and adhere to the middle of the decorative oval die. Die cut an oval out of white cardstock using the #2 die from the HCD1-7156 Eyelet Ovals & Basics Small Die set. Emboss using the Tufted embossing folder and adhere to the front of the card

Stamp the large and small daffodils from the CPC-3943 Delightful Daffodil & Butterfly Cling Stamp and the HCPC-3944 Delightful Daffodil & Hyacinth Cling Stamp in Jet Black ink on Iris Cardstock. Colour with Zig Clean Colour Brush Markers and die cut with the coordinating die. Adhere to the front of the decorative oval using foam squares on some of the flowers to create dimension.

Stamp the butterfly image from the CPC-3943 Delightful Daffodil & Butterfly Cling Stamp in Jet Black ink on Iris cardstock. Colour with Zig Clean Colour Brush Markers and die cut with the coordinating die. Add Crystal Clear glitter to the wings using Dries Clear glue on a dry sponge and then adhere to the left of the flowers as shown with foam squares.

Happy Crafting

Ka Kite Anu

Patricia

You are Loved Lovely Ladybird

What’s a Cardlet, pray tell?  A Cardlet is a small motif, complete with background, sentiment and character that combine to make small card or layers onto a larger card.  We’re delighted to introduce you to the Sweet Cardlets Collection.

Becca Feeken sent over these lovely dies and watercolors for me to try.

Sweet Cardlets show up in a Glimmer format with a matching die.   They are metal plates that are used in the Spellbinders Glimmer Hot Foil System to transfer foil to paper through a combination of heat and pressure.  The Glimmer machine base is rolled through your die cut machine to deliver that pressure.  As long as you have a machine that can accommodate thick dies – like steel rule dies, you’re all set. A word to the wise, it is very addicting.  (Compatibility charts on the Spellbinders website)

The Inspiration behind Sweet Cardlets

We gotta fess up here.  There’s no such word as cardlets, yep, Becca straight up made it up.  You have to agree though, it sounds really cute, right?  Well that was the inspiration behind sweet cardlets.  As you can imagine it has something to do with cards and moreover, little cards.  

Always mindful of the budget, Becca wanted to create a collection where each set is all you need to make a little card.  Sweet Cardlets are small motifs with a 3″ x 3″ footprint.  Each has a background, a main character and several sentiments.  

We found it the right size to fit on an A2 card and even to layer onto an A7 card.  In fact, the 3″ background can be repeated for a long background or a larger background.  Dies cut out each main character and three sentiments with each set give you lots of options.

My Project For Today

For my projects today I have used the very beautiful Amazing Paper Grace Lovely Ladybug Glimmer Hot Foil Plate & Die Set Sweet Cardlets by Becca Feeken and the Heart Felt Sentiments Glimmer Hot Foil Plate & Die Set Sweet Cardlets by Becca Feeken paired with the gorgeous and timeless Amazing Paper Grace Picot Petite Squares Etched Dies Picot Petite Collection from Amazing Paper Grace by Becca Feeken.

The handcrafted roses are made using the Amazing Paper Grace Candlewick Rosebud Etched Dies Candlewick Sampler Collection by Becca Feeken and the small filler flowers are made using the small flower die from the Amazing Paper Grace Die of the Month – February Bella Diamante.

Here are what the dies look like:  

The other dies I have used are:

Here is the Spellbinders video showing amazing new samples as well as a walkthrough of the entire collection:

https:// youtu.be/ reAkX2HkGwY

Sweet Cardlets Availability:

These dies and plates are available from Spellbinders right now! Click here: Sweet Cardlets Collection

Happy Crafting

Ka Kite Anu

Patricia

Delightful Daffodil Bouquet

Kia Ora Koutou

Welcome to Inspiration Wednesday and today Heartfelt Creations is celebrating the release of the new Delightful Daffodil collection. This is such a bright and summery collection with stunning images to colour and beautiful papers.

Skip through a delightful paper collection full of pastel daffodil gardens, and bright springtime butterflies! Stamp, and die cut your own bouquets and elegant floral arrangements the quick and EZ way! No matter the time or occasion, you’ll always have the right floral gift that’s sure to impress every time!

Easily create bright and beautiful bouquets that will work for those happy spring days, and can work as a floral focal point for whatever the occasion demands. Build up as big as you need for a beautiful arrangement, or use just one or two flowers for a quick, simple, and elegant look! Combine with your decorative dies for that extra touch! The beauty and creativity is endless with the new Delightful Daffodil collection!

I enjoy colouring and for this card I have coloured the bouquet image with Zig Clean Colour Brush Markers and added it to layered 5″ x 7″ Royal Elegance Frame decorative dies for a simple card that is easy to post.

Products Used:

Delightful Daffodil & Butterfly Die, HCD1-7341
Delightful Daffodil & Butterfly Cling Stamp Set, HCPC-3943
Delightful Daffodil Paper Collection, HCDP1-2124
Royal Elegance Frames Die, HCD2-7307
Eyelet Oval & Basics Small Die, HCD1-7156
Ornamental Tags Die, HCD1-7203
Celebrate Love Sentiments Cling Stamp Set, HCPC-3847
Deluxe Flower Shaping Paper Pack of 50 – White, HCPP1-475
Zig Clean Color Real Brush Markers – 48 Pack, 478594
Rajni Chawla’s Frosting Powder, PGM15016
Designer Dries Clear Adhesive, 159723
Ranger Archival Ink Pad – Jet Black, RACP468

Other Products:

Iris cardstock, DMC silk ribbon, Stampin Up folder – Tufted (retired), Pearls, white cardstock

Instructions:

Cut a piece of Deluxe Flower Shaping Paper 10” x 7”, score at 5” along the long side and fold to create a base card of 5” x 7”. Cut a piece of blue pattern paper 4 7/8” x 6 7/8” and adhere to the front of the card.

Die cut the outer decorative frame using the #2 die from the HCD2-7307 Royal Elegance Frames Die set out of white cardstock. Add Frosting Powder to the decorative edges with Dries Clear glue on a dry sponge and adhere to the front of the card. Die cut two inner decorative dies out of white cardstock using the #3 die from the HCD2-7307 Royal Elegance Frames Die set and adhere together. Add Frosting Powder to the decorative edge with Dries Clear glue on a dry sponge and then adhere to the front of the outer decorative die. Die cut a plain oval using the #2 from the HCD1-7156 Eyelet Ovals & Basics Small Die set out of white cardstock and emboss using the Tufted embossing folder and then adhere to the centre of the decorative dies.

Stamp the daffodil spray from the HCPC-3943 Delightful Daffodil & Butterfly Cling Stamp set in Jet Black ink on Iris cardstock. Colour with Zig Clean Colour Brush Markers, die cut with the coordinating die and adhere to the centre of the decorative die as shown.

Stamp the sentiment from the HCPC-3847 Celebrate Love Sentiments Cling Stamp set in Jet Black in on blue pattern paper and die cut the tag using the small decorative tag die from the HCD1-7203 Ornamental Tags Die set. Add some satin ribbon and adhere to the base of the daffodil spray with a bow.

Happy Crafting

Ka Kite Anu

Patricia

Bella Diamante – Happy Birthday Card

This month’s Amazing Paper Grace Die of the Month is an elegant tall card with a diamond motif as a focal point. 

Becca Feeken of Amazing Paper Grace sent me these stunning dies to create with.

Becca says a book cover with had four elegant corners inspired her, she thought it was a dreamy and dramatic way to showcase a frame.  Bella Diamante is a 5 x 7 card front, with several element layers and rims to use as inlays.  These multiple rims and elements will allow for both A2 and A7 cards.  Elegance reigns supreme with the ability to create shaped cards,  framed cards, or simply embellish with class.

There are 7 dies included in the Bella Diamante

I had so much fun creating with the Bella Diamante that I made another card – this time for a special birthday. I have made a 5″ x 7″ card base and layered the dies using some Pearlescent vellum to create a lovely contrast. I have also used some fun foam to create some dimension on the outer frame. Layering the white cardstock with gold cardstock is always so elegant, and this is a favourite technique of mine and works so well with Amazing Paper Grace dies. And I have finished the card with some beautiful handcrafted flowers and leaves.

Supplies:
Stamps:   Heartfelt Creations Heartfelt Sentiments (retired)
Paper: DMC Soft Floral Flower Shaping Paper
Ink: Ranger Archival ink – Magenta Hue, Buttercup, Leaf Green, Library Green
Accessories:  Amazing Paper Grace February 2021 Die of the Month – Bella Diamante, Amazing Paper Candlewick Rosebud Etched Dies Candlewick Sampler Collection by Becca Feeken, Amazing Paper Grace Grand Cinch and Go Flowers Etched Dies by Becca Feeken

The Amazing Paper Grace Die of the Month is available exclusively at Spellbinders Paper Arts during February 2021. Bella Diamante at the special kit club price, along with other membership perks.

View this month’s Amazing Paper Grace Die of the Month:

https://youtu.be/bS6_SYnAHoU 

How would you use the Bella Diamante die? Share with me in a comment!

Follow me on Facebook!

Follow me on Instagram!

Follow me on YouTube!

Happy Crafting

Ka Kite Anu

Patricia

Summer Gateway Card

Kia Ora Koutou

Welcome back and today I have some more inspiration from Heartfelt Creations using the fabulous new decorative gateway dies. We are now in the middle of hot sunny days here in New Zealand and it seems appropriate that I have a summery card using the beautiful Countryside Cottage collection.

Products Used:

Teardrop Lattice Gateway Die, HCD2-7337
Lattice Flourish Gateway Die, HCD2-7338
Eyelet Frame Gateway Die, HCD2-7340
Cottage Tree ‘scapes Die, HCD1-7333
Cottage Summer ‘scapes Die, HCD1-7334
Countryside Cottage Cling Stamp Set, HCPC-3938
Cottage Summer ‘scapes Cling Stamp Set, HCPC-3940
Cottage Tree ‘scapes Cling Stamp Set, HCPC-3939
Window Hinges Die, HCD1-7285
5″ x 7″ Gateway Fold Card – White, HCCB1-495
Clear Cardstock 8.5 x 11, GBKK811B1
Designer Dries Clear Adhesive, 159723
Darice Adhesive Foam Strips, D120601
Rajni Chawla’s Frosting Powder, PGM15016
Ranger Archival Ink Pad – Jet Black, RACP468

Other Products:

Iris Cardstock, white cardstock, spray adhesive

Instructions:

Die cut three background panels out of the yellow green ombre paper using the #1 die from the HCD2-7337 Teardrop Lattice Gateway Die and adhere to all three panels of the gateway card base.

Front panel: Die cut two outside decorative frames using the #1, #2 and #3 dies from the HCD2-7337 Teardrop Lattice Gateway Die out of white cardstock. Adhere together, add Frosting Powder with spray adhesive and then adhere to the front panel. Die cut an inside panel using the #3 die from the HCD2-7337 Teardrop Lattice Gateway Dies out of pattern paper with pot plants at the base and then adhere inside the frame.

Stamp the tree and leaf images from the HCPC-3940 Cottage Tree-scapes Cling Stamp set in Jet Black ink on Iris cardstock. Colour with Zig Clean Colour Brush Markers and die cut with the coordinating dies. Adhere the tree trunk to the inside of the frame with foam strips. Adhere the leaves over the tree and around the base of the trunk. Stamp the grass image from the HCPC-3938 Countryside Cottage Cling Stamp set in Jet Black ink on Iris cardstock. Colour with Zig Clean Colour Brush Markers and die cut with the coordinating die. Adhere around the base of the tree trunk as shown.

Die cut the lattice door out of white cardstock using the #3 and #4 dies from the HCD2-7337 Teardrop Lattice Gateway Die. Cut a piece of clear cardstock to fit and adhere to the back of the decorative die. Die cut two small hinges from the HCD1-7285 Window Hinges Die out of white cardstock. Adhere to the left of the gate and card front as shown to create the hinged gate.

Middle Panel: Die a decorative frame using the #1 and #2 dies from the HCD2-7337 Teardrop Lattice Gateway Die out of white cardstock. Add Frosting Powder with spray adhesive and adhere to the middle panel. Die cut eyelet shape using the #5 die from the HCD2-7340 Eyelet Frame Gateway Die set out of white cardstock and adhere to the centre of the frame. Die cut the inner panel out of pattern paper using the #3 die from the HCD2-7337 Teardrop Lattice Gateway Die and adhere to the front of the eyelet panel.

Stamp the pot plants and grass images from the HCPC-3938 Countryside Cottage Cling Stamp set in Jet Black ink on Iris cardstock. Colour with Zig Clean Colour Brush Markers and die cut with the coordinating dies. Adhere to the paper pane.

Die cut three sentiments using the sentiment die from the HCD2-7338 Lattice Flourish Gateway Die set – two from white cardstock and one from yellow ombre paper. Adhere the three sentiments together with the yellow paper on the top and then adhere to the top of the panel.

Back Panel: Die a decorative frame using the #1, #2 and #3 dies from the HCD2-7337 Teardrop Lattice Gateway Die out of white cardstock. Add Frosting Powder with spray adhesive and then adhere to the back panel. Die cut an inside panel using the #3 die from the HCD2-7337 Teardrop Lattice Gateway Dies out of pattern paper with pot plants at the base and then adhere inside the frame. Die cut an inner decorative frame using the #3 and #4 dies from the HCD2-7337 Teardrop Lattice Gateway Die out of white cardstock and adhere to the inside of the decorative frame over the pattern paper.

Stamp the pot plant images from the HCPC-3938 Countryside Cottage Cling Stamp set in Jet Black ink on Iris cardstock. Colour with Zig Clean Colour Brush Markers and die cut with the coordinating dies. Adhere to the paper panel as shown with foam strips.

Stamp the leaf images from the HCPC-3940 Cottage Tree-scapes Cling Stamp set in Jet Black ink on Iris cardstock. Colour with Zig Clean Colour Brush Markers and die cut with the coordinating die and adhere around the pot plant.

Happy Crafting

Ka Kite Anu

Patricia

Amazing Paper Grace February Die of the Month Blog Hop – Bella Diamante

This month’s Amazing Paper Grace Die of the Month is an elegant tall card with a diamond motif as a focal point.  It’s a new shape to the line-up and today I’m introducing the Amazing Paper Grace Die of the Month for February 2021, Bella Diamante.

Becca Feeken of Amazing Paper Grace sent me these stunning dies to create with.

Becca says a book cover with had four elegant corners inspired her, she thought it was a dreamy and dramatic way to showcase a frame.  Bella Diamante is a 5 x 7 card front, with several element layers and rims to use as inlays.  These multiple rims and elements will allow for both A2 and A7 cards.  Elegance reigns supreme with the ability to create shaped cards,  framed cards, or simply embellish with class.

There are 7 dies included in the Bella Diamante

My Project Today using Bella Diamante

I have made a beautiful Mother’s Day card and a coordinating basket that you could put chocolates, toiletries or other small gifts that would make a perfect gift for your mother. The card is a lacy shaped, very feminine card that has been embellished with handcrafted flowers and pearls.

For the basket I have made a small box and decorated the front and back with the background and decorative dies cut in half. The inner diamonds were perfect for placing over the handles and creating the base for the handcrafted flowers.

The sides and the insides have been decorated with panels made with the Amazing Paper Grace Diamonetta Background Glimmer Hot Foil Plate from Delicate Impressions Collection by Becca Feeken.

Designer Tip:

These dies are fabulous when embossed to give a more decorative look.

Supplies:
Stamps:   Heartfelt Creations Thank You Sentiments
Paper: DMC Soft Floral Flower Shaping Paper
Ink: Ranger Archival ink – Magenta Hue, Buttercup, Leaf Green, Library Green
Accessories:  Amazing Paper Grace February 2021 Die of the Month – Bella Diamante, Amazing Paper Candlewick Rosebud Etched Dies Candlewick Sampler Collection by Becca Feeken, Amazing Paper Grace Grand Cinch and Go Flowers Etched Dies by Becca Feeken

For more SKU Inspiration

Visit each Creative Team blog linked below for their take on creative paper crafting ideas with Bella Diamante, the new Amazing Paper Grace February 2021 Die of the Month!


Visit Elena Olinevich
Visit Nida Tanweer
Visit Tara Brown
Visit Anita Kejriwal
Visit Linda Parker
Visit Kate Skonieczna
Visit Joanna Wisniewska
Visit Beatriz Jennings
Visit Patricia Manhire
Visit Agnieszka Posluszny
Visit Beth Pingry
Visit Becca Feeken at Amazing Paper Grace

The Amazing Paper Grace Die of the Month is available exclusively at Spellbinders Paper Arts during February 2021. Bella Diamante at the special kit club price, along with other membership perks.

View this month’s Amazing Paper Grace Die of the Month:

https://youtu.be/bS6_SYnAHoU 

How would you use the Bella Diamante die? Share with me in a comment!

Follow me on Facebook!

Follow me on Instagram!

Follow me on YouTube!

Happy Crafting

Ka Kite Anu

Patricia

Petite Picot For You

Amazing Paper Grace has gone back to her roots with classic sewing inspired motifs! Introducing the Picot Petite Collection!

Becca Feeken sent over these lovely dies for me to try.

Over time we’ve had lace-inspired designs and have loved the feel of Hemstitching and Candlewicking. Reminiscent of needlework and treasured handwork proudly displayed, Becca Feeken has developed another classic line of layering shapes that feel so much like tatting or picot crochet.  As you might imagine, these shapes are crisp, clean, and timeless. Whether you are simply adding a classic layer to a card or cutting an aperture to highlight a lovely sentiment – these shapes mix and match with other sewing inspired motifs as well as intricate backdrops.

Classic Shapes are Timeless

With each Classic Collection, Amazing Paper Grace creates the most popular die-cutting shapes in oval, round, square, and rectangles. Moreover, these classic shapes mix and match with Hemstitch Classics, Candlewick Classics, Elegant Twist Classics, and now Picot Petit.

The Inspiration behind Picot Petite

If you’ve ever seen tatting, the little loop produced along the edge is called a “picot”.  It’s this little loop that is the basis for the border on all of the Petite Picot shapes.  They are lovely as a backdrop for any other layerings as the little picot peeks out.  It’s just a subtle way to bring in the ways of classic needlework to give texture and dimension to the backdrop of our cards.

The Picot

For this card I have created a base with the beautiful Bella Clair lace edge dies (now retired) and the gorgeous Amazing Paper Grace Diamonetta Background Glimmer Hot Foil Plate from Delicate Impressions Collection by Becca Feeken. I then layered the Amazing Paper Grace Picot Petite Ovals Etched Dies Picot Petite Collection from Amazing Paper Grace by Becca Feeken and added the ovals to the card with some fun foam. I have also added a gold accent to highlight the picot edged dies from the Amazing Paper Grace Elegant Twist Ovals Etched Dies from the Elegant Twist Collection by Becca Feeken.

I have made the flowers using the Amazing Paper Grace Candlewick Rosebud Etched Dies Candlewick Sampler Collection by Becca Feeken along with the leaves. The small filler flowers are from the Amazing Paper Grace Elegant Infinity – APG Die of the Month Club which is still available for purchase.

The sentiment is from the Amazing Paper Grace Heart Felt Sentiments Glimmer Hot Foil Plate & Die Set Sweet Cardlets by Becca Feeken. This is such a sweet set to use..

These are the dies that I have used to create this card:

Happy Crafting

Ka Kite Anu

Patricia