Whispering Love Heart

Kia Ora Koutou

Welcome back to my second post for Dress My Craft this month.  This time I have made a gorgeous heart from a SVG from Dreaming Tree decorated with gorgeous handmade flowers using a range of flower dies from Dress My Craft.

Here is a link to my YouTube channel for a video on how I have made all these flowers and decorated the heart:


Please visit the Dress My Craft blog here for a list of products I have used and the links to purchase the products here: https://dressmycraft.blogspot.com/2020/03/whispering-heart-love-and-hugs.html

Please click on the Dreaming Tree icon to the left of this blog to purchase this SVG file.

Happy Crafting

Ka Kite Anu

Patricia

Bringing Sunshine as You Recover

Kia Ora Koutou

Welcome back to Inspiration Wednesday at Heartfelt Creations.  In these very scary times my card this week has turned out to be quite prescient as it is a bright and sunny get well card featuring some Wild Rose flowers.  I am currently in self isolation and very thankful for my crafting to keep me occupied.

Products Used:

Large 3D Wild Rose Shaping MoldHCFB1-487
Large Wild Rose Cling Stamp SetHCPC-3907
Large Wild Rose DieHCD1-7290
Small 3D Wild Rose Shaping MoldHCFB1-486
Small Wild Rose Cling Stamp SetHCPC-3906
Small Wild Rose DieHCD1-7289
Wild Rose Paper CollectionHCDP1-2113
3D Lush Lilac Shaping MoldHCFB1-466
Lush Lilac Cling Stamp SetHCPC-3816
Lush Lilac DieHCD1-7170
Wild Aster Spray Cling Stamp SetHCPC-3888
Wild Aster Spray DieHCD1-7258
Cheerful Note Sentiments Cling Stamp SetHCPC-3848
Ticket and Tags DieHCD1-7201
Regal Frame & Accents DieHCD1-7248
Bright Bead Stamens-MediumHCS1-458-3
Assorted Pearl Stamens-SmallHCS1-459-1
Deluxe Flower Shaping Paper Pack of 50 – WhiteHCPP1-475

Other Products: 

Hero Arts Embossing & Watermark Ink, heavy cardboard, foam tape, spray adhesive

For more tips on creating with the Wild Rose Collection watch the tutorial at https://youtu.be/2ALPhFnT-qI.

For more tips on creating with the flower shaping molds, watch the tutorial at https://youtu.be/FSdPL7nXvQE.

For more tips on creating with the Wild Aster Collection watch the tutorial at https://youtu.be/1mriCKqh-Ac.

For more tips on creating with the Lush Lilac collection, watch the tutorial at https://youtu.be/KDbdzC0MnAI.

Instructions: 

Cut a piece of white cardstock 10” x 7”, score at 5” along the long side and fold to create a base card of 5” x7”. Cut a piece of dark green patterned paper 4 15/16” x 6 15/16” and adhere to the card front. Cut a piece of white cardstock 4 13/16” x 6 13/16” and adhere to the card front with heavy cardboard. Cut a piece of light green patterned paper 4 1/2” x 6 1/2″ and adhere to the front of the white card.

Die cut three outer frames from the HCD1-7248 Regal Frame & Accents Die set using the outer decorative die and the large plain edge die out of white cardstock. Adhere two die cuts together and then add Frosting Powder to the two decorative dies with spray adhesive. Adhere the single die cut to the card front and the double die cut to the front of the other die cut with foam tape. Die cut the inner lattice frame using the large and small plain edge dies and the lattice die out of white cardstock. Add Frosting Powder with spray adhesive and then adhere to the centre of the decorative die cuts.

Stamp the spray image from the HCPC-3888 Wild Aster Spray Stamp set in the Hero Arts Embossing & Watermark ink on vellum and die cut with the coordinating die. Trim and adhere to the centre of the decorative die cuts.

Stamp the leaf images from the HCPC3907 Large Wild Rose Stamp set in Fern Green ink on Deluxe Flower Shaping Paper. Colour with Leaf Green and Fern Green inks and die cut with the coordinating die. Shape using the coordinating mold, add Crystal Clear glitter using a damp sponge and then adhere to the right of the decorative die.

Stamp the flower images from the HCPC-3906 Small Wild Rose Stamp in Sunflower ink on Deluxe Flower Shaping Paper. Colour the images with Buttercup ink and die cut with the coordinating die. Shape using the coordinating mold and assemble with petals of the same size. Pierce the centres and thread the yellow pearl beads through with a small piece of wire and secure with Dries Clear glue. Add the Indian Gold mousse to the edges of the petals and Crystal Clear glitter with Dries Clear glue on a damp sponge. Trim the stamens and adhere over the leaves.

Stamp the sentiment from the HCPC-3848 Cheerful Note Sentiment Stamp in the Hero Arts Embossing ink on the light green patterned paper and heat emboss with gold embossing powder. Die cut with the tag die and nestle under the flowers as shown.

Please stay safe and well and listen to the science, wash your hands and follow instructions from your leaders.

Happy Crafting

Ka Kite Anu

Patricia


Candlwick Classic Card with Flowers

Kia Ora Koutou

Welcome back and today I want to share a card made with beautiful decorative dies from Amazing Paper Grace by Becca Feeken.  I have used the Nestabilities Candlewick Squares dies and offset them as shown.  I have decorated the card with handcrafted flowers made from Dress My Craft and the embossed background is from the Lace 3D embossing folder.


Happy Crafting

Ka Kite Anu

Patricia

A True Classic Never Ages

Kia Ora Koutou

Welcome back and today I am sharing a card that was for a custom order and the brief was to have a VW beetle car.  Fortunately, I still had my Simply Classic Stamp and Die set and I got my Zig Clean Colour Brush markers out and had so much fun painting the car as well as the fence and tulips from the Tulip Time collection and the foxgloves from the Happy Camper collection.  I was really happy at how this card turned out and my client was thrilled with it.  The Courtyard Elegance die is just stunning and it is one of my go to dies for making scenic cards.

Happy Crafting

Ka Kite Anu

Patricia

Treasure Heart Box with Wild Roses

Kia Ora Koutou

Welcome back to Inspiration Wednesday for Heartfelt Creations and this week I have a box to share with you.  This month Heartfelt Creations released a gorgeous new box die with the Wild Rose collection is really easy to make in so many different ways.

Products Used:

Other Products: 

Floral tape, heavy cardboard, Art Glitter Pearl Glitter

For more tips on creating with the Wild Rose Collection watch the tutorial at https://youtu.be/2ALPhFnT-qI.

For more tips on creating with the flower shaping molds, watch the tutorial at https://youtu.be/FSdPL7nXvQE.

Instructions: 

Cut 6 panels from the HCD1-7291 Treasured Heart Die using the panel die and the inner decorative die out of white cardstock.  Die cut 6 outer decorative dies out of gold cardstock and adhere to the decorative windows slightly offsetting them to show a white border.  Cut 6 pieces of clear cardstock 2” x 2” and adhere behind the windows.  Die cut 36 small hearts out of white cardstock and 36 outer hearts from gold cardstock from the HCD1-7291 Treasured Heart Die set and adhere the outer gold hearts to the inner white hearts and  then adhere to the flaps.  Adhere a small magnet at the back of one of the flaps and assemble the box.

Die cut two large Arianna Lace decorative dies out of white cardstock.  Add Frosting Powder with spray adhesive and glue together offsetting the lace dies and add a small magnet on the bottom of these dies.  Die cut 2 small circles using the second smallest circle die from the HCD1-7154 Eyelet Circle & Basics – Small Dies set out of white cardstock and 1 small circle out of heavy cardboard.  Adhere the heavy cardboard circle in between the white circles and then adhere over the magnet on the base of the lace dies.

Stamp the flower images from the HCPC-3906 Small Wild Rose Stamp in Magenta Hue ink on Deluxe Flower Shaping Paper.  Colour with Magenta Hue and Tiger Lily ink and die cut with the coordinating die.  Sponge the edges with Magenta Hue  and shape using the coordinating mold.  Add further shaping with groove golf tools and pleat the edges of the petals before assembling.  Pierce the centres of the flowers and thread through the bright yellow bead stamens with magenta rock candy stamens with some fine wire and secure with Dries Clear glue. Add Frosting Powder using Dries clear glue on a damp sponge and trim the wires and adhere the flowers to the top of the lace.

Stamp the leaf images from the HCPC3907 Large Wild Rose Stamp set in Fern Green ink on Deluxe Flower Shaping Paper.  Colour with Leaf Green and Fern Green inks and die cut with the coordinating die.  Shape using the coordinating mold and add Crystal Clear glitter using a damp sponge and then adhere to the top of the lace under the roses.

Stamp the large flower image from the HCPC-3773 Flowering Dogwood Stamp set in Sunflower ink on Deluxe Flower Shaping Paper.  Colour with Buttercup ink and die cut with the coordinating die.  Shape using the 3D Blossom Shaping Mold and assemble when dry.  Pierce the centres and thread through three light yellow bead stamens and fasten with Dries Clear glue.  Add Frosting Powder with Dries Clear glue on a damp sponge.  Trim the ends of the wires and adhere next to the roses.

Stamp the leaf images from the HCPC-3773 Flowering Dogwood Stamp set in Leaf Green ink on Deluxe Flower Shaping Paper.  Colour with Vivid Chartreuse ink and die cut with the coordinating dies Shape using the groove golf tools.  When dry add Crystal Clear glitter using Dries Clear glue on a damp sponge  and nestle around the dogwood flower.

Stamp the leaf images from HCPC-3887 Wild Aster Stamp in Fern Green ink on Deluxe Flower Shaping Paper.  Colour the images with Vivid Chartreuse ink and die cut with the coordinating die.  Shape using the groove golf tool and add Crystal Clear glitter with dries clear glue on a damp sponge.  Adhere around the base of the flowers.

Stamp the flower images from HCPC-3816 Lush Lilac Stamp set in French Ultramarine ink on Deluxe Flower Shaping Paper.  Colour the centres with Buttercup ink and die cut with the coordinating die.  Sponge the edges on the front and back of the flowers and the centre of the back with Buttercup ink.  Shape using the coordinating mold and when dry pierce the centres of the flowers before inserting the light yellow bead stamens. Add Pearl glitter with Dries Clear glitter using Dries Clear glue on a damp sponge.  Sponge the wires with Leaf Green ink and make two small clusters of flowers and secure using floral tape and adhere under the rose and dogwood flower.

I have another post coming so please look out for this.

Happy Crafting

Ka Kite Anu

Patricia

With All My Love Wild Roses

Kia Ora Koutou

Welcome back to my second card for the debut of the Wild Rose collection from Heartfelt Creations.

This time I have made some Wild Roses out of vellum on a shaped easel card.


Products Used:

Large 3D Wild Rose Shaping MoldHCFB1-487
Large Wild Rose Cling Stamp SetHCPC-3907
Large Wild Rose DieHCD1-7290
Small Wild Rose Cling Stamp SetHCPC-3906
Small Wild Rose DieHCD1-7289
Wild Rose Paper CollectionHCDP1-2113
Rounded Lattice Window DieHCD1-7274
Swirly Accent Spray DieHCD1-7263
Ornamental Tags DieHCD1-7203
Cheerful Note Sentiments Cling Stamp SetHCPC-3848
Vellum Paper – 10 Sheets3-GN2911-F
Opaque Embossing Powder – WhiteEP100
Crystal Ultrafine Transparent Glitter 1/2 oz.85-glitter

Other Products: 

Heavy cardboard, white cardstock

For more tips on creating with the Wild Rose Collection watch the tutorial at https://youtu.be/2ALPhFnT-qI.

For more tips on creating with the flower shaping molds, watch the tutorial at https://youtu.be/FSdPL7nXvQE.

For more tips on creating with the tags & sentiments, watch the tutorial at https://youtu.be/eAfLuNkRda4.

Instructions: 

Cut a piece of white cardstock 12” x 6”, score at 6” along the long side and fold to create a base card 6” x 6”. Cut a piece of rose flower patterned paper 2 1/2” x 6” and adhere to the front of the card 1” from the bottom of the card. Cut the green patterned paper 2 1/2” x 6” and 1 1/2” x 6”. Cut a piece of clear cardstock 2 1/2” x 6” and adhere to the back of the strips of paper to create a card front 6” x 6”. Adhere to the card front with heavy cardboard.

Cut three decorative window dies from the HCD1-7291 Treasured Heart Die set out of gold cardstock and adhere to the clear cardstock strip. Die cut two lace edge strips from the HCD1-7161 Sweetheart Borders Die set out of gold cardstock and adhere to the edges of the window as shown.

Stamp the sentiment from the HCPC-3847 Celebrate Love Sentiment Stamp set in Cactus Flower ink on the green patterned paper. Die cut the ticket out using the tag die from the HCD1-7201 Ticket & Tags Die, sponge around the edges with Cactus Flower ink and adhere to the bottom left as shown.

Stamp the flower images from the HCPC-3906 Small Wild Rose Stamp in Magenta Hue ink on Deluxe Flower Shaping Paper. Colour with Magenta Hue and Tiger Lily ink sand die cut with the coordinating die. Sponge the edges with Plum and Magenta Hue inks and shape using the coordinating mold. Add Frosting Powder using Dries clear glue on a damp sponge. Adhere to the left around the tag and the top of the window as shown.

Stamp the leaf image from the HCPC3907 Large Wild Rose Stamp set in Fern Green ink on Deluxe Flower Shaping Paper. Colour with Leaf Green and Fern Green inks and die cut with the coordinating die. Shape using the coordinating mold and add Crystal Clear glitter with dries Clear glue on a damp sponge. Adhere around the flowers as shown.

Stamp the leaf images from the HCPC-3835 Leafy Accents Stamp set in Library Green ink on Deluxe Flower Shaping Paper. Colour with Leaf Green and Magenta Hue inks and die cut with the coordinating die. Shape using the coordinating mold and add Crystal Clear glue on a damp sponge. Trim and adhere around the leaves and flowers as shown.

This collection is a must have and one I will be using again and again.

Happy Crafting

Ka Kite Anu

Patricia

Treasured Anniversary Hearts

Kia Ora Koutou

Welcome back and today we at Heartfelt Creations are very excited for the release of the gorgeous Wild Rose Collection.  And to celebrate I have two cards in two posts.

First up I have a lovely card with windows made using the new Treasure Heart Gift Box die.


Products Used:

Other Products: 

Heavy cardboard, white cardstock

For more tips on creating with the Wild Rose Collection watch the tutorial at https://youtu.be/2ALPhFnT-qI.

For more tips on creating with the flower shaping molds, watch the tutorial at https://youtu.be/FSdPL7nXvQE.

For more tips on creating with the tags & sentiments, watch the tutorial at https://youtu.be/eAfLuNkRda4.

Instructions: 

Cut a piece of white cardstock 12” x 6”, score at 6” along the long side and fold to create a base card 6” x 6”. Cut a piece of rose flower patterned paper 2 1/2” x 6” and adhere to the front of the card 1” from the bottom of the card. Cut the green patterned paper 2 1/2” x 6” and 1 1/2” x 6”. Cut a piece of clear cardstock 2 1/2” x 6” and adhere to the back of the strips of paper to create a card front 6” x 6”. Adhere to the card front with heavy cardboard.

Cut three decorative window dies from the HCD1-7291 Treasured Heart Die set out of gold cardstock and adhere to the clear cardstock strip. Die cut two lace edge strips from the HCD1-7161 Sweetheart Borders Die set out of gold cardstock and adhere to the edges of the window as shown.

Stamp the sentiment from the HCPC-3847 Celebrate Love Sentiment Stamp set in Cactus Flower ink on the green patterned paper. Die cut the ticket out using the tag die from the HCD1-7201 Ticket & Tags Die, sponge around the edges with Cactus Flower ink and adhere to the bottom left as shown.

Stamp the flower images from the HCPC-3906 Small Wild Rose Stamp in Magenta Hue ink on Deluxe Flower Shaping Paper. Colour with Magenta Hue and Tiger Lily ink sand die cut with the coordinating die. Sponge the edges with Plum and Magenta Hue inks and shape using the coordinating mold. Add Frosting Powder using Dries clear glue on a damp sponge. Adhere to the left around the tag and the top of the window as shown.

Stamp the leaf image from the HCPC3907 Large Wild Rose Stamp set in Fern Green ink on Deluxe Flower Shaping Paper. Colour with Leaf Green and Fern Green inks and die cut with the coordinating die. Shape using the coordinating mold and add Crystal Clear glitter with dries Clear glue on a damp sponge. Adhere around the flowers as shown.

Stamp the leaf images from the HCPC-3835 Leafy Accents Stamp set in Library Green ink on Deluxe Flower Shaping Paper. Colour with Leaf Green and Magenta Hue inks and die cut with the coordinating die. Shape using the coordinating mold and add Crystal Clear glue on a damp sponge. Trim and adhere around the leaves and flowers as shown.

Please watch out for my next post.

Happy Crafting

Ka Kite Anu

Patricia

Classic Rose Tutorial

Kia Ora Koutou

Welcome back to a special tutorial for Heartfelt Creations featuring the fabulous Classic Rose stamp, die and mold die set.

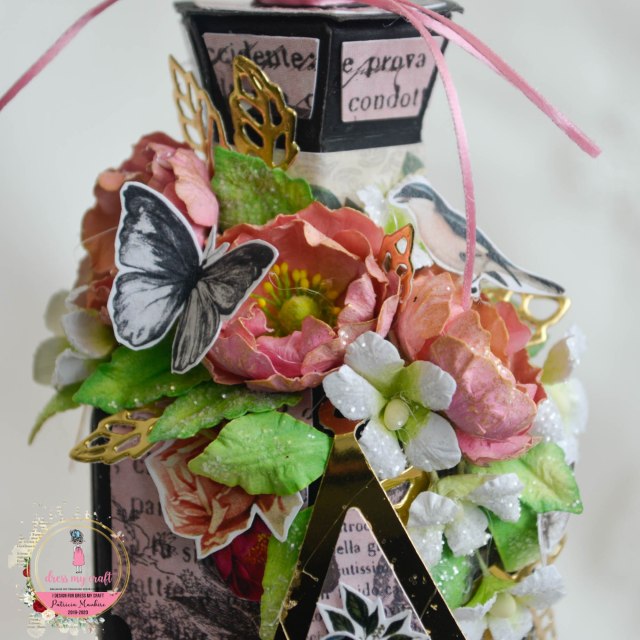
Making roses is so easy with the coordinating 3D flower shaping molds.  The molds allow for consistent shaping and this tutorial will show you the step by step instructions to create different size roses to decorate your cards.

Directions:


Step 1:

Stamp the flowers with Magenta Hue ink on Deluxe Flower Shaping Paper.  Colour the flowers in the centres with Tiger Lily ink and the petals with Magenta Hue ink and die cut with the coordinating die.

Colour the edges of the petals with Cactus Flower ink and the backs of the smaller petals with Magenta Hue ink.


Stamp the leaves with Library Green ink on Deluxe Flower Shaping Paper.  Colour with Vivid Chartreuse and Magenta Hue inks and die cut with the coordinating die.


Step 2:

Place the petals and the leaves in the coordinating mold.  Spritz lightly on the back with some water and then run through your die cutting machine.


Step 3

To create the bud take the smallest petal and add Dries Clear glue to two opposing petals and join together.  When dry add the other three petals.  This can be used as a small bud as well as for the centre of the larger flowers.


Step 4


Shape the next size up petal with the stamped image on the outside and then add the small bud to the centre with Dries Clear glue.  This also makes a good bud to go with the bigger flowers and also rose centres.

Step 5


For the largest flower use three largest petals, one of each of the next sizes.  Assemble the three largest petals offsetting the petals each time.  Use two foam mats to get a deeper impression when assembling the flower.   Take the largest size of the smallest stamp set and shape into a bowl with the stamped side on the outside.  Add your previously made bud and add to the centre of this petal with Dries Clear glue.  Add this to the centre of the larger petals.

Step 6

For the second largest size flower use three of the smaller petals from the larger stamp set and one each of the other sizes.  Assemble the two layer bud as before.  Assemble the three larger petals offsetting each time as with the larger flower.  Add the largest petal from the smaller stamp set and adhere to the centre of the flower with the stamped side up.  Add the bud to the centre of the flower as shown.

Step 7

For the third sized flower take two of the largest size petals from the smaller stamp set and one each of the other sizes from the same stamp set.  Make a double petal bud as per previous instructions.  Assemble the two larger petals offsetting the petals and making a deep bowl.  Add the bud to the centre of the flower.

Step 8

For the smallest flower make a single petal bud.  Take two of the middle sized petals from the smaller stamp set and assemble together offsetting the petals and creating a bowl shape.  Add the bud with Dries Clear glue and leave to dry.

Step 9

To finish the flowers add Crystal Clear glitter using Dries Clear glue on a damp Hydra sponge.


Heartfelt Creations supplies:

HCPC-3752 Classic Rose Stamp

HCD1-7110 Classic Rose Die

HCFB1-462 3D Rose Shaping Mold

RACP614 Magenta Hue ink

RACP531 Vivid Chartreuse ink

RACP475 Library Green ink

HCPP1-475 Deluxe Flower Shaping Paper (50)

HCST1-401 Deluxe Flower Shaping Kit

PGM15015 Crystal Clear glitter

159723 Dries Clear Glue

352854 Metal Tip for Adhesive Bottles

35854 Hydra Sponge

HCDA2-450 Stack and Store Daubers

Other Supplies:

White cardstock

Tips

Allow the flowers to dry after removing from the mold.

Allow the flowers to fully dry after assembling them before adding glitter.

I hope I have inspired you to create some gorgeous roses for your own projects.

Happy Crafting

Ka Kite Anu

Patricia

A Victorian Lady’s Essentials

Kia Ora Koutou

Welcome back and my Cricut has been chirping for this post for Dress My Craft.  The Myrcella Vanity’s SVG bundle files from Dreaming Tree was perfect for the Vintage Lady collection. Please click on my affiliate badge on the right side of this site for more information.


First up is a jewellery box that has been decorated with the beautiful Crochet Lace Border die in gold accents and flowers made with the Curved Flower, Five Petal Flower and Daisy Flower dies.

My second project is a perfume bottle complete with atomiser sprayer.  The flowers I have used on this is the the Curved Flower, Five Petal Flower, and Daisy Flower dies with the leaves from the Create a Flower Die set.

My final project is an oil bottle and this has been decorated with flowers from the the Curved Flower and the Create a Flower dies.


For a list of all Dress My Craft products used please visit my post on the Dress My Craft here.

To purchase the SVG files please click on my affiliate link on the right side of my blog.

Happy Crafting.

Ka Kite Anu

Patricia

Celebrating Petunias

Kia Ora Koutou

And welcome back to my final post for this week at Heartfelt Creations and I have another card featuring some more Classic Petunias.

Products Used:

Sweetheart Borders DieHCD1-7161
Daydreams Bridge DieHCD1-7233
Cherry Blossom Retreat Paper CollectionHCDP1-2100
3D Cherry Blossom Shaping MoldHCFB1-474
Tweet Cherry Blossoms Cling Stamp SetHCPC-3866
Tweet Cherry Blossoms DieHCD1-7230
Cherry Blossom Retreat Cling Stamp SetHCPC-3867
Cherry Blossom Retreat DieHCD1-7231
Large Classic Petunia Cling Stamp SetHCPC-3786
Large Classic Petunia DieHCD1-7140
Small Classic Petunia Cling Stamp SetHCPC-3785
Small Classic Petunia DieHCD1-7139
Assorted Bead Stamens-MediumHCS1-459-3
Stack and Store Daubers-Pack of 30HCDA2-450
Deluxe Flower Shaping Paper Pack of 50 – WhiteHCPP1-475
Rajni Chawla’s Crystal ClearPGM15015
Rajni Chawla’s Frosting PowderPGM15016
Ranger Archival Ink Pad – Jet BlackRACP468

Other Products: 

Iris cardstock, white cardstock, spray adhesive

For more tips on creating with the Classic Petunia collection, watch the tutorial at https://youtu.be/KOy_qNB9OAk.

For more tips on creating with the Cherry Blossom Retreat collection, watch the tutorial at https://youtu.be/OaA2da5H-E0.

For more tips on creating with the flower shaping molds, watch the tutorial at https://youtu.be/FSdPL7nXvQE.

For more tips on creating with the foam paper & stamens, watch the tutorial at https://youtu.be/Oma6ctVmUD0.

Instructions: 

Cut a piece of white cardstock 10” x 7”, score at 5” along the long side and fold to create a base card of 5” x 7”. Cut a piece of blue sky patterned paper from the Cherry Blossom Paper Collection 4 15/16” x 6 15/16” and adhere to the front of the card with a piece of heavy cardstock. Die cut two straight lace borders from the HCD1-7161 Sweetheart Border Dies set out of white cardstock. Add Frosting powder with spray adhesive and adhere to the top and bottom of the card as shown. Die cut the decorative die from the HCD1-7233 Daydreams Bridge Die set out of white cardstock. Add Frosting Powder to the die with spray adhesive and adhere to the centre of the card front between the borders.

Stamp the birdhouse image from the HCPC-3866 Cherry Blossoms Retreat Stamp set in Jet Black ink on Iris cardstock. Colour with Zig Clean Colour Brush Markers and die cut with the coordinating die. Add Crystal clear to the leaves and flowers with Dries Clear glue on a dry sponge and then add the birdhouse to the front of the decorative die.

Stamp the large and small petunias from the HCPC-3786 Large Classic Petunia and HCPC-3785 Small Classic Petunia Stamp sets in Magenta Hue ink for the flowers and Leaf Green ink for the leaves. Colour the centres of the flowers with Magenta Hue and Cactus Flower inks with the stack and store daubers and the leaves with the Vivid Chartreuse inks and die cut with the coordinating dies. Shape using the 3D Basic Flower Shaping Mold and then squeeze the flowers with fingers before assembling. Pierce the centres of the flowers and add the deep pink stamens through the centres.   Add Crystal Clear glitter to the flowers with Dries Clear glue on a damp sponge. When dry trim the wire stems and adhere draping over the vase as shown. Make a small bud with a small flower and add a small leaf to the base and then add to the flowers. Add extra leaves around the flowers.

Stamp two petunia border images from the HCPC-3786 Large Classic Petunia Stamp set in Jet Black ink on Iris cardstock. Colour with Zig Clean Colour Brush Markers and die cut with the coordinating die. Add Crystal Clear to the border with Dries Clear glue on a dry sponge. Trim the borders and adhere around the flowers and leaves as shown.

Stamp the sentiment from the HCPC-3785 Small Classic Petunia Stamp set in Cactus Flower ink on white cardstock and die cut using the smallest arrow die from the HCD1-7204 Arrows & Banner Die set. Adhere this sentiment to a piece of blue sky paper from the Cherry Blossom Paper Collection and trim to create a small border. Adhere to the bottom of the card as shown and add a small petunia spray to the left side of the arrow.

Stamp the bird images from the HCPC3866 Tweet Cherry Blossoms Stamp set in Jet Black ink on Deluxe Flower Shaping Paper and die cut with the coordinating die. Colour with French Ultramarine and Peanut Brittle inks and then shape using the coordinating mold. Add Crystal Clear glitter using Dries Clear glue on a damp sponge and then adhere around the flowers as shown with foam tape.

Happy Crafting

Ka Kite Anu

Patricia