The Paper Trail Blog Hop – Timberline

Welcome back to the Paper Trail Blog featuring the fabulous Timberline papers.  This is such a masculine paper and a lot of fun to use.

If you have come from Betsy’s blog,  you are in the right place and if you have just popped in to visit then feel free to have a good browse.  The blog hop is circular so once you have visited everyone you will end up where you have started.

For my post today I have done a layout of my son using the WOTG layout with my own twist.  I cut out the basic layout months ago and finally with this blog hop I managed to get it completed.  I could not believe that the school photo of James went so well with the Twilight base card and  I also managed to find some photos of James playing cricket at about the same age and once again the photos went well with the colours.  Here is the layout:

CTMH - Timberline double page layout

My Cricut machine got another good workout.  I have used the Artbooking cartridge to cut the vines and leaves, the Ready. Steady.Go and the All Boy titles and the Art Philosophy cartridge for the scalloped matting.  The leaves have been cut using Ponderosa Pine cardstock and then layered with Olive cardstock.  I have then distressed them all with Desert Sand ink to add some dimension to the leaves.  I have also used an embossing tool to add some texture to the vine leaves.  Here is a close up of the leaves:

Close up of Artbooking leaves

I have kept to a fairly simple colour scheme – just using Ponderosa Pine and Desert Sand inks on the Ponderosa Pine, Bamboo and Twilight cardstock.  I think this makes for a very harmonious layout.

Here is a list of the materials I have used for the layout:

Cardstock – Twilight, Bamboo, Ponderosa Pine, Colonial White

Inks – Ponderosa Pine. Desert Sand

Papers – Timberline

Stamp sets – Catch You Later, Take Note Cricut Bundle, Tech Speak

Cricut Cartridges – Art Philosophy, Artbooking

Dimensional elements

I have also made some fishing cards from these papers.  I love the Timberline paper with it’s beautiful plaid pattern and the wonderful woodgrain effect paper – very versatile.  In the past I have found it very difficult purchasing decent masculine cards and CTMH make it so easy to make cards for everyone.

CTMH Timberline card

CTMH Timberline card

CTMH Timberline card

CTMH Timberline cardThe materials used are:

Cardstock – Colonial white, Cashmere, Chocolate, Slate

Paper – Timberline

Inks – Cashmere, Chocolate, Twilight

Stamp sets – Catch You Later, Joyful Birthday, Just a Number

Bakers Twine – Chocolate

Sparkles Black and Grey Assortment

(I have used my Scorpal to score the horizontal lines – time to get the CTMH Stripe embossing folder I think!).

I hope you have enjoyed your visit here and seen how much fun the Timberline papers are.  Now hop on over to Mary’s blog here to check out her fabulous creations.

Happy Crafting

Patricia


CTMH Easter Goodies

Welcome baack

Easter is not far away now and I went to the supermarket yesterday and the Easter Egg gift boxes were very much the same as what they have been for years and are just advertising for Cadbury.   So I decided I would make some boxes using the Artiste cartridge and today I have been very busy and here are some of my results.  Sorry about the first photo but there are better photos coming up, but daylight savings has finished and I was running out of light to take photos.

Easter goodies made from the CTMH Artiste Cartrige


I have used three different cuts from the Artiste cartridge.  The first one is on page 73 of the booklet.  I have also cut the grass from the Artbooking cartridge and placed it around the base of the box.  The cute rabbit in the front is from the Hoppy Easter stamp set and I have coloured it in using the CTMH alcohol markers.

Easter goodies made from the CTMH Artiste Cartrige

Here is a close up of the rabbit.  I have also cut the butterfly out from the Artiste cartridge and added some bling with some CTMH sparkles.

Easter goodies made from the CTMH Artiste Cartrige

The second box has been cut out using the pattern on page 69.  I have mixed and matched the cardstock colours to match the soft toys I purchased to go with the boxes.  Inside there is also an Easter Egg.  I am still using up my Chantilly papers (which are no longer available unfortunately) and these went perfectly with the boxes and colour scheme.  The ribbon has been cut using the pattern on page 56 and the flower is also cut out from page 33 and finished off with pink sparkle gems and green epoxy bubbles.  The sentiment is from the Hoppy Easter stamp set and the tag is from Holiday Tags.

Easter goodies made from the CTMH Artiste CartrigeFinally I love these cute little boxes from page 73 of the booklet.  There is also a flower box for something different.  I have also cut the grass from the Artbooking cartridge and put it around the base of the box and I then put the sentiment on the box.  These are so cute and they are big enough to fit an Easter egg inside.

Easter goodies made from the CTMH Artiste CartrigeMaterials used:

Cardstock – Sky, Pear, Buttercup, White Daisy, Cotton Candy, Hollyhock

Papers – Chantilly (NLA)

Inks – Pear, Outdoor Denim

Markers – Cotton Candy, Pear

Stamps – Hoppy Easter, Holiday Tags

Cricut Cartridges – Artiste, Artbooking

Sparkles – clear assortment

Pink Glitter gems

Blue and Green Epoxy bubbles

Liquid Glass

All these will be for sale at Craft Hutt and I will also take some to a craft fair I will be going to on Good Friday.

Have a good week.

Happy Crafting

Patricia

Skylark Wedding Cards

Welcome back

I do apologise for missing last week’s post but I have had some family issues to deal with, and while they have settled down there is still going to be some problems to work through.

For this post I have been playing around with the last of my Skylark papers and have made some wedding cards.  I am really enjoying using a different combination of colours and papers to what I normally use.  Here I have used Lagoon and the beautiful Teal shimmer trim to create a pop of colour with the Skylark papers.

CTMH Skylark Wedding card

For this card I have used the pattern out of the Make It From Your Heart Volume 2 page 46 and used a cut from the Artbooking cartridge (page 48) in Lagoon cardstock for the centre panel which fitted  in well.  I love using the Perfect Fit – Frames 2 for an accent and the little wedding couple from The Happy Couple stamp set fits perfectly in the middle.  The congrats stamp is from the Cricut Artiste Collection Kudos.  And I have finished the card with a flower from the Skylark Assortments.

CTMH Skylark Wedding card

For this card I have again used the Quatrefoil embossing folder to add some interest to the plain cardstock.  I love how the papes from Skylark are great for cards as well as for scrapbook layouts and here I have trimmed the corner of the 12 x 12 paper to fit the card base.  I have added an extra pennant topped with a blue epoxy bubble and the sentiment is from The Happy Couple stamp set.  A very simple yet elegant card.

CTMH Skylark CongratulationsAgain for this card I have manage to trim the patterned paper to fit the card and keep the lovely bird which ties in well with the striped lagoon paper for the bottom of the card.  I have cut the lovely ribbon out with the Artbooking Cricut cartridge.  I the stamp is from The Happy Couple stamp set.  I have finished off with a couple of epoxy bubbles and the Teal shimmer trim.

CTMH Wedding card using Skylark and Lagoon

This card was very quick and easy with the Cricut Artbooking cartridge.  I have cut the same image but for a portrait card instead and teamed it with the Lagoon striped paper from Skylark pack and the Teal shimmer trim and just placed a simple sentiment on it matted with Lagoon cardstock.  Another simple, yet elegant card.

Materials used:

Cardstock – White Daisy, Lagoon

Paper – Skylark Paper Pack

Ink – Lagoon

Skylark assortment

Green and Blue Epoxy bubbles

Stamps – Cricut Artiste Collection, Kudos (only available as part of the Artiste Cricut Collection, The Happy Couple, Perfect Fit – Frames 2

Cricut Cartridges – Artiste, Art Philosophy and Artbooking

These cards will be available for sale at Craft Hutt, so if you live in Wellington do pop in and say hello and have a look at all the wonderful arts and crafts for sale.

I am going to be busy over the next few days as I have the Australasian CTMH SOTM hop coming up and I have also been invited to another blog hop featuring papers from CTMH.

I hope you all have a good week.

Happy Crafting.

Patricia

New Product Blog Hop – Part 2

Welcome to this blog hop featuring new products from the Ideas Book and catalogue from Close to My Heart.

1011248_10151828118462574_1470363421_n

For this post I have used one of the note boxes available for sale through CTMH and decorated it with the Skylark paper which I had left over from the WOTG and it is just beautiful.

Here it is:

CTMH  box

CTMH box

The birdcage has been die cut out of Honey cardstock and sponged with Desert Sand to get the old gold look.  I have used a Couture Creations die as I couldn’t find a birdcage on the CTMH cartridges.  

For the flowers I have been inspired by Cathy Derouche (a sister CTMH consultant who has done some great videos and uploaded them to YouTube) and used my Art Philosophy (p 50 for the outside petals) and Artiste cartridges (page 54 for the centre) to cut out the shapes.  I have used White Daisy cardstock and sponged with Buttercup ink and then sponged all the edges with Sweet Leaf ink to create a subtle yellow/green flower that matched the Skylark paper beautifully.  Prior to inking I have used an embossing stylus to create some texture and shape to the flowers.  This has created a more realistic and faded look to the roses which is what I was wanting to achieve.

The leaves have been cut using the Artiste  cartridge (page 54) out of Sweet Leaf cardstock.  Again I have dry embossed using an embossing stylus to create a leafy texture and then sponged with Pear ink.

Finally I added a little bling to finish off the picture using the Clear Sparkles Flourishes – small.

Once I had completed all the embellishments the rest of the box was easy to do.  I have used Juniper cardstock to mat the Skylark papers on all the sides.

I have left the inside of the box empty for the box to be used as a trinket or keepsake box.

Here are a couple of close-ups of the flowers:

CTMH flowers

CTMH flowers

Materials used:

Cardstock – White Daisy, Juniper, Sweet Leaf, Honey

Papers – Skylark B&T Duos

Inks – Desert Sand, Buttercup, Sweet Leaf, Pear

Cricut Cartridges – Artiste and Art Philosophy

Sparkles Clear Flourishes – small

Couture Creations birdcage die

Sizzix Garden Flower set

Cuttlebug embossing machine

<!– start LinkyTools script –>

Powered by Linky Tools

Click hereto enter your link and view this Linky Tools list…

<!– end LinkyTools script –>

Happy Crafting

Patricia

CTMH Skylark embossed card.

Welcome

I hope everyone has had a good week and are ready for new week.  For this week’s post I am ( showing a very simple card featuring one of the new embossing folders from Close to My Heart.

CTMH cardI love the Skylark colours and here I have used Lagoon cardstock with the Skylark yellow paper which echoes the pattern of the embossing.  For the flower I have cut three daisy shapes with my Cricut Artiste cartridge out of Buttercup cardstock and sponged the edges of the shapes with Sweet Pear to tone down the yellow to allow it to be more subdued and match the yellow paper better.  I then finished the flower off with a flower from the Skylark Assortment pack.  I am really enjoying using the twist ties to add something different to a project and here they finish off the flower nicely.

Materials used:

Cardstock – Buttercup, Lagoon

Inks – Lagoon, Slate, Sweet Leaf

Papers – Skylark

Skylark Assortment

Stamp – Holiday Tags (D1560)

Cricut cartridge – Artiste

Slate twist ties

Next week I have a couple of blog hops so I am busy with preparing for them so watch this space…

I hope you all have a good week and I will see you next week.

Happy crafting

Patricia

A Sad Farewell to Chantilly by Close to My Heart

Welcome back

Firstly I would like to apologise for not following other blogs and commenting on them as much as I would like but I have been very busy.  Earlier last year I told you about setting up Make Shift, well that unfortunately has popped down, so I have started up my own shop called Craft Hutt.  This is also an art and craft collective that focuses on selling hand crafted NZ made goodies.  Craft Hutt is still in it’s infancy so needs a lot of TLC to get established and I have been quite busy with manning the shop plus doing all my own crafting.   Once things settle down I will be keeping up with all that is happening around the world.  In the meantime check us out on Facebook.com/CraftHutt for all the latest news and information.

For this weeks post I have been doing some layouts using the last of my beautiful Chantilly papers.  This lovely paper is no longer available, but I am eagerly awaiting a delivery of the gorgeous new papers coming in the next catalogue.  I love using the Made it From Your Heart books Volumes 1 and 2 as it is quick and easy to make a fabulous 2 page layout.  All you need to do is sort out your photos.   I have left the photo mats blank as I am uncomfortable about putting photos of my family on the internet.

CTMH Chantilly double page layout

For this layout I have used the recipe from page 12 of the Volume 2 book.  This layout was also featured in the Laughing Lola WOTG and I love it as it is so easy to use either landscape or portrait photos.  I have distressed all the edges except for the white photo mats with Desert Sand ink and the flowers and leaves are from the Cricut Artiste and Art Philosophy cartridges.  I still have space to do some titles and I can use one of the photo mats for journalling as well.  I love the simplicity of the colour scheme, especially with the little pop of pink with the Hollyhock cardstock.

CTMH Chantilly Double page layoutFor this layout I have used the recipe from page 24 of the Volume 2 book.   I have cut out some flowers and birds from the patterned paper and adhered them to the page and also used the Just for You (B1398) stamp set to make a flower embellishment. The journalling shape has been cut out using the Art Philosophy Cricut cartridge.  For this layout I have not distressed the edges to keep it crisp and clean.  As you can see there is still some finishing to do with titles etc but that can wait until the photos are in place first.

These layouts did not take very long and yet are very effective.

Materials used:

Cardstock – Hollyhock, Twilight, Pear, Colonial White, White Daisy, Buttercup, Topiary, Desert Sand

Ink – Outdoor Denim, Desert Sand, Buttercup, Pear, Cotton Candy

Chantilly paper pack

Chantilly complements

Cricut Cartridge – Artiste, Art Philosophy

Stamp set – Just for You (B1398)

As I said before I am looking forward to getting my next order with a whole lot of new products from the next catalogue.  I am hoping to participate in a couple of blog hops to showcase the new items so watch this space…

I would like to remind people that there is only a few days left for purchasing any retiring items so please don’t delay and order your items now as these are available while stocks last only.

Have a good week and Happy Crafting

Patricia

CTMH Paper Doll Cards Using Paper Piecing

Welcome

I would like to pass on my best wishes to all my Facebook and blogging friends who are experiencing extreme weather conditions at the moment.  I hope you are all keeping well and safe in either the extreme heat or the very very cold weather.

For my post today I have used the gorgeous Paper Doll (D1547) stamp set which takes me back to my childhood.  I loved playing with paper dolls and dressing them up with different clothes and this stamp set is so cute and it is almost like what I had as a child.  The good news is that this stamp set is still going to be available in the new product guide coming next month.

I have used a paper piecing technique to create the clothes as well as some colouring in with my alcohol markers.  Splitcoaststampers have a tutorial on paper piecing and you can find it on this link.

For these little girls I have stamped the image of the girl on White Daisy cardstock and then I have stamped the outfits onto the some scrap White Daisy cardstock to have a base for the patterned papers.  These images have been fussy cut out carefully.

I have used Chantilly papers to create a lovely combination of clothes for my little girl and as it is already so beautifully coordinated it was easy to do.  Unfortunately, the Chantilly papers will not be continued with the next product guide.  However, I have seen the new Product Guide and I love the new papers coming out.  Watch this space…

CTMH - Paper Doll stamp set - Paper piercing

For this card I have stamped the top onto a piece of yellow patterned paper and then fussy cut it out and adhered it to the base outfit.  And for the pants I have used my Pear alcohol markers to colour in the pants and the Cotton Candy alcohol markers for colouring in the bag etc.  I then used the little tags to glue the outfit onto the base girl image.  The hair has been coloured in using Buttercup alcohol markers.  The hat has made by stamping the hat image onto Desert Sand cardstock and then fussy cut.  I have coloured the flowers using the above alcohol markers and using a craft knife I have cut along the edge of the hat to allow me to place it on the head of the girl.

To complete the card I have embossed the Cotton Candy cardstock with my Swiss Dots embossing folder from Cuttlebug and  stamped the cross stitch from the Stitch Wonder stamp set onto the Buttercup card and adhered it to the base card stock.  I have used scrap yellow patterned paper to make some ribbons and finished off by stamping the sentiment from the You are My Happy stamp set onto a piece of White Daisy cardstock.

CTMH - Paper Doll Stamp set - Paper Piercing CTMH Paper Doll stamp set - Paper piercing

On the bottom two cards for the dresses I have stamped onto the pink patterned paper and then carefully cut out just the dress and using my Bonded Memories glue stick adhered it onto the base of the clothes.  I then stamped the same image onto the green paper for the pants and again cut out the pants carefully and adhered them onto the base with my glue stick.  I have used my Cotton Candy and Pear alcohol markers to colour in the flowers on one of the dresses.   I then used the little tags to glue the outfit onto the base girl image.The hair has been coloured in using Buttercup alcohol markers.  The hat has made by stamping the hat image onto Desert Sand cardstock and then fussy cut.  I have coloured the flowers using the above alcohol markers and using a craft knife I have cut along the edge of the hat to allow me to place it on the head of the girl.  For the head band I have stamped the image of the head band onto Cotton Candy

For a touch of whimsy I have used the grass from the Bugs and Hugs stamp set which looks quite cute and gives a background for the girl to stand on in the middle card.

On the bottom card I have stamped the lemon image onto Buttercup cardstock and then fussy cut them and then halved them to make the border.

For both cards I have stamped the image of the sign onto Desert Sand cardstock and cut it out and adhered it to the card. 

I love the sentiments with this stamp set and for the bottom two cards I have used Outdoor Denim ink to stamp the sentiments on White Daisy cardstock and trimmed them to fit and matted them with Pear cardstock.

To complete the cards I have added a touch of bling with the clear sparkles and epoxy bubbles.

This technique helps to create a little three dimensional feel to the girls and the girls really look like they are about to step out of the cards.

The top card is from a recipe from the Make it From Your Heart Volume 2.  This is such a versatile book with lots of great ideas for both scrapbooking and cardmaking.  There are a number of different books with lots of ideas available on my website.

Materials used:

Stamp sets – Paper Doll (D1547), Stitch Wonder (C1564), Cricut Artiste Collection Kudos (D1530), Bugs and Hugs (D1535) (retiring), You are My Happy (no longer available)

Cardstock – White Daisy, Desert Sand, Buttercup, Cotton Candy, Pear

Chantilly Paper Pack

Inks – Pear, Cotton Candy, Outdoor Denim

Alcohol Markers – Cotton Candy, Pear, Buttercup

Clear Sparkles

Green and Blue Epoxy Bubbles

Bonding Memories Glue

Pink glitter gems

White Bakers twine

Cuttlebug embossing folder – Swiss Dots

I hope that you all have a great week and I will catch up with you next week.

Happy Crafting

Patricia

CTMH SOTM Cross Stitch Wishes

Happy New Year

I would like to wish you all a happy, healthy, prosperous and safe 2014.

Unfortunately, life did get in the way for me and I was unable to participate in the Australasian Blog Hop on the 1st January.  But please click on this link to see what my fellow CTMH Consultants downunder have been doing.  However, I did manage to get my stamp set early and here is what would have been my entry.

This month the stamp set is Cross Stitch Wishes (S1401).  This is a great stamp set for all those crafters out there.  Over the years I have done a lot of different crafts including sewing, cross stitch and quilting (more cross stitching then quilting – see my only effort at quilting a bag under my Crafty Creations page) and this stamp set suits me to a tee.  This set is also great for scrapbooking all your photos of your crafts as well.

For my card I have used the ‘sunburst’ technique for the background.  I have got the instructions from a fellow CTMH Consultant, Patti Gaspari Ehrhardt, but there are numerous instructions on YouTube that can show you how.  It is very simple and a great way of using up scraps.  I have also used another stamp set Stitch Wonder (C1564)  which goes so well with this SOTM set.  When I was doing a lot of digital scrapbooking I loved using a stitch kit to finish off my layouts.  I also used this in my last post on a layout using White Daisy pigment ink to look like I had stitched the cardstock down.

I have also used the Cricut cartridge – Artiste to cut out the buttons and cotton reel. I have used a combination of sponging and my alcohol markers to colour in the thread on the reel.   The buttons have had liquid glass applied for a three dimensional effect.  These cartridges are amazing and the Artbooking cartridge is on my must get list for this month.

Here is my card:

CTMH SOTM Cross Stitch Wishes

Materials used:

Cardstock – White Daisy, Cotton Candy, Slate

Chantilly papers

Inks – Cotton Candy, Slate

Alcohol Markers – Cotton Candy

Stamp sets – Cross Stitch Wishes, Stitch Wonder

Cricut Cartridge – Artiste

Liquid Glass

As usual with the Stamp of the Month set it is available for just $5 for any purchase over $75 saving $24.

Plus January is National Papercrafting month and there is another special offer for this month.

You can get an exclusive Cloud Nine cardmaking kit for $20 (retail value $74 NZD) with a qualifying purchase of $55 or more (excluding tax and shipping) during January in celebration of National Papercrafting Month. Make 10 adorable cards (2 each of 5 designs) with funky messages to put any recipient on cloud nine! You can add one cardmaking kit for every $55 in your order*.

1401-cc-npm-cloud-nine-au_nz

This is a gorgeous set, the colours are fantastic and they are so easy to put together.  They would be great to give as a gift for a friend as well.

Watch the campaign video and contact me for further details.

If you buy both sets at the special price you can save a total of $78.

Whew that is a lot for this week.  I hope everyone has a great week and I will catch up with you next week.

Happy Crafting

Patricia

Australasian Close to My Heart Stamp of the Month Blog Hop

Hello and welcome aboard the Australasian Close to My Heart Stamp of the Month Blog Hop. If you have arrived here from Marianne’s Blog, Your Creative Journey with Marianne, then you are in the right place. If you landed here by accident, no problem, please join in by following the link at the end of this post.

I am really excited to finally show you what I have been doing for this month’s blog hop.  This has been a work in progress and I originally wanted to make a box for a thank you gift and it wasn’t quite what I had expected so my creative mind went into overdrive and thought it would be great to do an exploding box and use the December SOTM set and then I was all sorted for this hop.  I had done an exploding box as part of a group a few years ago for a friend who was undergoing surgery and she has still got it now as it was such a special gift.

I ended up doing two boxes – one for Christmas and one made out of Chantilly for more general purposes.

Side view of the exploding box

The inside of the box showing the three layers and the decorations that I have p

Exploding hexagonal box All  assembled

To cut out the hexagon box shapes I have used the Artiste Cricut cartridge page 48 3 D object.  For the Chantilly box I have cut out 3 different sizes – 3.25, 3.00 and 2.75 inches.  The Christmas box is slightly smaller and the sizes are 3.00, 2.75 and 2.5 inches.

Using my Cricut machine has made this so much easier and I could spend more time on decorating the box.  Here is the base and as you can see I have cut up the cardstock and paper ready to put on the base front and back.

????????????????????????????????????????????????????????????????????????????????The dimensions I have used for the Chantilly panels are:

Bottom layer:

Outside panel – 2 1/2″  x 3″

Inside – plain cardstock panel 2 1/2″ x 3 ”

Patterned paper panel 2 3/4″ x 2 7/8″

White cardstock – 2 1/4″ x 2 6/8″

Middle Layer

Outside panel – 2 3/8″ x 2 7/8″

inside – plain cardstock 2 3/8″ x 2 7/8″

Patterned paper 2 1/4″ x 2 6/8″

White cardstock 2 1/8″ x 2 5/8″

Inner Layer

Outside panel – 2 1/2″ x 2 1/4

Inside – plain cardstock 2 1/2″ x 2 1/4″

Patterned paper – 2 3/8″ x 2 1/8″

White cardstock – 2 1/4″ x 2″

Unfortunately, the sides were not even so you may have to do a little adjusting to get an even matting.  If you are sharp eyed you will have seen I have made a mistake with the middle layer with the inside layers being smaller than what I have written here but I have given you the above dimensions to make it easier for you.

Here is the middle layer with the layers all cut out and I have distressed the edges with Desert Sand ink.

????????????????????????????????????????????????????

I then adhered all the layers to the sides outside and inside.

?????????????????????????????????????????????????????????????? ?????????????????????????????????????????????????????

I then used  the You are My Happy stamp set to stamp images using Outdoor Denim ink on the White Daisy cardstock and distressed the edges with Desert Sand ink.  These were then adhered onto the patterned papers.

For the middle of the top layer I had to cut out another  hexagonal shape (2 1/2″) out of patterned paper using the base of the box.  If I had the Artbooking cartridge I would have been able to cut the hexagon from there.  However, this was a simple way to get the nice patterned paper and I just cut the sides off and it fitted very nicely.  The edges were also distressed with Desert Sand ink.

All stamped and ready to assemble

Once I had completed each layer the box was adhered together to create the exploding box.

All  assembled

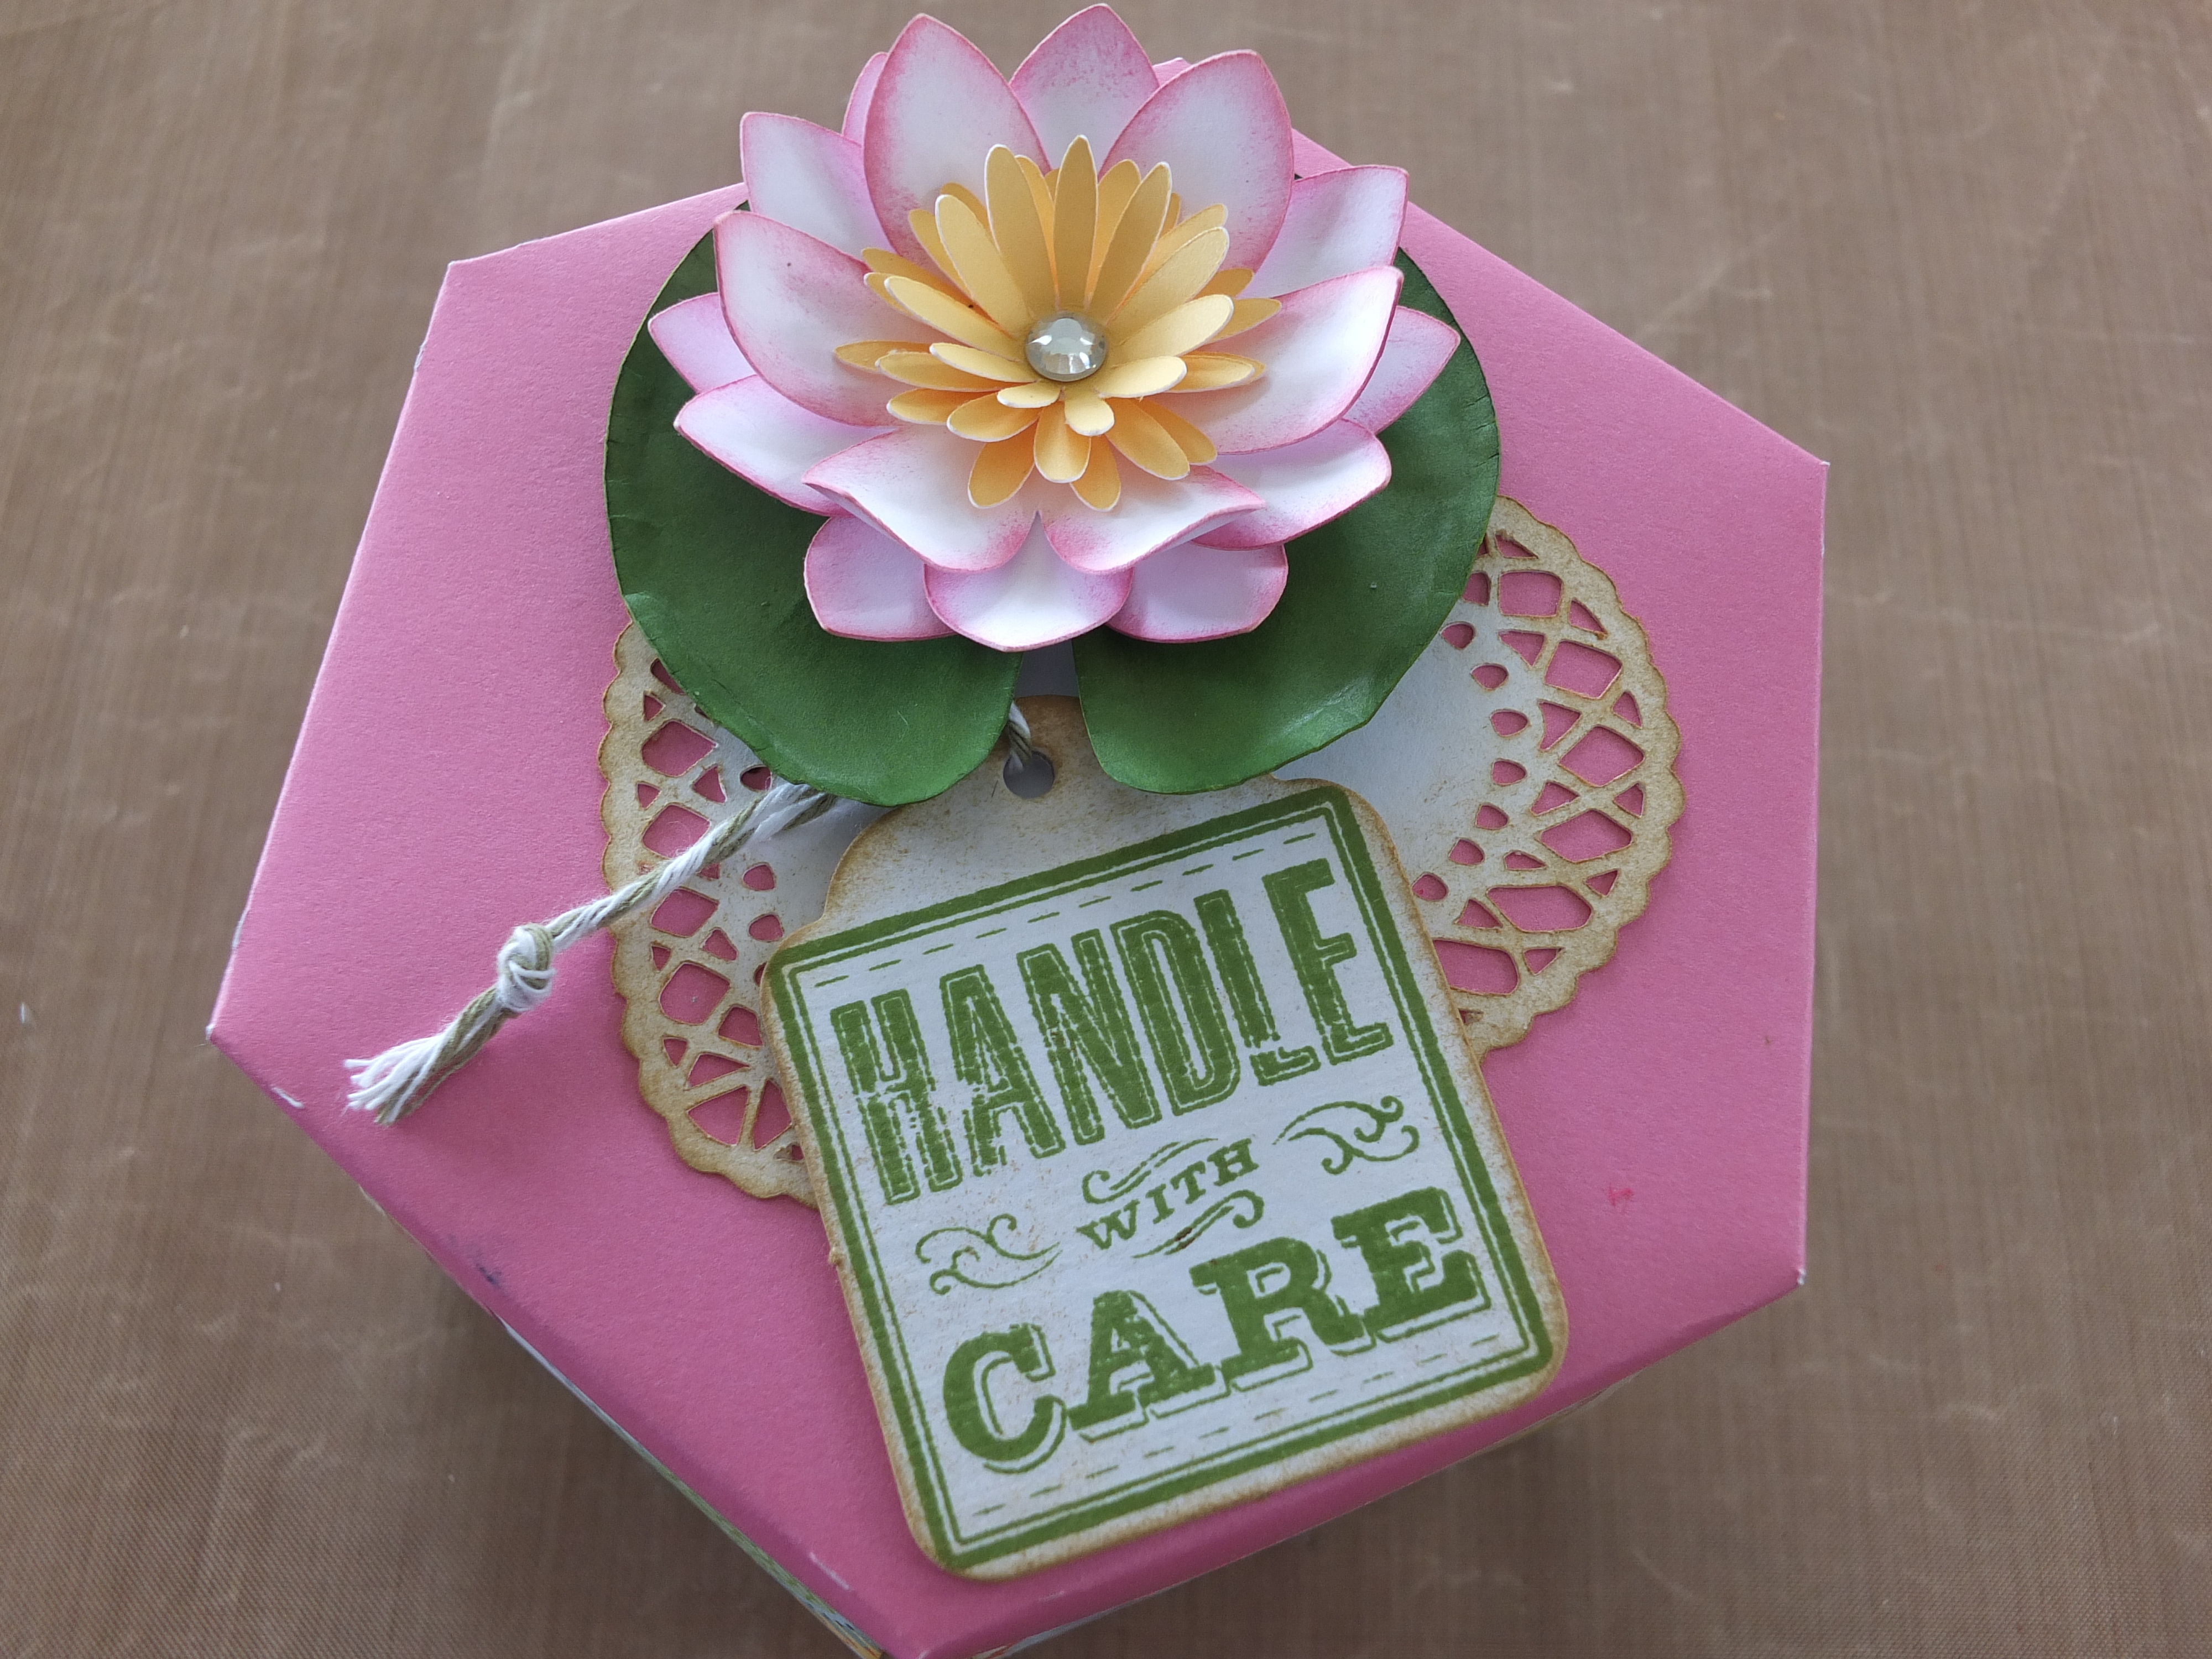
I cut out the top of the box out of Cotton Candy cardstock and decorated it with a lily on a lily pad and a heart shaped doily and topped it off with a dimensional tag stamped using the SOTM set Special Care.   I have got the idea for the lily from Angela Mansfield a fellow CTMH consultant.  She was very generous and gave very good detailed instructions.

Here are the instructions for the decoration on the top.

The flower has been cut from White Daisy cardstock using the  Artiste Cricut Cartridge (pg 73 accent 1)at 2 1/2 ”   – 3 layers.  I have sponged the edges of the layers and then shaped the petals using my fingers.  The 3 layers were adhered together to form the base of the lily.

For the centre I have cut 3 flowers again from the Artiste Cartridge (pg 54 Accent 3) from  Buttercup cardstock and layered them on top of each other and once again using my fingers to gently add some shape and dimension.  To complete the lily I added a clear sparkle in the centre.

For the lily pad I have cut a plain circle from the Art Philosophy cartridge (pg 21 circle1) at 3″ out of  New England Ivy cardstock.  I then cut a small wedge out of the circle and using an embossing tool I went around the edge of the circle to  create a small lip for a ruffled edge.  I also embossed some vein lines to add some more realism.  to finish off I have sponged the edges with Topiary ink.

I have cut the lovely heart shaped doily from the Art Philosophy cartridge (Pg. 70 Font layer) out of White Daisy cardstock and distressed it with Desert Sand ink.

Finally I have distressed  a dimensional element tag with Desert Sand ink and stamped the Handle With Care stamp using Topiary ink onto it.  I am really pleased with the distressed look this came out with.

Here are some close up views of the top.

Close up of the lily Close up of the tag

Materials used for this box are:

Cardstock – Cotton Candy, Desert Sand, New England Ivy, White Daisy, Buttercup

Dimensional elements – tags

Inks – Cotton Candy, Topiary, Desert Sand, Outdoor Denim

Stamp sets – CTMH SOTM set – Special Delivery, You are My Happy

Sparkles

Chantilly papers

Memory Bond adhesive

CTMH Artiste and Art Philosophy Cricut cartridges

For the Christmas box I have followed the same procedure as above but I have reduced the size of the box.

The papers used are from the Holidays from the Heart gift guide and I have teamed them with Slate and Ruby cardstocks.  I love the look of the candy cane papers.

Christmas exploding box

The rosette has been cut using the Artiste Cartridge (pg 50, accent 4).  I can’t remember exactly the sizing but I think I cut it at 2″.

The rose has been cut out of Ruby cardstock from the Art Philosophy cartridge (pg 69, Font) and the holly leaves have been cut using New England Ivy cardstock from the Art Philosophy cartridge (pg 46, Leaf3).  The holly leaves have had lines embossed and the edges sponged with Topiary ink to add some dimension. The holly berries have been cut from the Art Philosophy cartridge again (pg 64, Layer) and I have added some liquid glass to add some shininess and dimension to the berries.

I have not distressed the dimensional tag and chosen instead just to stamp the Handle with Care image using Ruby ink onto the white tag.

Inside I have decorated in a similar fashion but this time I have used the Art Philosophy cartridge to cut out postage stamp shapes (pg 24, Square6) at 1″ and stamped all the images from the Magical Days Holiday stamp set from the Holidays from the Heart gift guide in a mix of Slate, Juniper and Ruby inks.

another view all laid out Close up view of the panels using the Holidays from the Heart  Magical Days Holi

Materials used:

Cardstock – Ruby, Slate, White Daisy, White Daisy

Sparkle and Shine B&T Duos from the Holidays from the Heart gift guide.

Inks – Ruby, Slate, Juniper

Dimensional elements – tags

Grey Bakers twine

Stamp sets – SOTM Special Delivery, Magical Days Holiday

Memory Bond adhesive

Liquid Glass

The Special Delivery stamp set  is a very versatile set and I would have loved to have done a baby layout with this, but as I already have scrapped my children’s baby photos I thought I would do something completely different.

This exclusive stamp of the month is only available during December. It can be yours for just $5 with a qualifying order of $75 or for $29 if ordered separately from your CTMH consultant. If you do not have a consultant please contact me or place an order in my online store.  I’d love you to leave a comment and some liking before heading off to the next stop, Jenny’s  blog, Jen’s Creative Classroom.

Happy Crafting Patricia

CTMH Rosette Christmas Tree

Welcome to my blog – especially to all my new followers.  I hope that you find some inspiration from my creative endeavours just I find inspiration from other blogs and blog hops.

Today I will be showing my version of the rosette Christmas tree that is shown front of our Holidays from the Heart Gift Guide.  Here is the picture on the front of the Holiday Gift Guide.

1310-cc-holidays-from-the-heart-au_nz

There are instructions for doing the rosettes with the Artiste Cricut cartridge and Jenny Gilbert has really detailed instructions here.  However, I have been asked to teach my friends at Crafty Angels how to make these trees so I have done mine by hand so they are able to go home and do their own.

Here is my version of the tree:

??????????????????????

I have adapted the instructions from the archives of Close to My Heart which used a scoring board and a trimmer to make the tree.

The papers that I have used are the Sparkle and Shine papers from the Holidays from the Heart Gift Guide and they pleat so easily.

Before cutting the paper I used my ScorPal to score all the papers at 1/2″ intervals as it made it a lot easier to cut and pleat later.

I have cut the following pieces:

3 strips of 3″ x 12″

3 strips of 2 3/4″ x 12″

2 strips of 2 1/2″ x 12″

2 strips of 2 1/4″ x 12″

2 strips of 2″ x 12″

2 strips of 1 3/4″ x 12″

2 strips of 1 1/2″ x 12″

2 strips of 1 1/4″ x 12″

2 strips of 1″ x 12″

1 strip of 3/4″ x 12″

20 circles – I have used a 1 3/4″ punch for the larger circles and my CCS from CM for cutting two small circles for the top rosette.

As you can see I have reduced the size by 1/4 inch each so make the tree graduate to a point.  You could use another small rosette of 3/4″ x 12″ to place at the top of the tree but I have used my Cricut Art Philosophy cartridge to cut out snowflakes for the top of the tree as well as smaller snowflakes to decorate the tree.  The smaller white snowflakes have had glue applied and I have sprinkled some prisma glitter to give some glitter.  I have also stamped the stars from the Sparkle and Shine WOTG stamp set and fussy cut them out and put some sparkles in the middle of them for a bit of ‘sparkle and shine’.

??????????????????????????????????????????? ?????????????????????????????????????????????

I have not used a hot glue gun as my skin does not heal easily and I still have scars from last Christmas on my fingers!  But I have discovered Liquid Glass from CTMH to be a really great adhesive for making the adhesive (and for rolling flowers).  The Liquid Glass gives you about a minute to manipulate into place and then it sets really quickly and it did not take me long to do the rosettes.  There are lots of videos on YouTube to show you have to form the rosettes  (I am sorry but I couldn’t find the particular one that I used).  I made sure I had the circles close by to place them on the rosette quickly before I lost the shape.  Because the adhesive set very quickly it did not take long.  Foam squares have been used in between the rosettes as well for additional height.

To finish I had to purchase some green and red ribbon as I did not have Ruby Chevron ribbon or the ribbon to dye with the re-inkers like they have in America.

The materials I have used are:

Sparkle and Shine B&T Duos

Slate cardstock

Daisy White Cardstock

Juniper Ink

Slate Ink

Ruby Ink

Art Philosophy Cricut Cartridge

Foam squares

Non-stick scissors

Bonding Memories glue

Liquid Glass

Clear Sparkles

Prisma Glitter

Purchased ribbons.

I hope that you are inspired to make your own version of the tree.  A shorter version would look great as Christmas place settings with names on them, or doing a group of three different sizes would look nice as decorations together as well.

Have a great week as we spiral onwards towards Christmas.

Happy Crafting

Patricia