More Christmas ideas from CTMH

Welcome

This is my last post for the year featuring Christmas craft ideas seeing as it is Christmas Day on Thursday.

I have been inspired by Joy Tracey to make my version of her Artiste ornament.  For the instructions please click here for a link to her blog and the video that she has made to show how this is done.  My version has used Glacier and White Daisy cardstock and I have finished off with a silver sequin and a licorice epoxy bubble.  I bought the silver sparkle tulle from the local variety plus store to complete the ornament.
20141217_105840I have also made some more simple gift tags this time using the Art Philosophy cartridge to make boot shapes. The boots have been cut out with Ruby cardstock and the trims in White Daisy and Black cardstock.  It is hard to see on this photo but I have also put a piece of the white shimmer trim on the boot top for a bit of sparkle.2014-12-14 18.12.12

I also cut some White Daisy cardstock to back the boot so as to be able to write to and from on it.  I have used the stamps from the Holiday Tags stamp set and stamped the images in Ruby ink.

2014-12-14 18.12.25A hole and some slate bakers twine finished off these very quick and easy tags.

Materials used:

Cardstock – White daisy, Glacier, Ruby, Black

Inks – Ruby

Stamps – Holiday Tags

Cricut Cartridges – Art Philosophy, Artiste

Ribbon (NLA)

1 1/4 punch (available while supplies last)

Silver sequin

Licorice epoxy bubbles (NLA)

Slate bakers twine

Liquid glass

White Shimmer trim

These tags and other crafts that I make are available for sale at Gift Hutt in Lower Hutt, New Zealand.

Wishing you all a very Merry Christmas and a Happy New Year and  may Santa bring you more craft supplies to keep you busy in the New Year!

Happy Crafting

Patricia


More Christmas ideas from CTMH

Welcome again

Wow it is not very long now until Christmas although my North American friends have Thanksgiving coming up shortly.  I am still working on Christmas ideas and I absolutely love the Yuletide Carol papers with the Victorian feel to the papers and they are so versatile for lots of different projects.

Today I will feature three different ideas for using these gorgeous papers.

First up are three cards that I have made using patterns from Make it From Your Heart Volume 2 and inspiration from the Annual Inspirations book.  I have also used wet embossing to create the shiny effect on these cards.  I have been making cards for 20 years now and the first technique I learnt was wet embossing and I was so thrilled to see CTMH bring back embossing powders and I have finally  had the chance to use the powders that I have bought.

Christmas card 3

For this card I have embossed the baubles from the Holiday Cheer stamp set with gold powder on Ruby cardstock and then fussy cut them out.  This card is similar to one that I did earlier on and I changed it a little to make it easier to cut up for classes.  The bow has been cut out of the Artiste cartridge and finished with a bling gold gem.

Christmas Card 2

This card has been inspired from the Annual Inspirations Book and using the pattern from MIFYH book Volume 2 pattern 28.  This is such a simple card design but is so versatile and here I have used two different papers and also Ruby cardstock for the panels.  I have stamped the Noel from the Noel stamp set and the sentiment is also from the same stamp set.  I love the Curlicue stamp set from the Artfully Sent cartridge and now have a supply ready to go.  The frame has also been embossed with gold embossing powder.  The holly wreath is from the Noel stamp set and I have stamped it on scrap Colonial White cardstock and fussy cut it out to place at the top and coloured in the ribbon with the Shinhan Touch Twin Carmine marker.

Christmas Card 1This card has also been inspired by the Annual Inspirations book and the MIFYH book Volume 2 pattern 23.  Very quick and easy to do but a stunning card just topped off with gold sequins.

I then made some tags using different tag shapes from the Art Philosophy Cricut Cartridge and using the Yuletide Carol papers decorated them to make little packs for sale.

Christmas tagsI have used a number of different stamp sets – Seasons Tweetings, Yuletide Carol WOTG and Sweet Salutations.

Finally I have decorated some Kraft bags with the Yuletide Carol papers and  Cricut cuts from the Art Philosophy and Artbooking cartridges.  I bought the Kraft bags from my local $2 shop and I am pleased how they have turned out.  It is always good to stretch myself out of my comfort zone of cards and scrapbooking.  And they did not take very long to make!

Yuletide Carol Kraft Bags

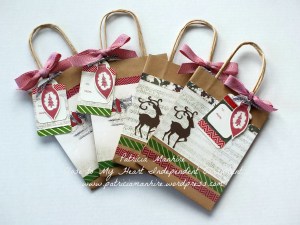
For this bag I have cut the deer out of the Artbooking cartridge and put the washing tape directly onto the bag for a softer look.  The bauble is from the Home for the Holidays SOTM set from October.  The ‘T0 and From’ for the gift tag is from the Holiday Tags stamp set .  I think this stamp set is one of my favourites because it is so versatile for lots of different projects.

Yuletide Carol Kraft bag with reindeer

This particular paper is my favourite paper – it is so whimsical and on the back is the most beautiful roses and it is hard to decide what side to choose.  This time I have put the washi tape onto the same colour cardstock to create a stronger colour.  I have used Ruby chevron ribbon (free from last months Ribbon special) and Slate chevron ribbon.Yuletide Carol Kraft bag with stockings

Materials used:

Cardstock – Ruby, New England Ivy, Cocoa, Colonial White, Cashmere

Paper – Yuletide Carol

Stamps – Home for the Holidays (NLA), Holiday Tags, Just to Say… Cricut Collection, Yuletide Carol WOTG, Curlicue Frames Cricut Collection, Seasons Tweetings, Sweet Salutations, Noel

Inks – Ruby, Versamark, New England Ivy

Cricut Cartridges – Artiste, Art Philosophy, Artfully Sent and Artbooking

Embossing powder – gold

Washi tape – Ruby chevron, Topiary mini chevron

Ribbon – Ruby chevron, Slate chevron

Shinhan Touch Twin marker – Carmine

Gold sequins

Gold shimmer trim

Bling Gems Gold Assortments

Most of these products will be available for sale at Gift Hutt.  I also have some kits available for sale for the cards.  Please feel free to contact me through this blog – they can be pre stamped and just ready to put together if you would prefer.

As usual all these products (except for the Kraft bags) are available from my website here.

Happy crafting

Patricia


Sustainable Christmas Tree with CTMH

Welcome

I have just had a very productive morning this morning crafting with my aunt.  She had seen this idea on Pinterest of using corks from wine bottles and making a Christmas tree and we finally got around to making them up.

We made two trees  – the first one I decorated with the stickers from the Cut Above Holiday  Treat Bag kit.  These packs are great for treat bags and they come with lots of stickers to decorate.

1466243_10152849662338134_5402534974489098490_n


When my aunt was working at a rest home she collected the used wine bottle corks and today we got together to make up the trees.  She had bought a small oval box from the local $2 shop and filled it with sand.  She then covered it with some gold coloured textured wallpaper to create the base of the tree.  This came up really well and looks just like a log of wood.  Then we got the hot glue gun out and glued the corks together.  We first glued the six bottom corks together and then worked our way up to the single cork at the top.  The corks were different sizes and shapes which makes for an interesting tree shape.  I made the mistake of putting the stickers on first but I should have left them to after the tree was completed and then I could have coordinated them better and also they would have been straighter as well.  Never mind it still came up well.  My aunt had the star and we cut a groove at the top and glued the star in place.

Cork Christmas tree using CTMH Cut Above Christmas Treat bag stickers

It didn’t take very long at all and we were very pleased with the result.

And here is the second tree my aunt made using different brads.  As you can see it is quite effective.

Cork Christmas TreeI hope that I have inspired you to create something different and out of the box.

Happy Crafting.

Patricia


CTMH Yuletide Carol Pic Folio Album

Welcome back.

It is not that long to Christmas now and I have been busy with Christmassy things such as Christmas cards and decorations.  However, I have taken some time out to complete this My Creations Hip Pic album.   I have been looking at these albums for some time and I was inspired by my upline, Grace Green, who created a similar album using the Yuletide Carol papers.  I love these papers as they are so traditional and the patterns are beautiful.  Some of them are too beautiful to cover with photos in fact.

The Hip Pic albums are  sturdy kraft chipboard albums with  16 white pocket photo pages with 3¾” × 3¾” windows that hold 16 – 4″ × 6″ photos and are spiral-bound. You can decorate as much or as little as you want and they will look fabulous.  These are very inexpensive and great to decorate up with lovely papers and embellishments and give as a gift.

Z1956


I have done the front of the album utilising the lovely image of the stockings and the bird.  Inside I have used an assortment of stamps and die cuts from the Artbooking and Artfully Sent cartridges to decorate the pages.

CTMH Yuletide Carol Pic Folio albumMaterials used:

Cardstock – Ruby, New England Ivy, Topiary, Black, Colonial White, Cocoa

Paper – Yuletide Carol

Yuletide Carol Assortments

Stamps – Noel Holiday, Charming Chevrons, Artfully Sent – Just to Say…

Inks – Ruby, Black, New England Ivy

Washi Tape – Topiary Chevron, Gold Polka Dot, Silver Geometric

Gold gems

Chevron sparkles

Cricut Cartridge – Artbooking, Artfully Yours

Scallop punch

All these materials and the album are available for purchasing through my website here.

This album will be for sale at Gift Hutt.

Happy Crafting

Patricia


CTMH makes Christmas cards easy.

Welcome back.

A very short  post today.   Christmas is not that far away so I have been busy making some Christmas cards.  I love the two Christmas reflections pack from Close to My Heart – Snowhaven and Yuletide Carol.  Both have such different themes but they both make stunning Christmas cards.

CTMH Yuletide Carol Christmas card

I love utilizing  the patterns on the papers and the gorgeous wee socks hanging on the shelf is so beautiful and the red paper from the Snowhaven pack coordinates well.

CTMH Snowhaven Christmas card

I taught a class yesterday starting with the basics of card making just using the basic equipment i.e. no Cuttlebugs and Cricut machines and this is a good example of a card anyone can make with the basic tools and lovely patterned papers.

CTMH Snowhaven Christmas cardFinally this is one of my favourite cards.  I love the combination of the Ruby, Black and Glacier colours.  I have used the Artfully Sent Cricut cartridge to cut the sentiment tag and used the Curlicue Frames stamp set that came with the cartridge to stamp it in Black ink.  I love the sentiments from the Just to say… stamp set that also came with the cartridge.  I know that I am going to get a lot of use from these two stamp sets.  This pattern is from the Make It From Your Heart  Volume 2 book and is such an easy pattern to use.

Materials used:

Cardstock – Black, Ruby, White Daisy, Colonial White

Paper – Snowhaven, Yuletide Carol

Inks – Ruby, Black

Stamp sets – Artfully Sent Just to say…, Curlicue Frames,  Scandanavian Wishes (NLA)

Cricut Cartridge – Artfully Sent

Gold sequins

Clear sparkles 

Twin Touch Shinhan marker – Carmine

Embossing folder – Dots

These cards are for sale at Gift Hutt along with my other cards I have featured in my recent posts.

Have a good week and happy crafting.

Patricia


Sparkle and Shine Double Page Layout

Welcome back

I hope you all had a good Christmas and are now rested for the new year.  I would like to thank you so much for all the lovely get well wishes.  I am on the improve and am looking at getting back into crafting again which is always a good sign.

For my last post for this year I am finally using a scrapbook layout.  While I a primarily a cardmaker I do enjoy scrapbooking as well.  Close to My Heart has really made it a lot easier for me as well.  It is so much easier coordinating colours and papers to create fabulous layouts.

I am really enjoying using the WOTGs from Close to My Heart and also have found the “Make It From Your Heart” Volumes 1 and 2 books by Jeanette Lynton really useful to use for creating well balanced and interesting layouts for my scrapbooks.

I have loved using the Holidays from the Heart WOTG – Sparkle and Shine as the colours and papers are gorgeous.  I have completed the two double layouts that are suggested but as they have family members in them that are not happy about having their photos posted, I have used this layout with my cat, Sox, in it.  The photos are from last year’s Christmas and we had record high temperatures of 32 degrees.  Needless to say we were struggling in the heat and our poor Sox just did not know what to do with himself.  Plus, he had to be in the action and not miss out on the fun of opening presents!

For this layout I have used the recipe from page 32 “Make It From Your Heart” Volume 2 book by Jeanette Lynton.  I have found this particular recipe really useful as I can use landscape photos much more easily.  I have also used my Cricut to cut out the titles using Cricut Craft Room to make the letters weld together.

CTMH Sparkle and Shine double page layoutThese books that are available from Close to My Heart are great when you are struggling for inspiration.  There are layouts for all number of photos and the instructions are easy to follow.  Here I have added some extra embellishments and titles to help make it my own and kept it very simple to make the photos the focus of the pages.

The materials I have used are:

WOTG – Sparkle and Shine

Stamp set – Stitch Wonder Everyday Life

Cardstock – Slate, Ruby, Juniper, White Daisy

Inks – Slate, Ruby, Juniper, White Daisy

Sparkle Clear Flourishes – small

Cricut Cartridge – Art Philosophy

Make It From Your Heart Volume 2 by Jeanette Lynton

These products in the Holidays with Heart Gift Guide are still available through until December 31st while stocks last.   Orders totaling over $150 during the promotion can choose one starred item from The Holidays with Heart Gift Guide for free so it is an ideal time to purchase one of our Cricut Collections or our ink and marker organiser.

So be in quick as there are only a few days left before these products are no longer available.

I am hoping to get my creative mojo up and running in time to do the Australasian Blog Hop for the SOTM on 1st January which will be good.  There are some very talented ladies downunder and it is a real privilege working with them.

Enjoy the rest of the year and look forward to more creative gorgeousness next year.

Happy Crafting

Patricia

CTMH Gift Card Holders

Hello everyone

Gosh Christmas is just around the corner and I still have not completed my Christmas shopping.  Life has just got in the way over the last couple of weeks.  However, I will get it all done by the big day.

For those who do not know what to get for people a gift voucher is a great option and then the recipients are able to take advantage of the sales post Christmas.  Close to My Heart Cricut cartridges have the answer for how to present these vouchers with a cool gift card holder.  My inspiration for these cards came from Pinterest and in particular from this blog Busy with the Cricky where Susan has done some lovely cards and given instructions on how to make them.

For my cards I have used the Artiste cartridge and I have cut the the card from page 59 in the booklet and cut them at 5″ which gave me two cards per 12 x 12 sheet of cardstock.  Then using patterned paper I cut another card at 4.75″.  To finish off I cut a piece of white daisy cardstock at 4.5″ to place in the middle of the card for a sentiment and for people to write on.  The two smaller pieces had the centre cut out and I was able to mat the patterned paper onto the cardstock easily.

Here are my versions:

CTMH Christmas gift card holdersHere are some close ups of the cards.  One or two photos may be a bit blurry so I apologise for that.

CTMH Gift Card Holder CTMH Gift card holder CTMH Gift Card Holder CTMH Gift card holder CTMH Gift card holder CTMH Gift card holder CTMH Gift card holder CTMH Gift card holderAnd I have kept the inside of the cards fairly simple to enable people to write on them.  Sorry I have just realised that I missed taking a photo of the little section to put the voucher in but you can just see a little part of it in the photo below.  I will try and rectify this in the next week to really show you how neat this little card is.

CTMH Gift Card Holder insideI have mainly used the stamp set from the Seasons Tweeting Gift Bag kit from the Holidays from the Heart Gift Guide.  This little owl is so cute and I love the different sentiments that go with them.

Here is a list of the materials I have used:

Cardstock – Ruby, Juniper, Daisy White

Patterned paper – Sparkle and Shine paper packet

Stamps -Seasons Tweeting Gift Bag kit, Scandinavian Wishes, Sparkle and Shine Workshop on the Go Stamp set

Inks – Slate, Ruby, Juniper

White Bakers Twine

Clear Sparkles

Artiste Cricut Cartridge – rosette from page 55 cut at 1″, bows from page 55 and cut at 1/2″ and 1″.

Art Philosophy Cricut Cartridge – Holly leaf  from page 46 cut at 1″ and the rose from page 69 and cut at 3″

As you can see I am loving my Cricut and there is so much more to do yet.  I have  just barely scratched the surface with all the cool things to do on it and I still have to get the Art Booking cartridge.  I think I am going to be very busy and it  will keep me out of mischief I am sure lol.

The products from the Holiday from the Heart Gift Guide are still available until the end of December and if you spend over $150 you can choose one starred item for free.  Just by buying a Cricut Cartridge you would qualify for this special offer so visit my shop now and have a browse.

I hope you all have a great week and I will now have to see what I can come up with for my last blog post before Christmas.

Happy Crafting

Patricia

Christmas Cards and Treats

Welcome back.

Well it is that time of the week for another blog post.  This time I am just going to show some Christmas cards and party favours that I have been making while I have been working on a big project for our next blog hop on the 1st November focusing on the December Stamp of the Month – Special Care.

I am loving the papers from the Holidays from the Heart Gift Guide.  They are so beautiful and the colours coordinate so well.  I have also done some layouts using the WOTG Sparkle and Shine kit and once I have printed some more photos I will post them on here.  I am so pleased with how they turned out as I have used the recipes in the Make it from the Heart series of books.  This has made it a lot easier to get good layouts and then I could concentrate on coordinating papers and embellishments to finish off the pages.

Back to the cards.   Christmas cardThis card recipe is rapidly becoming one of my favourite designs.  It is from the Make It from the Heart Volume 1 which is a great source of recipes for both scrapbook layouts and cards and is sooo cheap for quick inspiration (just $12 per book!).  So quick and easy to mix and match colours and papers and these patterns go so well together.  I have also used different stamp sets and I was really pleased how they turned out and actually did this card in a class last week and they turned out well.  I had pre-cut everything and the Cricut has come in so handy – I have used the Artiste cartridge here.

The stamp sets I have used are:  Perfect-Fit Birthday Occasions, Perfect-Fit – Frames 2 Occasions and Magical Days Holiday from the Holidays from the Heart Gift Guide.

CTMH card using Sparkle and Shine papers and SOTM set Scandinavian Wishes

I have never really used alphabet stamps before so I am pleased this has turned out well.  This is another simple card that did not need special equipment to make – just a good accurate trimmer like the Fiskars Surecut Deluxe Craft Paper Trimmer that is available from my shop.  (Just as an aside I have been doing a lot of cutting and had to get some more blades quickly, and I won’t be doing that again as the blades were more expensive at the local Warehouse Stationary than what I can pay retail through Close to My Heart!).  I am using bakers twine more often now and the sparkles add the shine to the card.

The stamp sets I have used are:  Urban Alphabet, Scandanavian Wishes – November SOTM.

???????????????????For this card  I have been inspired by a card by a fellow CTMH consultant, Wanda, and here is my take on it.  I have used my Cricut (Art Philosophy) to cut out the frame and the holly leaves, berries and the flame.  The holly leaves have been embossed by hand to give some shape to the leaves and the edges were distressed with Topiary ink (I have used Olive cardstock).  The berries were cut out of Ruby cardstock and I have used my Liquid Glass to create some dimension and make them stand out.  The flame was cut using a petal shape and I have stamped the candle on the base of the petal.  

The stamp sets I have used are:  Scandanavian Wishes (October SOTM)  and Illuminate (November SOTM – available for $5 if you spend over $75 – be in quick though as this will no longer be available after the end of the month).

Finally here some party favours that I have made from the Artiste and Art Philosophy Cricut cartridges.  I have put little chocolate bars inside them and used them as little thank you gifts for the ladies attending my classes at the Upper Hutt Library.

??????????????????Christmas boxThe stamp sets I have used here are: Banner Wishes Occasions and Santa Claus Holiday – both from the Holidays from the Heart Gift Guide.

Just a reminder that you can choose one ‘star’ product free for every $150 you spend in both the Holidays from the Heart Gift Guide or the 2013 Product Launch Guide.  This great deal is available through until the 31st December 2013 or until stocks last.

1310-cc-holidays-from-the-heart-au_nzPlease feel free to click on the links to my website to go shopping for any of these products or contact me for further information.

My next blog post will feature the December SOTM – Special Care.  I can’t wait to show you what I have been up to.

In the meantime have a great week.

Happy Crafting

Patricia


CTMH Rosette Christmas Tree

Welcome to my blog – especially to all my new followers.  I hope that you find some inspiration from my creative endeavours just I find inspiration from other blogs and blog hops.

Today I will be showing my version of the rosette Christmas tree that is shown front of our Holidays from the Heart Gift Guide.  Here is the picture on the front of the Holiday Gift Guide.

1310-cc-holidays-from-the-heart-au_nz

There are instructions for doing the rosettes with the Artiste Cricut cartridge and Jenny Gilbert has really detailed instructions here.  However, I have been asked to teach my friends at Crafty Angels how to make these trees so I have done mine by hand so they are able to go home and do their own.

Here is my version of the tree:

??????????????????????

I have adapted the instructions from the archives of Close to My Heart which used a scoring board and a trimmer to make the tree.

The papers that I have used are the Sparkle and Shine papers from the Holidays from the Heart Gift Guide and they pleat so easily.

Before cutting the paper I used my ScorPal to score all the papers at 1/2″ intervals as it made it a lot easier to cut and pleat later.

I have cut the following pieces:

3 strips of 3″ x 12″

3 strips of 2 3/4″ x 12″

2 strips of 2 1/2″ x 12″

2 strips of 2 1/4″ x 12″

2 strips of 2″ x 12″

2 strips of 1 3/4″ x 12″

2 strips of 1 1/2″ x 12″

2 strips of 1 1/4″ x 12″

2 strips of 1″ x 12″

1 strip of 3/4″ x 12″

20 circles – I have used a 1 3/4″ punch for the larger circles and my CCS from CM for cutting two small circles for the top rosette.

As you can see I have reduced the size by 1/4 inch each so make the tree graduate to a point.  You could use another small rosette of 3/4″ x 12″ to place at the top of the tree but I have used my Cricut Art Philosophy cartridge to cut out snowflakes for the top of the tree as well as smaller snowflakes to decorate the tree.  The smaller white snowflakes have had glue applied and I have sprinkled some prisma glitter to give some glitter.  I have also stamped the stars from the Sparkle and Shine WOTG stamp set and fussy cut them out and put some sparkles in the middle of them for a bit of ‘sparkle and shine’.

??????????????????????????????????????????? ?????????????????????????????????????????????

I have not used a hot glue gun as my skin does not heal easily and I still have scars from last Christmas on my fingers!  But I have discovered Liquid Glass from CTMH to be a really great adhesive for making the adhesive (and for rolling flowers).  The Liquid Glass gives you about a minute to manipulate into place and then it sets really quickly and it did not take me long to do the rosettes.  There are lots of videos on YouTube to show you have to form the rosettes  (I am sorry but I couldn’t find the particular one that I used).  I made sure I had the circles close by to place them on the rosette quickly before I lost the shape.  Because the adhesive set very quickly it did not take long.  Foam squares have been used in between the rosettes as well for additional height.

To finish I had to purchase some green and red ribbon as I did not have Ruby Chevron ribbon or the ribbon to dye with the re-inkers like they have in America.

The materials I have used are:

Sparkle and Shine B&T Duos

Slate cardstock

Daisy White Cardstock

Juniper Ink

Slate Ink

Ruby Ink

Art Philosophy Cricut Cartridge

Foam squares

Non-stick scissors

Bonding Memories glue

Liquid Glass

Clear Sparkles

Prisma Glitter

Purchased ribbons.

I hope that you are inspired to make your own version of the tree.  A shorter version would look great as Christmas place settings with names on them, or doing a group of three different sizes would look nice as decorations together as well.

Have a great week as we spiral onwards towards Christmas.

Happy Crafting

Patricia


Australasian Close to My Heart Stamp of the Month Blog Hop

Hello and welcome aboard the Australasian Close to My Heart Stamp of the Month Blog Hop. If you have arrived here from Mandy’s Blog, Hall of Indulgence, then you are in the right place. If you landed here by accident, no problem, please join in by following the link at the end of this post.

Today I would like to share with you these cards which features the November  stamp of the month “Illuminate”. I have enjoyed the challenge of working with this stamp set as it is quite different to what I normally work with and I hope you like my offering.

I love working with clear acrylic stamps and Close to My Heart clear My Acrylix stamps are the best quality I have ever used over too many years I care to remember!  With clear stamps it is so easy to place your stamps accurately on your paper and with these samples I have tried to show you how you can link up stamps to create a more complete image.

To start with I did some basic cards but decided that I needed to do something a little different with yet another folded card.  I searched Google and ended up on Split Coast Stampers again for a recessed window card.  The link for this tutorial is here.  I also wanted to convey a message of light shining on Mary and child and the birth of Christianity.

Here is my version using the “Illuminate Stamp” and “Mary and Babe” stamp sets and the lovely silver paper from Holiday from the Heart Gift Guide. Recessed window card using CTMH November SOTM Illuminate , and Holidays from the Here are some close ups to show more details of this card. Recessed window card using CTMH November SOTM Illuminate , and Holidays from the_0002 I have stamped the image of the Mary and Babe in slate grey on the background cardstock slightly to the right of the card to take into account the lantern that would be hanging there. Recessed window card using CTMH November SOTM Illuminate , and Holidays from the_0001To create the lamp post I have stamped the image on a piece of scrap cardstock and then fussy cut out the image and then using a sharp craft knife I have cut out around the swirls on the top of the lamp post.  When fussy cutting or cutting with a knife it is very important to move the paper or card around and not your scissors or knife as you get a better result. I have used alcohol markers (buttercup) to colour in the lamp to create a little bit of colour (and create the image of light shining onto Mary and her baby) to a very serene silver/grey colour scheme.  To stamp the yellow rays of light on the base card I have put the lantern in the approximate place it would end up and then marked the spot with a pencil and then stamped with buttercup ink to create the rays of light.  I have used my Bonding Memories glue to adhere the lamp post onto the side of the card and then put two layers of foam adhesive to create the correct height of the lantern with the recessed window, and to stabilise the lantern. Recessed window card using CTMH November SOTM Illuminate , and Holidays from the_0002Using my Cricut I cut out the sentiment shape and then stamped the sentiment from “Illuminate” in black.  I also cut out the edging on the shape from Twilight cardstock and glued it onto the background shape.  I felt that it needed a little more black and balance so added the black bakers twine.  I finished off with some sparkles to add a little shine. Here are my first efforts with the “lluminate” stamp set: CTMH November SOTM Illuminate CTMH November SOTM Illuminate CTMH November SOTM Illuminate The materials I have used are:

November SOTM set – “IlluminateHolidays from the Heart – “Mary and Babe”

Daisy White cardstock

Black cardstock

Twilight cardstock

Buttercup cardstock

Juniper cardstock Slate

Cardstock Holidays from the Heart Sparkle and Shine B&T Duos 

Buttercup alcohol markers

Black and white bakers twine

Cuttlebug embossing folder – Swiss Dots

Cricut – Art Philosophy cartridge

Clear sparkles Adhesives –

Tombow tape runner and Bonding Memories glue

This exclusive stamp of the month is only available during November. It can be yours for just $5 with a qualifying order of $75 or for $29 if ordered separately from your CTMH consultant. If you do not have a consultant please contact me or place an order in my online store.  I’d love you to leave a comment and some liking before heading off to the next stop, Monika’s blog, A Sprinkle of Glitter.

Happy Crafting Patricia