Kia Ora and Welcome Back
Today sees the release of the gorgeous Sweet Peony collection from Heartfelt Creations.
Sweetly fragranced, and delicately airy, the graceful peony flower is a breathtaking and dreamy blossom that calls a quiet attention to itself! Lush foliage filled plants bursting forth with tightly wound flower buds among softly ruffled blossoms bring with them a hint of old fashioned romance and delight! Join Heartfelt Creations as we stroll through beautiful peony filled gardens in the new Sweet Peony Collection! Pause, linger and refresh your soul as you amble through a paper collection filled with delightful peony flowers in happy hues of angelic pinks and dark burgundies, set among a refreshing array of leafy greens, sky blues, and sunshine yellows! Soft swirls, gorgeous stripes, and dainty lace like accents come together to create pleasing backdrops for bold peony blossoms, chipping birds and divine window scenes! Three coordinating cling stamp set and die combinations bring the luscious peony flower to the forefront of this gorgeous collection. An assortment of varying sized peony petals and foliage die cut pieces work together to create dimensional and dynamic peony blossoms ready to captivate and take center stage on card fronts, scrapbook layouts and altered art pieces! So, breathe deep, drink in the sweetness of the peony blossoms, and feel free to linger awhile as we take in the gentle beauty of the Sweet Peony Collection!
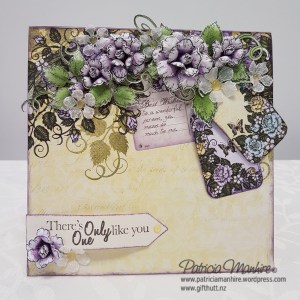
Today I have a special card to share with you. I love how I can combine lots of different collections together for one card and this would make a perfect Mother’s Day card.


Materials Used:
HCD1-7173 Small Sweet Peony Die
HCD1-7174 Large Sweet Peony Die
HCD1-7175 Peony Bud and Blossom Die
HCPC-3819 Small Sweet Peony Cling Stamp
HCPC-3820 Large Sweet Peony Cling Stamp
HCPC-3821 Peony Bud and Blossom Cling Stamp
HCDP1-288 Sweet Peony Paper Collection
159723 Art Glitter Dries Clear
PGM15015 Rajni Chawla’s Crystal Clear
HCPC-3816 Lush Lilac Cling Stamp
HCD1-7172 Lush Lilac Scroll & Cage Die
HCD7169 Rain Boots and Blossoms Die
HCPC-3811 Rain Boots and Blossoms Stamp
HCPC-3644 Birds and Blooms Stamp Set
HCD1-756 Birds and Blooms Die
HCD1-7110 Classic Rose Die
HCPC-3752 Classic Rose Cling Stamp set
HCD1-799 Regal Borders and Pockets Die
HCPP3-452 White cardstock
TSMP900 Tuxedo Black ink
TSMP103 Memento Canteloupe
TSMP 604 Memento Summer Sky
TSMP707 Memento Bamboo Leaves ink
TSMP301 Memento Rhubarb Stalk
HCST1-401 Deluxe Flower Shaping Kit
HCFB1-464 Basic Flower Shaping Mold
HCFB1-462 Rose Shaping Mold
HCST1-401 Deluxe Flower Shaping Kit
HCDA2-45 Stack and Store Daubers
159723 Art Glitter Dries Clear
PGN15015 Rajni Chawla’s Crystal Clear
Other – Bronze metallic cardstock, Brilliance Pearlescent Lavender ink, Bitty Sparkles, Art Glitter micro beads, Versamgaic Sweet Petunia, Perfect Plumeria
Instructions:
Cut a piece of white cardstock at 6” x 12”, score at 6” along the long side and fold to make a base card of 6” x 6”. Cut the 6” x 6” panel from the paper collection and adhere over the front of the card. Die cut the cage die from the HCD1-7172 Lush Lilac Scroll & Cage Die
In bronze metallic card and adhere at the top of the card. Die cut the border from the HCD1-799 Regal Borders and Pockets Die in the bronze metallic cardstock and adhere to the top of the card.
Stamp the images from both the HCD1-7173 HCPC-3819 Small Sweet Peony Cling Stamp and the HCPC-3819 Small Sweet Peony Cling Stamp in Rhubarb Stalk and Rose Coral inks on white cardstock. Colour the Rose Coral images in Rose Coral ink and the Rhubarb Stalk images with the Perfect Plumeria ink and then die cut with the corresponding dies. Shape the flowers using the HCFB1-464 Basic Flower Shaping Mold, allow to dry and assemble with a combination of the large and small images to make large flowers and buds. Add Crystal Clear glitter to the flowers with Dries Clear glue on a damp sponge. Adhere around the bottom of the card as shown.
Stamp the images from the HCPC-3821 Peony Bud and Blossom Cling Stamp set in Rose Coral ink and colour in with the Rose Coral and Canteloupe ink and die cut with the coordinating dies. Shape and adhere around the large peonies. Add Crystal Clear using Dries Clear on a damp sponge.
Stamp the leaf images from the both the HCD1-7173 HCPC-3819 Small Sweet Peony Cling Stamp and the HCPC-3819 Small Sweet Peony Cling Stamp in Bamboo Leaves ink and colour in with New Sprout ink and die cut with the coordinating die. Sponge the edges with Bamboo Leaves and then shape, trim and adhere around the peonies as shown.
To make the small leaves stamp the images from the HCPC-3811 Rain Boots and Blossoms Stamp set in Bamboo Leaves on white cardstock. Colour the images with Bamboo Leaves and die cut with the coordinating die. Adhere around the peonies to the left and right of the card among the peonies.
Stamp the dandelion images in Bamboo Leaves ink, colour with Bamboo Leaves ink and die cut with the coordinating die. Add micro beads to the centre with Dries Clear glue and allow to dry. Add Crystal Clear glitter with Dries Clear glue and adhere the dandelions to the card around the peonies.
Stamp the small lilac spray image from the HCPC-3816 Lush Lilac Cling Stamp set in Tuxedo Black ink on white cardstock. Colour the leaves with Bamboo Leaves ink and the lilacs in Lavender ink and die cut with the corresponding die. Shape and adhere over the top of the bird cage.
Stamp the lilacs from the HCPC-3816 Lush Lilac Cling Stamp in Pearlescent Lavender ink, sponge with the Lavender ink and die cut with the corresponding die. Shape the lilacs with the HCFB1-466 Lush Lilac Mold, allow to dry and adhere the lilacs l over the small lilac spray over the cage. Add Crystal Clear glitter to the lilacs with Glue Gloss and small bitty sparkles to the centres of the flowers.
To make the rose leaves stamp the images from the HCPC-3752 Classic Rose Cling Stamp set in Tuxedo Black ink on white cardstock. Colour the image with Bamboo Leaves ink and die cut with the coordinating die. Shape the flowers using the Rose Shaping Mold, allow to dry and adhere to the top left of the card as shown. To make the roses stamp the images from the HCPC-3752 Classic Rose Cling Stamp set in Pearlescent Coral, sponge the centres with Canteloupe inks and die cut. Sponge the edges with the Pearlescent oralShape the flowers using the Rose Shaping Mold, allow to dry and assemble and adhere to the leaves as shown.
Stamp the bird images from the HCPC-3644 Birds and Blooms Stamp Set in Tuxedo Black ink on white cardstock and cut out with the corresponding die. Colour with Canteloupe, Summer Sky and Sweet Petunia inks and add Ultrafine Crystal glitter with glue gloss. Shape lightly and adhere to the bottom right over the peony and top left on the birdcage.
Die cut the tag using the Luggage and Tags die, shape and adhere it just under the bird as shown.
Please checkout the gorgeous artwork from the rest of the Design Team on the Heartfelt Creations blog here: https://www.heartfeltcreations.us/blog/688/debuting-the-sweet-peony-collection
Happy Crafting
Ka Kite Anu
Patricia