Enchanted digital sketch


Sometimes I need a little inspiration for my scrapbooking whether it be traditional or digital.  So some clever people have come up with scrapbook layout sketches that make it so easy to get great results.   One of these very clever and smart people is Chris Lothian who is has a Facebook page called Christine’s Creative Capers.  She has designed pages that we can download and use on our StoryBook Creator and get a great page in 5 minutes.

I have used the lovely photos I took off the monarch butterfly last week and teemed them up with the Enchanted digital kit and they went really well together.

This was so easy to do as all I needed to do was click and drag the various papers and photos onto the layout.  I did have to just add the paper to the scalloped strips on the sides by selecting them and then adding the paper to the selected element.  And to finish off I just substituted the flowers with flowers from the kit.  Easy Peasy!

First here is the original sketch:

Chis Lothian sketch #12

And this is the finished layout:

Butterfly Magic

This sketch is also suitable for traditional scrapbooking.  Please note that all sketches on Chris’ Facebook page is for personal use only.  

Have a great day and Happy Crafting.

Patricia

Monarch butterfly on snapdragon_0002.jpg

Image representing Flickr as depicted in Crunc...
Image via CrunchBase


My photo of the day. I had just come home after getting some photos printed for a camera club competition when I saw this monarch butterfly outside. I rushed inside to get my camera and managed to take a series of photos with this one being the best. I love the majesty and fragility of these butterflies. So I was back at the shop to print this one of for the camera club competition. This is my first entry so I do not know how I will go. Will keep you posted.
Have a great day
Patricia


Easel paper pad holder

Hello

As I said yesterday I have been busy with my crafts as well as my camera.  I have been trying to design an easy paper pad holder that I can teach to my friends at my Crafty Angels group later in the year.  I wanted to create an easy and economical gift that people can do at home.

For these projects I have used paper and cardstock that I have had for a few years.  They are different brands, but I was able to match the colours quite nicely.  Use whatever you have and embellish as you would like.

After working through some prototypes here is the final product with instructions:

The completed pad with embellishmentsInstructions:

Here are the pieces I have used to make this pad holder:
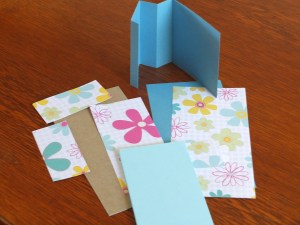
Materials for making easel paper pad holders for gifts

Cut a 4″ x 8 ”  piece of base cardstock and score it at 4″, 5″, 6″ and 8″.  Fold as per the easel card with the last 1/2 ” folded in to help anchor the easel a lot stronger.

The folds for the easel supports


To continue with the easel card place tape on the fold to create the easel.  I have used double-sided tape as it is much stronger than the tape runner that I normally used.Tap on the easel fold The fold adhered down on card

Cut out a piece of card stock 8″ x 4″ ( or length to fit whatever size of pad).  Cut a piece of patterned paper 7 3/4″ x 3 3/4″ and then adhere it to the cardstock

Patterned paper for base Patterned paper adhered to base of pad

Then adhere this card to the base of the easel.

The base of pad adhered to the easel supports


Then place double-sided tape onto the last fold and adhere it to the base of the long card.  This will help stabilise the easel.

Tape on the fold to support the easel The easel now taped to together to create the easel


Cut out a piece of patterned paper to match the cardstock 3 3/4″ x 1 3/4 to cover the top of the easel card.  (I seemed to have missed taking a photo of this step – sorry).

Cut out a die cut tag and stamp your greeting on it.  Here I have used a stamp from Kaiser craft.  Adhere it to the front of the easel.

Die cut tag adhered to the easel


To make the base stronger I used a  piece of heavy chipboard that came with my card stock packs from Creative Memories and cut it 4″ x 8″.  Use double-sided tape to adhere it to the base of the card.  Trim with scissors if necessary. (Depending on how strong your card base is you may miss this step).

Heavy cardboard base with tape on it


Adhere the paper pad to the card with double-sided tape.

The base of the paper pad is taped up ready to adhere to the base


Add embellishments to finish.

Here is the finished article again with embellishments added on to it.

The completed pad with embellishments


Here are the earlier versions of my templates.

Some other paper pads I have done


These would make great gifts or stocking fillers at Christmas time with a nice pen to match.

Materials used:

Creative Memories rotary trimmer

Creative Memories card

Double sided tape

Creative Memories tape runner

Kaisercraft stamp

Spellbinders Fancy Framed Tag Two die

Stampin’Up Black ink

Cardstock, patterned paper and various embellishments that I have had for a number of years

I hope you have fun to make these and that it is not too difficult to follow the instructions.

Have a great day.

Patricia


Pansy.jpg

Image representing Flickr as depicted in Crunc...
Image via CrunchBase

My final photo of the day. I am really pleased with my efforts today. It makes up for my lean days but I am learning something new everyday. Today I learnt that it is easier to take macro photographs when I use the 1:1 ratio. I am able to get much closer and still use my auto focus. Going manual is very much a work in progress but I am determined to get to the bottom of it. Thank you to Print Sense Photography for making it so easy to understand the terminology of manual photography.
Patricia