This is a quick post is for all those people out there (like me) who have Creative Memories albums but not enough pages or protectors. The very resourceful new CTMH Consultants in Australia have discovered a solution to your dilemma. You can convert the CTMH page protectors to use in your CM albums and save a lot of money instead of trawling through Trade Me or Ebay and paying exorbitant prices. It looks to be very easy to do and the CTMH pages are really good quality and will protect your photos in many years to come. I am really hanging out until the time I can sign up as a Close to My Heart Consultant in New Zealand. Hopefully it will be early next month.
Please check out this YouTube video for further information and details:
I have been busy going through all my stash and found these gorgeous papers that I bought years ago when I first starting scrapbooking. They are from K & Company and the pack is called Hopscotch. I have no idea if they are still available, but the papers make beautiful cards. I have already done a couple of layouts of my ballet forms from many years ago and will perhaps keep a couple of papers for layouts for my daughter for when she did ballet. I managed to match up the colours with various cardstock that I had already and I am really pleased with how they turned out. For most of these cards I have distressed the edges and that has helped with making the different papers stand out more from the backgrounds. The little pictures of flowers, butterflies and tutus have been fussy cut out from the paper. These cards have been easy as the paper and colour coordination was made easy by using the same range of papers.
I am sure these will go down a treat at Make Shift.
Here they are:
Materials used for these cards:
K & Company Hopscotch 12 x 12 pad
Creative Memories Cardstock – Pink Shimmer
Bazzill Cardstock – Bling (sorry not sure of the name)
Creative Memories Custom Cutting System – circles.
Tim Holtz Distressing Ink – Victorian Velvet
I am really excited to be going to Auckland tomorrow to find out more about Close to My Heart and also get my hands on some of the products. I can’t wait to join up and start having workshops at Make Shift.
I hope you all keep well and safe and Happy Crafting
It is sooo good getting my computer back! But there is still a lot to do with tidying up all my photos and trying to remember all my passwords to go back onto various websites. I think I will be busy over the next few weeks. I am so pleased that I had backed up onto an external hard drive, although I did lose a couple of digital kits but it is no big deal fortunately.
As I said yesterday I have been working on James’ album and he is now up to 9 months old and soon I will be doing his first birthday. I am still trying to make my resources stretch and have kept up with lots of photos per page and linking the album with accents such as the border maker twinkle chain and picket fence cartridges as well as the same colours throughout. It is not taking long to get through these photos and I should have his first year album completed very soon which will be good.
I am loving the Border Maker system for my scrapbooking and have had this idea brewing in my head since buying the Rustic Fence cartridge, and despite my working on my son’s album, I just had to get this out onto a page. I also got some inspiration from a page that came from Creative Memories using lots of leaves from the Reflection Paper Flower range. I have also used the little flowers that come from using the Twinkle Chain cartridge as well. They make great embellishments – especially when I am working with flowers and flower photos. I never waste anything – I have scrap drawers to prove this!!
In case people wonder why I do so many flower layouts and not many of my family, my family are not keen on having a lot of photos of themselves on the internet. Once photos are on the internet it is hard to control where they go. They don’t mind the baby ones so much (?) but would prefer not be to identified with more recent photos. I have to respect their wishes. Besides I must confess to having hundreds of nature photographs and can’t resist using them.
When I was at Crafty Angels last week I did these cards out of one piece of 12 x 12 cardstock. I love using the Reflections range to make cards as the colours are so peaceful and serene. The flowers are gorgeous as well, topped off beautifully by the bling from the Enchanted range. You can also see I have made a daisy from a previous post as well as using the border maker picket fence and twinkle chain cartridge.
The background paper in the middle card was printed off from my StoryBook Creator 4.0. I find that is a great way to get different papers when I need something in a hurry. I have also used it for doing sentiments, as well as in the last card.
I must confess to using my Cuttlebug and Spellbinders dies as well as some Stampendous and Stamp’n’Up stamps for the sentiments.
I got the dimensions for these cards from http://scraphappywithbrenda.blogspot.co.nz/2012/03/3-cards-from-12×12-base.html.
Stampendous stamp – sorry lost the name of this stamp (I think it is no longer available)
Stamp’n’Up stamp
If you would like to know more about Creative Memories and their products please feel free to contact me. As you can see they are very versatile for all your cardmaking and scrapbooking needs.
As I said yesterday I have been busy with my crafts as well as my camera. I have been trying to design an easy paper pad holder that I can teach to my friends at my Crafty Angels group later in the year. I wanted to create an easy and economical gift that people can do at home.
For these projects I have used paper and cardstock that I have had for a few years. They are different brands, but I was able to match the colours quite nicely. Use whatever you have and embellish as you would like.
After working through some prototypes here is the final product with instructions:
Instructions:
Here are the pieces I have used to make this pad holder:
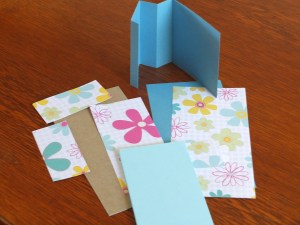
Cut a 4″ x 8 ” piece of base cardstock and score it at 4″, 5″, 6″ and 8″. Fold as per the easel card with the last 1/2 ” folded in to help anchor the easel a lot stronger.
To continue with the easel card place tape on the fold to create the easel. I have used double-sided tape as it is much stronger than the tape runner that I normally used.
Cut out a piece of card stock 8″ x 4″ ( or length to fit whatever size of pad). Cut a piece of patterned paper 7 3/4″ x 3 3/4″ and then adhere it to the cardstock
Then adhere this card to the base of the easel.
Then place double-sided tape onto the last fold and adhere it to the base of the long card. This will help stabilise the easel.
Cut out a piece of patterned paper to match the cardstock 3 3/4″ x 1 3/4 to cover the top of the easel card. (I seemed to have missed taking a photo of this step – sorry).
Cut out a die cut tag and stamp your greeting on it. Here I have used a stamp from Kaiser craft. Adhere it to the front of the easel.
To make the base stronger I used a piece of heavy chipboard that came with my card stock packs from Creative Memories and cut it 4″ x 8″. Use double-sided tape to adhere it to the base of the card. Trim with scissors if necessary. (Depending on how strong your card base is you may miss this step).
Adhere the paper pad to the card with double-sided tape.
Add embellishments to finish.
Here is the finished article again with embellishments added on to it.
Here are the earlier versions of my templates.
These would make great gifts or stocking fillers at Christmas time with a nice pen to match.
Materials used:
Creative Memories rotary trimmer
Creative Memories card
Double sided tape
Creative Memories tape runner
Kaisercraft stamp
Spellbinders Fancy Framed Tag Two die
Stampin’Up Black ink
Cardstock, patterned paper and various embellishments that I have had for a number of years
I hope you have fun to make these and that it is not too difficult to follow the instructions.