
Hello and welcome aboard our Stamp of the month Australasian Close to My Heart Blog Hop. If you have arrived here from Doris Taylor Creative Inspirations, then you are in the right place. If you landed here by accident, no problem, please join in by following the link at the end of this post.

Today I would like to share with you a scrapbook layout and of course some cards which features the December SOTM Cutie Pie which is available exclusively throughout December for $33 or for just $5 when you spend $75.
I was really looking forward to getting this stamp set as I had the perfect photos to do a scrapbook layout with them. I have some photos from when my family went to the Sweet Pea cafe for a High Tea and was waiting for the opportunity for scrap them. I have ordered my photos from Studio J while they were on special last month at just $5 per layout. I was able to order a mix of sizes and then sorted out my layout to match the photo sizes. Studio J doesn’t just do scrapbook layouts – you can also do photos and you can get them in lots of different sizes from 2 x 2, 3 x 3, 3 x 4, 4 x 4, 6 x 4 , 5 x 7 and larger photos in a 12 x 12 page and just cut them up when you get them for your layouts.
For this layout I have used the pattern 10 from the Make it From Your Heart Volume 2. I love the How To books from CTMH as they make it so easy to get stunning layouts without too much effort. After all why invent the wheel again.
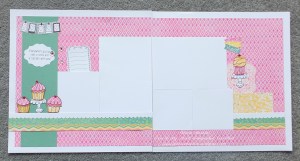
I have used the Brushed paper pack and I am getting low on supplies now so had to do a little juggling but I am happy with the finish. I have gone with Juniper and Pear accents to cut down on the pinkiness of the overall layout.
The cute cupcakes screamed paper piecing so I have stamped the base image on Cotton Candy cardstock and then again on the yellow flowers on the large flower patterned paper and just cut out the cupcake wrapper and then stamped again on the pink diamond paper and cut just the frosting out and then adhered the shapes on the base cardstock. These images were really easy to fussy cut out and because of the double layers I did not need to use foam tape to add dimension. I have topped the cupcakes with a clear sparkle coloured in with Carmine Shinhan Touch Twin markers to coordinate and add a touch of bling to the overall layout.

On the other side I have stamped the lace doily image from the Sweet and Lovely Artbooking Cricut Bundle, which worked in really well with the cupcakes and overall theme, with versamark ink onto a precut shape from the Artbooking cartridge in Cotton Candy cardstock and embossed in white embossing powder. I love the effect of the lace doily and it just fitted well with the overall theme of High Tea. The ‘sweet’ stamp has come from the same stamp set and I have stamped three images in Juniper, Canary and Cotton Candy inks and then fussy cut them out.

I will probably tweak this a little once I get my photos and may add some of the new Pixie Extra Thick twine that has just been released with the new Seasonals Catalogue out today.
After finishing the layout I had to make a card using the same lace doily and this time I have cut it in half to create the effect of a lace tablecoth and then paper pieced another cupcake and the cake plate to add onto it. I have used the Damask embossing folder to create a textured table cloth and paired the table cloth with the pink diamond paper. I have used the zip strip as a border and placed a piece of the beautiful new white shimmer trim for some extra bling. Again I have topped the cupcake with a coloured sparkle. I love this little sentiment which is guaranteed to bring a smile to anyone.

For this card I have used my favourite pattern from the MIFYH Volume 2 pattern 28 and this time I have trimmed the yellow flower paper with Cotton Candy cardstock and some more white shimmer trim and then used my scallop edge punch on the green trim to place at the top. It now looks like curtains in a wind0w (my imagination is working overtime).

Finally I have used the same pattern and turned the card into a portrait card (I know the measurements off by heart now!). This paper is gorgeous and goes from yellow to a deep pink with a bubble effect. This time the trim has been made using Canary and Cotton Candy cardstock with the white shimmer trim. The cake dish has been stamped directly onto the White Daisy cardstock and the cupcake has been paper pieced with the pink diamond paper. I have popped this cupcake with the new thinner foam tape which is lovely as it is a more subtle dimension. I have just realised that I need to put a pink sparkle on the top and will do that tomorrow. I love putting the sequins on to lift the card a little with some bling.

Cutie Pie is only available until the 31st December from your CTMH consultant here. I’d love you to leave a comment before heading off to the next stop, Anne’s Blog, Mummy you made this?
Materials Used:
Cardstock – White Daisy, Juniper, Canary, Cotton Candy, Pear
Paper – Brushed B&T Duos
Stamps – Cutie Pie, Sweet & Lovely Cricut Bundle Artbooking
Inks – Black, Juniper, Cotton Candy, Canary, Versamark
White Shimmer Trim
Cricut Cartridge – Artbooking, Art Philosophy
Embossing Folder – Damask
Scallop edge punch
White Embossing powder
Clear Sparkles
Silver Sequins assortment
Shinhan Touch Twin marker – carmine
Have a good week and Happy Crafting
Patricia


