The Art of Hidden Journalling from CTMH

Welcome back

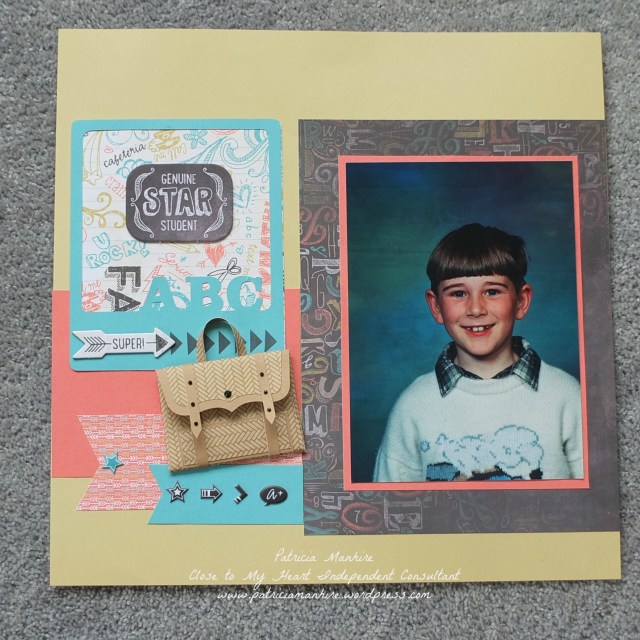
Keeping with the scapbooking theme here is a layout that I have done with some hidden journalling.  I prefer to hide my journalling, as for me it seems to take away from my artwork.  I have taken my inspiration from the layout in the Make It From Your Heart Volume 1 pattern 08.

Here is my layout using the Chalk It Up B&T papers, Complements and Assortments as well as the Artfully Sent Cartridge and Artbooking Cartridge.

CTMH Chalk it Up layout

I love the envelope that looks like a satchel and used my Artfully Sent cartridge to make the envelope.  I cut three different images – two the same size using Desert Sand cardstock and the herringbone paper and another one in the herringbone pattern that I used CCR to make a little smaller.   Unfortunately, I did not take any photos of the work in progress but I had to have the front in the herringbone pattern so I trimmed the top of it off the paper just before it folded over then adhered the herringbone paper image onto the Desert Sand image. I then put the smaller herringbone image on the top of the Desert Sand image and turned it over to create the satchel.  I then used Desert Sand trims to create the straps and finished off with the black sparkles from the Sparkles Black and Grey Assortments.

CTMH small bag

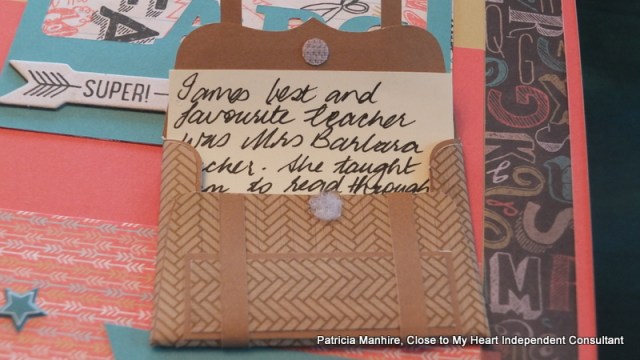
Here is the journalling inside the bag.  The little hook and loop dots are so useful for closing this little envelope/satchel.

CTMH Hidden Journalling

Materials used:

Cardstock – Lagoon, Sorbet, Desert Sand, Flaxen

Papers – Chalk It Up

Complements – Chalk It Up

Assortments – Chalk It Up

Cricut Cartridges – Artbooking, Artfully Sent

Hook & Loop Dots

Sparkles Black and Grey Assortment

Thank you for looking and I hope that you understand my instructions.

Watch out for the Australasian CTMH SOTM blog hop coming on the 1st April.

Have a good week and Happy Crafting

Patricia

CTMH Hopscotch Layouts with a Touch of Artfully Sent.

Welcome back.

Today I have another couple of layouts using the Hopscotch papers that are due to be retired at the end of the month.  I am going to miss this papers as the colours are gorgeous and the papers are really fun.

Last Easter my daughter had a craft making session with her friends, where they decorated up some Easter eggs and made them look like dinosaurs.  I took some photos, as you do, and when CTMH had a special a while back on Studio J I got these photos printed in different sizes.  The colours in the photos matched perfectly with the Hopscotch papers – particularly the Sorbet and Flaxen colours.

I have used the Hopscotch complements and assortments to finish of the embellishments as well as using the negative of the Sweet cut from Artbooking along with You’re the Bomb stamp set which is also retiring at the end of this month.

CTMH Hopscotch LayoutThe Artfully Sent Cricut cartridge is so versatile and here I have used the sleeve function to cut out the envelope to hold my journalling card for my daughter to complete when she can.  I have used the journalling card from the Artbooking Cartridge stamp set Take Note.  This stamp set is only available as part of the Artbooking Cricut cartridge and I use this a lot for my journalling.  Here is a close up of the sleeve and I have used strips of the Hopscotch papers to create the patterns.
CTMH Hopscotch Layout with an Artfully Sent Touch

Here is another layout using small strips of paper to embellish the layouts.  I have taken my inspiration from the Magic book but added my own twist.  I have also used Artfully Sent for the letters FUN and Artbooking cartridge for the embellishment and the Artiste cartridge for the Easter title.

CTMH Hopscotch Layout

Materials used:

Cardstock – Flaxen, Colonial White, Sorbet, Cotton Candy, Glacier

Papers – Hopscotch

Complements – Hopscotch

Assortments – Hopscotch

Stamps – You’re the Bomb, Take Note

Inks – Black,

Cricut Cartridges – Artbooking, Artiste, Artfully Sent

Gold Sequins

Glacier Extra Thick Twine

As I said these Hopscotch papers and the You’re the Bomb are only available until the end of the month so be in quick so you are not disappointed.  You can click here to go straight to my website to order.

There is another Seasonals Expressions coming out next month and I have had a sneak peak and there are some gorgeous new products coming so watch this space…

Have a good week and Happy Crafting

Patricia

CTMH Brushed Layout

Welcome

I have done a lot of cards recently, but I did find some time to do some scrapbook layouts a couple of weeks ago.  I am more of a cardmaker, but I do enjoy scrapbooking and I am so thankful that CTMH has a great range of how to books to inspire me.

For this layout I have used the Performance pattern on page 48 – 49 of the Magic book.  This is the first time that I have used hand stitching on a layout and I am happy with the outcome.  I am going to look at getting my sewing machine out and have a go with that as well.     I have used the stitch guide to punch the holes and some embroidery floss and stitched it by hand.

I don’t normally mix up Colonial White and White Daisy but sometimes rules are meant to be broken and I am happy with how the Colonial White cardstock highlights the photos above the pink of the background papers and the White Daisy base.

CTMH Brushed layout

Here are close ups of the flowers and butterflies.  The flourish has been cut using the Art Philosophy Cricut cartridge (page 59 Font Layer) and I played around in Cricut Craftroom to get the size right.  The flowers are from the Artiste cartridge (page 55 Accent 1>Shift) and I have cut several different sizes to create some depth with the flowers.  The butterflies are from Artbooking (page 62 Icon)and I have stamped them with using the rock and rock technique with Canary and Pixie inks with the butterfly stamp from the Brushed WOTG set.   CTMH Brushed LayoutI have used the script stamp from the Armour stamp set and lightly and randomly stamped onto the Colonial White cardstock in Bamboo ink and then distressed the edges with Desert Sand ink.  I love how this has turned out.

CTMH Brushed layout.

I have hidden the journalling in this pocket.   Sometimes I struggle to put journalling on a layout as it seems to detract from the artwork so putting them into pockets makes it easy to create layouts.

CTMH Brushed Layout

I originally stamped this sentiment with Black ink but it didn’t look right so I then stamped the sentiment with Cotton Candy ink onto some scrap Colonial White cardstock.  I fussy cut out the letters and then adhered them slightly to the left of the black letters to create a shadow and actually it looks so much better for it and I will be doing this again.

Materials used:

Cardstock – Colonial White, White Daisy, Pear, Cotton Candy, Pixie

Papers – Brushed B&T Duos

Stamps – Brushed WOTG, Your Own Kind of Wonderful, Artiste Stamp set

Inks – Bamboo, Black, Cotton Candy, Desert Sand

Cricut Cartridges – Artiste, Art Philosophy, Artbooking

Clear Sparkles

Gold Glitter gems

Stitch Guide

I am doing this late at night so hopefully I haven’t missed anything.

Happy Crafting

Patricia

Some More Artfully Sent Cards

Welcome

I have been too busy to participate in the Australasian blog hop for the SOTM stamp set but here are a couple of cards that I made some time ago when I had a card making frenzy using the Artfully Sent cartridge.  I am still getting my head around all the different features so I just made some cards using the sleeve feature.  These turned to be very quick and easy cards to do.

I used some of the cards that I had made with the mat ink method and using the pearl paint to line the cut cards.  For details of how I have done this please click here.

For the first one I have cut the rose shaped sleeve on page 37 Sleeve>Shift at 7″ and used the pixie coloured background paper to line the cut front.  The sentiment has been cut using the Artiste cartridge in the Brushed diamond patterned paper and then I have used the Cricut Craftroom to cut another shape in White Daisy cardstock slightly smaller.  The sentiment is from the Artfully Sent Just to Say stamp set that comes with the cartridge and I have embossed that with the Ranger silver embossing powder.   I have placed a trim of the pink shimmer trim over White Daisy cardstock trim that I have trimmed with the Scallop border punch.  To finish off this easy card I have stamped and embossed with silver embossing powder the butterfly from the beautiful Armour stamp set from the Seasonals Expression catalogue and then I have used some gems from the now retired Pewter gems

DSCF2462


Here are two versions of the same pattern from the Artfully Sent cartridge.  I have used another piece of Pixie coloured base card to line the card and then I  have sponged the larger accents such as the leaves, ribbon and yellow flowers from the negative pieces that have been cut from the card and then glued them onto the card.  This was quite quick and easy to do and I have finished off with some Extra Thick Pixie twine and a small banner with the Get Well sentiment from the Just to Say stamp set.

DSCF2461


For this next card I have used the cutout as a stencil and sponged the the small blue spots as the background  onto a pre-cut piece of White Daisy Cardstock.  On a separate card using the card as a template I have then sponged all the negative cutouts using  Pixie, Olive, Flaxen Canary inks.  I then used the stencil again to place the pieces onto the base cardstock..  Then using the stencil again I have adhered all the pieces onto the base card to create my card.  This piece was then matted on some Pixie cardstock.

2015-01-18 15.21.41

Here is the finished card with a butterfly cut out from the Artiste cartridge and some bling from the clear sparkles and some flourishes.  I thought this made a lovely Mother’s Day card and again used the sentiment from the Artfully Sent Just to Say stamp set.


2015-01-18 16.02.11Materials used:

Cardstock – Pixie, White Daisy, Cotton Candy

Inks – Pixie, Canary Olive, Flaxen, Sky, Versamark

Paper – Brushed

Stamps  – Just a Note (Artfully Sent), Armour

Cricut Cartridges – Artfully Sent, Art Philosophy, Artiste

Extra Thick Twine – Pixie

Clear Sparkles

Shimmer Trim – Pink

Ranger Silver Embossing Powder

Border Punch – Scallop

Epoxy Bubbles – Pewter (NLA)

All these products are available on my website here for you to purchase.

These cards are available for sale at Gift Hutt.

I have now moved Gift Hutt into a larger shop and will soon be offering scrapbooking and cardmaking classes so please watch this space.

Have a good week and Happy Crafting.

Patricia


Close to My Heart Artfully Sent Christmas Card

Welcome back

I have been very busy doing more Christmas cards and lots of other goodies for Gift Hutt.  Today  I would like to show you a card made using the new Artfully Sent Cricut cartridge.  I have been having problems using Cricut Craftroom so had not been able to do much for a couple of weeks, but finally yesterday I was able to cut again.  I am still getting used to the new cartridge and  I have seen some amazing pieces of artwork on various Facebook groups I belong to.

For this card I have cut out the scene card on page 47 of the booklet at 7″ out of Glacier cardstock.  I then cut out a piece of White Daisy cardstock at 4 3/4″ x 6 3/4″ to use for the scene.  This is the first time I have sponged a background and it is not perfect but still gives an idea of creating the scene.  There are a number of different videos on YouTube if you would like instructions on how to do this.  To create the snow hills I have used scrap cardstock shaped to create the hills and I have used a combination of Glacier and Indian Corn Blue inks for the snow and added some Outdoor Denim for extra depth around the moon.  To make the moon I cut out a circle from a post it not at 1 1/2″ and used that to sponge the colours around to create the moon.  I softened the moon by sponging lightly over with Glacier ink.  I then stamped the Santa Claus from the Santa Claus Holiday stamp set with Slate ink to create the depth of the image.

CTMH Artfully Sent Christmas CardThe trees were cut out of New England Ivy cardstock using the Artbooking Cricut cartidge. I wrinkled the trees a little to create some dimension and then I used some white liquid applique on the trees for a snow effect (available on special while stocks last).  The deer and cute little bird has been cut from the Artfully Sent cartridge in Chocolate cardstock and I ripped a piece of green paper from the Yuletide Carol paper pack for the effect of grass in the foreground and the ripped edge has come up looking like snow. (Unfortuanately, CTMH do not provide glitter for sale as some prisma glitter over the applique would have just finished the project of so well – extra sparkle would have been good.)

Here is a close up view of the scene I have created:

CTMH Artfully Sent Christmas Card scene

I stamped the sentiment from the Holiday Cheer stamp set using Glacier ink on White Daisy cardstock and matted it with New England Ivy cardstock and placed it on the front.  I then placed white enamel stars for a snow effect on the front.

My technique could do with some practice but I am still happy at how the card has turned out for my first effort.  And the good news is that CTMH  provide 5″ x 7″ envelopes to match so this card will be for sale at Gift Hutt and would make a very special card to give someone.

Materials used:

Cardstock – White Daisy, Glacier, New England Ivy, Chocolate, 

Paper – Yuletide Carol

Inks – Glacier, Slate, Indian Corn Blue, Outdoor Denim

Cricut Cartridges – Artfully Sent, Artbooking

Stamps – Holiday Cheer, Santa Claus Holiday

White enamel stars

I have some more Christmas ideas coming up and will post them over the next week.

Have a great week and Happy Crafting

Patricia


CTMH Artfully Yours

Hello again

Thank you for all the lovely feedback for my last post on the photo I took of the orchids at Gift Hutt.  I was so pleased that I finally managed to get what I had been seeing whenever the sun was shining through the window.

I have finally got my new Artfully Sent Cricut cartridge and have had a play with it.  There are so many different ideas in the cartridge that it was hard to know where to start but I had to start somewhere.  So I got some inspiration from the Annual Inspirations Book on page 65 with the lovely die cut card.  It was interesting getting some feedback on the Christmas cards I had made with the Stamp of the Month – Home for the Holidays.  The non-traditional cards got the most likes on Facebook.  Plus, as I am in Wellington, New Zealand,  and heading towards a warm Christmas some friends felt that the polar bear was not quite so appropriate for southern hemisphere countries so I thought I would do something more appropriate for the warmer climates.

The poinsettia is indigenous to Mexico and South America because of it’s green and red foliage is very popular in Christmas floral displays.  It has been a very popular emblem on Christmas cards in New Zealand for many years.

Poinsettia

I looked through all the CTMH cartridges and found just the right image on the Artiste cartridge to use to make up the flowers and the leaves.  I need to charge my tablet to upload my step by step photos and I will add a tutorial on how I made these once I have done that so please bear with me.

CTMH Artfully Sent Red Poinsettia Christmas card

I have used the sleeve (shift) image on page 46 at 5.5″ to cut out the card using Ruby cardstock.  Because the flower was quite heavy I have lined both sides inside with White Daisy cardstock to create some more stability.  I have added some trim using some topiary washi tape on a small strip of White Daisy cardstock and then matted it with some Ruby cardstock.  I am loving the sentiment stamp set that comes with the Artfully Sent cartridge and this stamp has some lovely fonts and sayings for all occasions.

I first practiced making the card with some Buttercup cardstock (NLA) and when I put the flower on it it actually went well as it toned with the yellow in the leaves so I decided to make a birthday card with it.  Here it is:

CTMH Artfully Sent Yellow poinsettia card

This is such a bright and cheerful card and would make a wonderful gift for someone.

Materials used:

Cardstock – White Daisy, Ruby, Buttercup (NLA) but Canary is a good substitution, New England Ivy

Stamps – Artfully Sent Just to Say, Just a Number, Noel

Inks – New England Ivy, Canary, Ruby, Black

Cricut Cartridges – Artfully Sent, Artiste

Embossing folder – Dots

Bling Gems Gold

Topiary washi tape

Both cards will be available for sale at Gift Hutt as most of my cards are.

Have a great week and happy crafting.

Patricia